In this guide:
Executive Summary
This guide is intended to help you achieve your security compliance objectives using Parasoft's deep code analysis and advanced development analytics technologies. Parasoft code analysis tools secure and harden your code, while Parasoft analytics monitor and track progress toward security compliance goals. Parasoft also provides reporting mechanisms for demonstrating compliance during an audit.
The primary audience for this guide is the person or people responsible for configuring dev/test processes in your organization. It provides context, rationale, and configuration information for Parasoft's solution that helps you bake security compliance into your development process and implement a secure-by-design strategy.
Parasoft tools can analyze code against any set of programming guidelines, but the full security compliance solution supports the following industry standards and collections of guidelines out of the box:
- CERT C
- CERT C++
- CWE
- CWE Top 25 Most Dangerous Software Errors
- CWE on the Cusp
- OWASP Top 10
- OWASP API Security Top 10
Each organization has different security requirements and environments. This guide is intended to help you set up and execute the security solution under the following scenario:
- Single compliance standard
- Single language
You can extend the basic process to other scenarios, including:
- Multiple languages and a single standard (project-based implementation)
- Multiple standards and a single language (e.g., OWASP + PCI)
- Combined quality with security
We recognize that each organization is at a different point in their security compliance initiative. You may be following this guide as you build the dev/test infrastructure, for instance, while others are much further along in their development journey. The Prerequisites section describes assumptions we make in this guide regarding the state of your dev/test infrastructure deployment.
This document guides you through the following security compliance implementation steps:
- Initial Set Up
- Define the Compliance Workflow
- Define Compliance Policy
- Choose and Adapt a Test Configuration
- Implement Your Compliance Strategy
- Monitor and Audit Compliance with Your Policy
- Advanced Configuration and Strategies
You should also review the Glossary of Terms section for clarity on terminology used in this guide.
Prerequisites
Refer to the Appendix section for specific versions of Parasoft products that support security compliance features and functionality. The appendix also includes the supported development languages and system integrations referenced in this guide.
Parasoft Products
We assume that you are familiar with Parasoft technologies and have already deployed and licensed the following products:
- Desktop instance(s) of either Parasoft C/C++test, dotTEST, and/or Jtest
- Server instance of either Parasoft C/C++test, dotTEST, and/or Jtest
- Parasoft Findings Plug-in for CI tools (optional)
- Parasoft DTP
- Parasoft DTP Security Bundle
Integrations
We assume that you will be using the following common systems and tools:
- A supported integrated development environment (IDE) for each team member using desktop instances of Parasoft code analysis tools (e.g., Eclipse, IntelliJ, VisualStudio). Integration with an IDE is optional but recommended.
- A supported source control management (SCM) system (e.g., git, Subversion).
- A supported continuous integration (CI) tool (e.g., Jenkins).
- A supported build system (e.g., Gradle, Maven, Ant, Bazel, Make, etc.). Integration with a build system is only required for automation with Jtest.
Supported Languages
Refer to the Appendix section for a full list of supported languages.
Initial Set Up
Prepare your dev/test environment by implementing the following components:
- Integration with Your Build Tool
- Integration with CI
- Installing and Deploying the Parasoft Security Bundle
Integration with Your Build Tool
Parasoft tools include a command line interface that enable you to programmatically execute analysis and tests, but you can use the plug-ins shipped with your tool to integrate with your build system. The plug-ins enable the build system to execute code analysis when the build tool runs.
Building with Jtest
Parasoft Jtest must be integrated into one of the following supported build systems to automate analysis and run tests:
You can configure specific aspects of the analysis, such as which test configuration to execute, in the .properties file, in the build file, or both.
Building with dotTEST
Parasoft dotTEST supports integration with MSBuild and NAnt, but a build system is not required to automate analysis. Although build system integration eases automation, you can use a script to launch dotTEST with a specific .properties file and command line switches to configure code analysis execution.
Building with C/C++test
A variety of build systems are available for C and C++ development, including Make, CMake, Bazel, Bitbake, custom scripts, etc. Parasoft provides flexible ways to integrate with both common and custom build systems.
- Running Static Analysis (C/C++test Standard)
- Creating a Project Using an Existing Build System (C/C++test Professional for Eclipse)
- Creating a Project Using an Existing Build System (C/C++test Professional for Visual Studio)
C/C++test does, however, integrate with MSBuild and make-based build tools to collect code coverage.
Integration with CI
Parasoft tools include a command line interface that enables you to programmatically execute analysis and tests, but you can use the Parasoft Findings plug-ins to integrate with your CI process. The plug-ins allow your continuous integration system to consume the analysis results from Parasoft tools, which enables you to accept or reject the build. Additionally, the plug-ins provide visualizations of test execution and code analysis results directly in the CI interface.
The plug-ins are available for Bamboo, Jenkins, TeamCity, and Azure DevOps (formerly Visual Studio Team Services) CI systems. You can download the code for each project from Parasoft's GitHub page.
Refer to the Parasoft Findings for details on installation, configuration, and usage.
Installing and Deploying the Parasoft Security Bundle
The Parasoft Security Bundle is a package of tools for your DTP infrastructure that provide visibility into your security compliance efforts. The Security Bundle contains configurations that align the findings sent to DTP with security guidelines. It also includes specialized reporting mechanisms that enable you to demonstrate compliance with guidelines for auditing purposes.
The Security Bundle is available from the Parasoft market place in the customer portal. Refer to the Security Bundle documentation for installation instructions and other details.
Define the Compliance Workflow
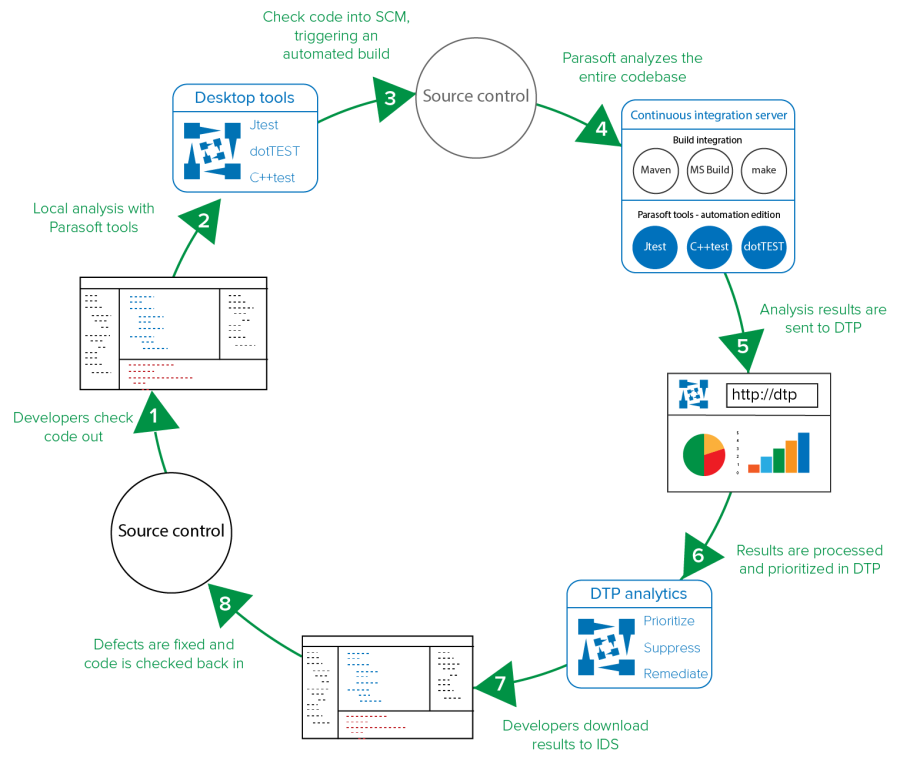
The following steps describe the basic secure development cycle:
- Developers check code out from source control.
- The code is modified and analyzed locally with the scope of analysis limited to the local changes. Depending on your implementation, local analysis may run a limited set of checkers.
- The code is checked into source control, triggering an automated build process.
- The entire codebase is analyzed during the build process.
- The results of the automated code analysis are sent to DTP.
- Depending on the implementation and business requirements, the CI process may or may not be gated. See Implementing Gates.
- The results are processed in DTP, where the team lead can use the Violations Explorer view to manually review violations and put them into remediation workflows or automate the process using DTP Enterprise Pack extensions and/or the DTP REST API.
- You can optionally create tickets in a tracking system from DTP. See Creating Tickets in External Systems (Optional).
- Developers download the processed results ("findings") from DTP into their IDEs.
- Developers remediate the defects and repeat the process until the code meets the compliance policy.
You will need to determine the specifics for your organization, including:
- which security standard to use and which guidelines within the standard to follow
- how the checkers should be configured/parameterized
- what processes to automate
- whether additional test configuration variations will be needed
Implementing Gates
Gating is the concept of preventing the code from being promoted to the next stage of the release pipeline. Some organizations implement gates during check-in. In a safety-critical industry, gating the check-in may be an acceptable workflow, but we recommend implementing gates during the CI process. Doing so removes barriers to developer productivity and enables feedback (i.e., static analysis violations associated with meaningful information) to loop back to developers more quickly. Additionally, the CI build typically provides more context to enrich the information.
Gating Source Control
You can configure your source control management (SCM) repository to trigger quality gates when developers check in their code. If you use git, for example, you can write a pre-commit git hook that runs Parasoft code analysis tools and aborts the commit if the violations are reported. Refer to the documentation for your source control tool for details on how to apply gates at the source control layer.
Parasoft integrates with popular source control systems and code repositories, which enables our tools to determine code authorship, scope of execution for incremental analysis, and to assign results to team members. Refer to the Appendix for supported systems.
Gating CI
You can configure your CI tool to apply quality gates as part of your build process. Parasoft integrates with several CI tools that enable you to visualize test execution and code analysis results from Parasoft tools in your continuous integration system interface. Refer to the Appendix for supported CI tools.
Configuring quality gates at the CI layer differs from system to system. The Parasoft Findings for Jenkins extension, for example, supports quality gate configuration from the UI. Refer to the documentation for your CI tool for details.
Feedback as Guidance for Developers
When viewed in the IDE or in DTP, code analysis violations include links to the documentation, which provides technical information and details about the potential impact of the programming patterns detected by the checkers. By providing detailed context about why violations are reported, developers gain a deeper understanding of the security issues associated with their code base. The guidance provided by the code analysis results, furthermore, is most effective when code analysis executes in the IDE before checking in the code.
Training for Secure Coding
Parasoft helps train your team on secure software development in a variety of ways. First, the rule checker documentation shipped with Parasoft DTP and code analysis tools provide thorough explanations of issues. It explains the security relevance, even if it’s not obvious, such as buffer overflows. They also include examples and links to resources, such as canonical sources from CERT, CWE, OWASP, etc.
Some documentation includes video and PDF training on specific violation topics. The resources are provided through our partnership with the Software Assurance Marketplace (SWaMP) and are free for our users.
Many checkers also include OWASP-specific training through our partnership with HackEDU. Contextual training for a specific static analysis violation is free and accessible from the documentation. Teams can also take advantage of the full security training and certification program available from HackEDU at an additional cost.
Finally, Parasoft offers training for our security solution available through several channels:
Customer portal: https://customer.training.parasoft.com. The training includes self-paced courses and knowledge-base articles.
- We post security-related information in our forums: https://forums.parasoft.com/
- We post security-related topics on our blog: https://www.parasoft.com/blog/?_sft_topic=security
- General documentation is available online at https://docs.parasoft.com
Define Compliance Policy
Compliance in your organization may mean that no static analysis violations are allowed when checking code against a specific set of guidelines, such as OWASP Top 10. Compliance may also mean zero violations for only specific parts of the code . . . or for specific guidelines within a standard that you've determined to be critical to your project.
One or more of the following statements may serve as examples of an organization's compliance policy:
- 0 violations for injection flaw (A1:2017- Injection) checkers = compliant
- A percentage of all guideline checkers have 0 violations = compliant
- 0 violations of severe technical impact guidelines = compliant
- 0 deviations for severity 1 violations and only approved deviations for severity 2 violations = compliant
Start defining a compliance policy by first choosing a set of guidelines. You will need to review the available standards and determine which one is the best fit for your organization. Next, determine which guidelines within the standard are important and commit to complying with them. You will also need to determine in which circumstances your code will be allowed to deviate from the standard. Finally, you will also need to determine acceptable severity levels for violations.
Refer to your policy as you begin adapting Parasoft components to report and monitor compliance to your chosen standard.
Additional Considerations
The following sections introduce additional background and concepts for helping you define a policy.
Compliance Policy Vs. Compliance Goal
Your compliance policy should be a measurable and achievable plan for releasing software that conforms to a security standard. You can also define a compliance goal that strives for a higher degree of guideline conformance. Your compliance goal (like your compliance policy) is encapsulated in a code analysis configuration. The difference is that you expect to comply your compliance policy prior to release, whereas you expect to run your compliance goal configuration with acceptable outcomes at some time in the future. This topic is discussed in greater detail in the Implement Your Compliance Strategy and Achieving Your Compliance Goal sections.
How Parasoft Supports Security Compliance Initiatives
Parasoft supports compliance initiatives with advanced code analysis and reporting technologies. Parasoft tools check the code for specific patterns that are known to result in software defects. The checkers (also called static analysis rules) map to guidelines within a standard. More than one checker may be required to verify that the code meets a guideline. Conversely, more than one guideline may rely on a single checker. Refer to the Glossary of Terms for more detailed definitions of standards and guidelines.

The mapping between Parasoft checkers and coding guidelines may have an impact on how you define compliance in your organization. A checker may report violations for guidelines that are critical to your application, as well as guidelines that are less relevant. This is why the ability to suppress violations (deviate from the standard) is important. Deviations are discussed in greater detail in the Documenting Deviations section.
Parasoft DTP collects the data and outputs guideline-specific visualizations and reports for monitoring and demonstrating compliance. This is discussed in greater detail in the Monitor and Audit Compliance with Your Policy section.
Severities
Parasoft checkers are identified according to the standard that they check against. For example, a checker that applies the CWE guideline "CWE-22: Improper Limitation of a Pathname to a Restricted Directory" has the ID "CWE.22.TDFNAMES."
Checkers are also categorized by severity. Parasoft tools rank the violations they report from severity 1 ("sev1") to severity 5 ("sev5") with sev1 violations being the most important. The expectation is that sev1, sev2, and sev3 checkers report defects that require remediation, whereas sev5 checkers are used as inspections checkers (sev4 violations are not used in the Parasoft security compliance workflow). Inspection checkers flag code that should be manually reviewed to ensure that the code is compliant with a guideline. See Inspection Rules for additional information.
Critical | Severity 1 |
High | Severity 2 |
Medium | Severity 3 |
Warning | Severity 4 |
Informational | Severity 5 |
Choose and Adapt a Test Configuration
Test configurations specify how Parasoft tools should execute their core features and functionality. They define the checkers that are enabled during code analysis, as well as configurations for checkers that support parameterization. Parasoft tools also ship with test configurations for executing unit tests, which specify how to instrument code for collecting coverage during test execution.
The following step are intended to help you refine your compliance plan and define the methods used to achieve compliance:
- choose a test configuration,
- execute the tool using the configuration,
- review the results,
- and adjust the configuration to your codebase and policy
Choosing a Test Configuration
The Parasoft Security Compliance Pack includes several test configurations that check compliance with the supported standards. When you install the Security Compliance Pack in DTP, the test configurations are automatically deployed to your DTP infrastructure. This enables you to centrally manage and distribute test configurations to your teams. Test configurations also ship with Parasoft tools for local execution, but using the test configurations stored in DTP enables you to uniformly apply checkers across teams (see Executing the Test Configuration).
Use the default test configurations as starting points and adapt them to meet your specific needs. Some checkers, for example, will need to be parameterized based on your code. Some checkers may not be a good fit for your codebase and should be disabled. If you do not need to handle input validation, for example, you may want to disable a checker that reports a violation when input validation isn't handled in a manner that's consistent with the guideline.
Refer to the Parasoft tool documentation for additional information about the default security compliance test configurations included with the tools:
- C/C++test Standard
- C/C++test Professional (Eclipse)
- C/C++test Professional (Visual Studio)
- dotTEST
- Jtest
You can review the test configuration prior to execution and make some initial modifications, but fully understanding how to adjust the test configuration is an iterative process. Refer to the Updating Your Configuration section for information about modifying the test configuration.
Executing the Test Configuration
You can run the test configuration from the command line (e.g., as part of the automated CI process) or directly from within the IDE where the Parasoft tool is installed. See Integration with Your Build Tool for command line execution. Refer to the following documentation for details on running within the IDE:
- C/C++test Standard
- C/C++test Professional (Eclipse)
- C/C++test Professional (Visual Studio)
- dotTEST
- Jtest
Executing the test configuration on your complete project using the default settings may take a significant amount of time. One of the purposes of this step is to determine a baseline so that you can make decisions on how to balance resources to meet your compliance policy. You may determine that splitting checkers across several test configurations tuned for different milestones or development phases will be necessary.
By default, test configurations limit the code analysis results to 1000 violations per checker. If a rule is violating more than 1000 times, it means one of three things:
- The checker is incorrectly configured and should be parameterized.
- The code is poorly constructed. Additional training is required and adoption of the checker may need to be phased in.
- The checker is not applicable to your code and should be disabled.
To understand the total scope of work, you should disable the limit during the baselining phase and re-enable it after modifying your test configuration. Disabling the 1000-violation limit may result in significantly longer execution time.
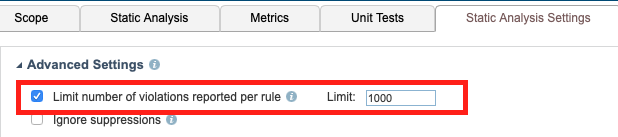
Refer to the DTP documentation for details on how to change this setting.
Reducing False Positives
Locally executing the test configuration on a representative sample of your code will help you determine the appropriate contexts for minimizing false positives. View the results after the initial execution and update the configuration based on the following factors (see Updating Your Configuration):
- Parameterization: Many checkers can be parameterized and may need to be tuned to your codebase. You should disable these checkers if they do not provide value based on your project.
- Value to the project: You should consider disabling checkers if they do not provide value based on your project.
- Age and criticality: Many projects include older code that should not be touched because knowledge about the code is no longer available or because it is extremely sensitive. Proper controls should be put in place to suppress violations related to this kind of code. Do not run SAST on any code that you either have no intention of fixing or where your policy prevents fixing without specific circumstances.
Applying AI/ML
Parasoft DTP has a powerful AI component that your team can train to prioritize and surface the most important results, while avoiding issues you’re likely to suppress. If you have already been using a Parasoft code analysis tool, then you can train the AI based on your history. If you are new to the Parasoft security solution, then you can manually train the AI to select some violations for you to process.
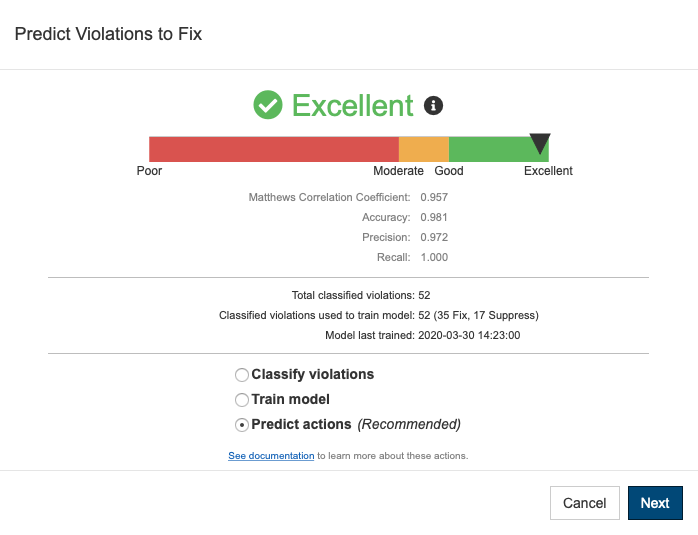
An AI is only as good as your ability to teach it, so take care to be thoughtful and accurate when classifying violations. Refer to the DTP documentation for details.
Viewing Results
There are several ways to view code analysis results. By default, Parasoft tools output results to the <TOOL_INSTALL>/reports directory, but you can customize the directory, as well as format (HTML, PDF, XML) when you deploy your tool. You can open the report or load the results into the desktop instances of your Parasoft tools.
Viewing Reports in the Desktop
Refer to the documentation for details on viewing reports in the desktop:
- C/C++test Standard
- C/C++test Professional (Eclipse)
- C/C++test Professional (Visual Studio)
- dotTEST
- Jtest
If you integrated Parasoft with your CI tool, then, in addition to the HTML output, you can review results in one of the supported systems. Refer to the Parasoft Findings documentation for details.
Viewing Results in DTP
See the Monitor and Audit Compliance with Your Policy section for details about the available DTP interfaces for viewing static analysis violations.
How Many Violations is Too Many?
By default, the number of violations reported is limited to 1000 per checker. If a checker hits this limit or some lower threshold that fits your organization, the checker needs to be assessed. You should either configure/parameterize the checker, disable for old code, or disable and re-evaluated in the future.
In addition:
- A large number of sev1 or sev2 violations likely require immediate attention.
- A large number of sev3 violations may point to a mismatch in your organizations coding culture and the type of violations reported by some checkers.
- A low number of violations (e.g., fewer than 200) may still represent a problem, especially if they are sev1 or sev2 violations.
Updating Your Configuration
Browse the results and update your test configuration based on whether or not you are going to fix the reported violations. Refer to the DTP documentation for details on how to update the test configuration.
Disable checkers that report violations that you are never going to fix. Suppress violations that are not acceptable in the reported instance but that you would otherwise fix (see Applying Suppressions). Refer to your compliance policy (see Define Compliance Policy) for guidance on which checkers to disable and which violations to suppress.
Some Parasoft checkers require parameterization, which is also configured in the test configuration. Parameterizable checkers have default values that you may need to change based on your code.
If the default severity associated with reported violations is too high or low, you can apply an updated rule map to change the severity—or even the category—to more accurately reflect how the coding pattern impacts your application. Refer to the Advanced Configuration and Strategies for information on changing checker severities and categories.
Applying Suppressions
Suppressions are one of the most important tools you can use when implementing a compliance initiative. A suppression is a code-level annotation that instructs Parasoft to continue checking for the pattern, but not to report it as a violation in the specific instance.
Instead of disabling a checker, for example, you may decide to suppress violations reported for modules associated with legacy code. In this way, the checker will stop reporting violations for code you are not going to touch but continue to report violations for new development.
Suppressions need to be documented in the final compliance report. See Documenting Deviations for details.
You can apply violations either in the desktop instance of your code analysis tool or in DTP.
Suppressing Violations in DTP
You can mark violations for suppression from DTP. The suppression is implemented on the next code analysis run. Refer to the DTP documentation for details on suppressing violations. When static analysis violations are processed in DTP, desktop users can download violations, including suppressions, into their IDEs.
Suppressing Violations in Code
After a static analysis run, you can load the results into your IDE and suppress them using the GUI. In the phase described in the Monitor and Audit Compliance with Your Policy section, you will download the results from DTP. Processed results are referred to in the IDE as "findings."
Refer to the tool documentation for details:
- C/C++test Standard
- C/C++test Professional (Eclipse)
- C/C++test Professional (Visual Studio)
- dotTEST
- Jtest
Determine Your Remediation Strategy
After disabling checkers, applying suppressions, and making other changes to the Parasoft reporting mechanisms to encapsulate your compliance policy, you will likely still have violations that need to be fixed. See Remediation Workflow for details on how to prioritize and remediate violations.
Implement Your Compliance Strategy
At this point, your baseline infrastructure is set up and you should know how to handle exceptions. The code analysis tools should be configured to execute the test configuration during the CI process according to your workflow (e.g., nightly, hourly, triggered on check-in, etc.). The tools should also be configured to report analysis findings to DTP.
Developers working on the desktop, however, have different requirements as they run the test configuration locally on a day-to-day basis.
Regularly running code analysis on the desktop prevents defects from being injected into the code. Checked-out code, however, may refer to functions that are not within the local scope, resulting in additional static analysis violation noise. Additionally, some checkers perform data flow analysis, which simulates application execution to analyze possible paths. These checkers may report additional violations and take longer to execute. Analyzing legacy code, furthermore, can also produce noisy results at a time when developers are trying to remain productive.
Configure your desktop tools to execute a version of the baseline test configuration with the following adjustments:
- Flow analysis checkers should be disabled.
- Checkers that report sev3 and sev4 violations should be disabled. You may also consider disabling sev2 checkers if too many violations are still being reported until you've achieved compliance with sev1 violations.
- Inspection-type checkers, i.e., sev5, may also be executed on the desktop so that developers can review the feedback.
- The scope of analysis should be configured to analyze only new and checked-out code. Do not run analysis on legacy code unless you plan on fixing it.
- Reporting to DTP should be disabled. DTP should only be collecting analysis data from the CI runs.
Refer to the DTP documentation for information on how to duplicate and edit a test configuration to use for local analysis.
Refer to the documentation for your tool for details on how to use configurations stored on DTP:
- C/C++test Standard
- C/C++test Professional (Eclipse)
- C/C++test Professional (Visual Studio)
- dotTEST
- Jtest
Clean local code does not necessarily mean that the code will not trigger violations on the server. The automated build executes all checkers in the primary test configuration in the context of the scope of the entire code base. As a result, code that ran clean locally may result in violations when integrated with the rest of the build.
Achieving Your Compliance Goal
If you cannot achieve your compliance goal in the current phase of development, then you should split your code analysis checkers across multiple configurations for different phases of the development process.
For example, remediate sev1 violations in the first phase, sev2 in the next, and sev3 in the final phase. This enable your teams remain productive and agile by limiting the potential violations that must be remediated in each build to a manageable amount.
What-if Scenarios
Your compliance policy is measurable and achievable. Your compliance goal, however, encapsulates your long-term compliance objectives (see Compliance Policy Vs. Compliance Goal). You should define a test configuration that executes your compliance goal and occasionally run it as a way to understand the cost of conforming to additional guidelines specified in your chosen standard. You could also enable a selection of checkers to gain insight on extending your compliance policy to include one or more additional guidelines.
Regulatory Compliance
If your project is subject to an audit as part of a regulatory approval process, such as PCI-DSS or UL-2900, be aware that any defects uncovered in this phase may result in additional liability if they are not addressed.
- Create a test configuration that includes all checkers required for your currently defined security compliance initiative, as well as additional checkers you want to implement in the future.
- Create a tool configuration (settings.properties) file that your desktop and server tools can use to execute the correct test configuration. The tool configuration should report analysis findings to DTP in a different filter to avoid affecting the data associated with your current release.
- Add a Parasoft job to the continuous integration process to run the test configuration at an interval that makes sense for your organization.
Viewing Results in DTP
The Security Compliance Pack includes several dashboards optimized for viewing high-level information about the code analysis results in DTP. The dashboards include, for example, widgets that group violations according to risk and widgets that show changes in violations over time. Refer to the Security Compliance Pack documentation for details about the widgets and reports included with the compliance pack. Additional details are covered in Monitor and Audit Compliance with Your Policy.
Remediation Workflow
The Violations Explorer view in DTP is an interface for reviewing and prioritizing findings, as well as applying remediation workflows. You can flag violations for suppression in subsequent runs (see Documenting Deviations), assign them to a team member, place them into external workflows, etc. Refer to the Violations Explorer documentation for usage.
Some widgets in the compliance-specific dashboards shipped with the Security Bundle link directly the Violations Explorer, but many widgets link to intermediate reports showing details associated with a specific aspect of the data. Refer to Monitor and Audit Compliance with Your Policy section for details about the dashboards, widgets, and reports.
Prioritize and Assign Findings
Prioritization in DTP means adding or updating the "priority" metadata associated with a finding. You can assign the following priorities:
- Critical
- High
- Medium
- Low
- Do not show
- Not defined
By default, priority is set to "Not defined," which can be changed in the Violations Explorer view. DTP also includes a REST API that enables you to programmatically control the metadata. You can also create an extension with the Extension Designer to automate prioritization when DTP collects the code analysis data. Refer to the API documentation (https://<YOUR_DTP_HOST>:<PORT>/grs/api) or the Extension Designer documentation for details.
There are several rationales for setting metadata:
Based on Authorship
In this approach, violations associated with code authored by specific team members can be prioritized for remediation. The focus here would be on potential defects introduced by outsourced, or third-party programmers, who may be a part of your software supply chain code, or on junior developers who need additional guidance.
Based on Severity
A consideration for this approach is that a high severity violation may normally be prioritized high but not in when it is reported in a part of the code with minimal security impact on the application. See Severities for details.
Based on Risk/Impact
The Risk/Impact field in DTP allows you to tag violations as extreme, high, moderate, and low. The default terminology used in this field is based on established risk score methods used in system engineering standards. You can also create custom tags that more accurately reflect conditions in your organization using the DTP REST API. Refer to the API documentation available at http://<host>:<port>/grs/api.
Based on Location in the Codebase
In many applications, certain parts of the codebase have a higher business value or represent greater risk than other parts. You can segment the code into resource groups and assign higher priorities to the findings associated with more valuable resources. Refer to the resource groups documentation for details.
Creating Tickets in External Systems (Optional)
Parasoft ships with out-of-the-box integration points with external ticketing systems (e.g. Jira and VersionOne), enabling you to create issues in the systems based on violations reported to DTP. Refer to the documentation for configuration and usage information.
- Integrating with Jira
- Integrating with CodeBeamer ALM
- Integrating with Polarion ALM
- Integrating with TeamForge
- Integrating with VersionOne
You can also automate ticket creation either by using the REST API or by creating a custom workflow with Extension Designer. If you choose to fully automate ticket creation, make sure that you've fully tested your scripts, including error conditions, to avoid accidentally create thousands of tickets. If you choose to leverage this functionality, creating tickets manually is the recommended workflow.
Configuring for Traceability
Deploy the Parasoft Traceability Pack for deeper integration with ALM systems. The integration includes traceability reporting for demonstrating traceability from test automation (including DAST results) and code analysis (including SAST results) to work items documented in the ALM. This enables you to associate security testing outcomes with the application's business requirements. This kind of full requirement traceability is necessary for audit and compliance in many safety-critical industries.
Documenting Deviations
When you need to deviate from the security standard, you can apply a suppression in DTP or in the code from the desktop instance of your analysis tool. Suppressing a violation means that the defect pattern is acceptable in this specific instance and that you are going to ignore the violations reported by the tool for the foreseeable future.
A suppression applies to an instance of the violation, not to the checker, itself. The checker will continue reporting violations when the questionable pattern is detected in other parts of the code. If the checker truly does not apply to your application in any instance, disable it in the test configuration. Refer to the DTP documentation for instructions.
Suppressions are also important in terms of the review process associated with inspection rules. Violations reported by inspection rules are designed to trigger a manual review of the code. When the code is verified per the standard, the inspection rule can be suppressed with a rationale that serves as the documentation for the deviation. See Inspection Rules for additional information.
Documenting deviations is critical to any compliance initiative. When you choose to ignore certain violations that are in your stated compliance policy, you must provide justification. You can document deviations in DTP or in the IDE. Additionally, the Security Compliance artifact includes a deviations report that you can review as part of your development process. The report is available in HTML or PDF format.
Suppressing in DTP
Suppressing violations in DTP adds an instruction for the code analysis tool to apply the violation during the next code analysis run. The rationale for the suppression is part of your deviation documentation and must be concise. See the DTP documentation for instructions on suppressing violations in DTP.
Suppressing in the Desktop
Violations are also referred to as "findings" when they've been processed and tagged with analytics data. You can suppress individual instances of findings, all instances of a finding type in a file, or all findings in the file from the Findings view in C/C++test, dotTEST, and Jtest. Refer to the tool documentation for instructions:
- C/C++test Standard
- C/C++test Professional (Eclipse)
- C/C++test Professional (Visual Studio)
- dotTEST
- Jtest
Deviation Approval and Audit Workflow
Of course, no developer would suppress a violation simply because he or she didn't want to fix it, but you should implement a workflow for reviewing and approving suppressions, anyway, as part of your compliance policy. The most common way to review and approve suppressions is to leverage your existing code review process. Many organizations use third-party tools or native SCM functionality.
The Security Compliance Pack includes a Deviations Report that you can review in DTP. You should review the report as part of your code review process. You can export the report to PDF and check it into your SCM for auditing purposes. Refer to the documentation for the specific standard you intend to comply with for details:
DTP includes an Action field that you can leverage as part of the suppression audit process. This field includes the following default values:
- Fix
- None
- Other
- Reassign
- Review
- Suppress
You can set the action to Suppress and assign the violation to a reviewer who will agree and suppress the violation or make the case that the violation should not be suppressed in the comments. In this way, you create an audit trail in DTP around your suppressions. Refer to the Violation Explorer documentation for details.
High Deviation Counts
Coding standards are not perfect, one-size-fits-all sets of rules—which is why deviations are permissible in the first place. A high number of deviations, however, suggests that additional action should be taken.
The checker may simply need to be turned off in the test configuration (see Choose and Adapt a Test Configuration). The severity of the reported violations may need to be lowered (see Customizing Rule Properties). The assignee or author may require additional training. The checker may be serving an "inspection rule" role (see Inspection Rules).
It is up to you to determine what is acceptable, but these aspects of your development process should be considered.
Inspection Rules
Checkers that report severity 5 (sev5) violations serve as inspection rules, which flag potential problems that require human oversight (also see Severities). When sev5 violations are reported in DTP, the action field should be set to Review and assigned to a team member for processing.
Inspection rules are noisy by nature. This is because they are intended to serve as a method calling attention to areas of the code that require manual peer review. If your security compliance strategy is to first prioritize compliance coverage, then you should disable sev5 checkers and focus on sev1, sev2, and sev3 violations. Inspection rules will eventually need to be re-enabled, however, because you will not be able to claim full compliance with guidelines that require manual inspection.
Importing Findings into the IDE
After processing the violations, developers can download them from DTP and load them into their IDEs. This workflow enables developers to hit the ground running on outstanding issues by immediately providing feedback as soon as they start their IDEs. The IDE should be configured to import only critical and high priority findings. Refer to the documentation for your tool for instructions on importing findings into the IDE:
- C/C++test Standard
- C/C++test Professional (Eclipse)
- C/C++test Professional (Visual Studio)
- dotTEST
- Jtest
Developers should treat the remediation of findings assigned to them as a regular part of their day-to-day workflow. They should also strive to check in code that does not trigger new violations so that each iteration brings the project closer to full compliance with the policy.
Monitor and Audit Compliance with Your Policy
Each standard supported by the Security Compliance Pack includes several components for monitoring and demonstrating compliance. Only violations reported by checkers in the compliance test configuration will appear in the compliance pack dashboards and reports. Refer to the documentation for each compliance artifact for details about adding compliance dashboards, viewing widgets, and viewing reports:
Dashboards
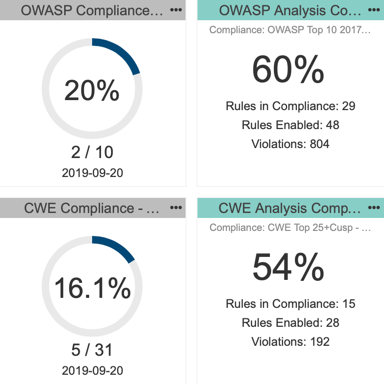
The dashboard templates shipped with the compliance pack include compliance specific widgets that show the compliance status for your project from several perspectives. The dashboards also leverage standard DTP widgets and reconfigure instances of the widgets to show data in context of the specific standard.
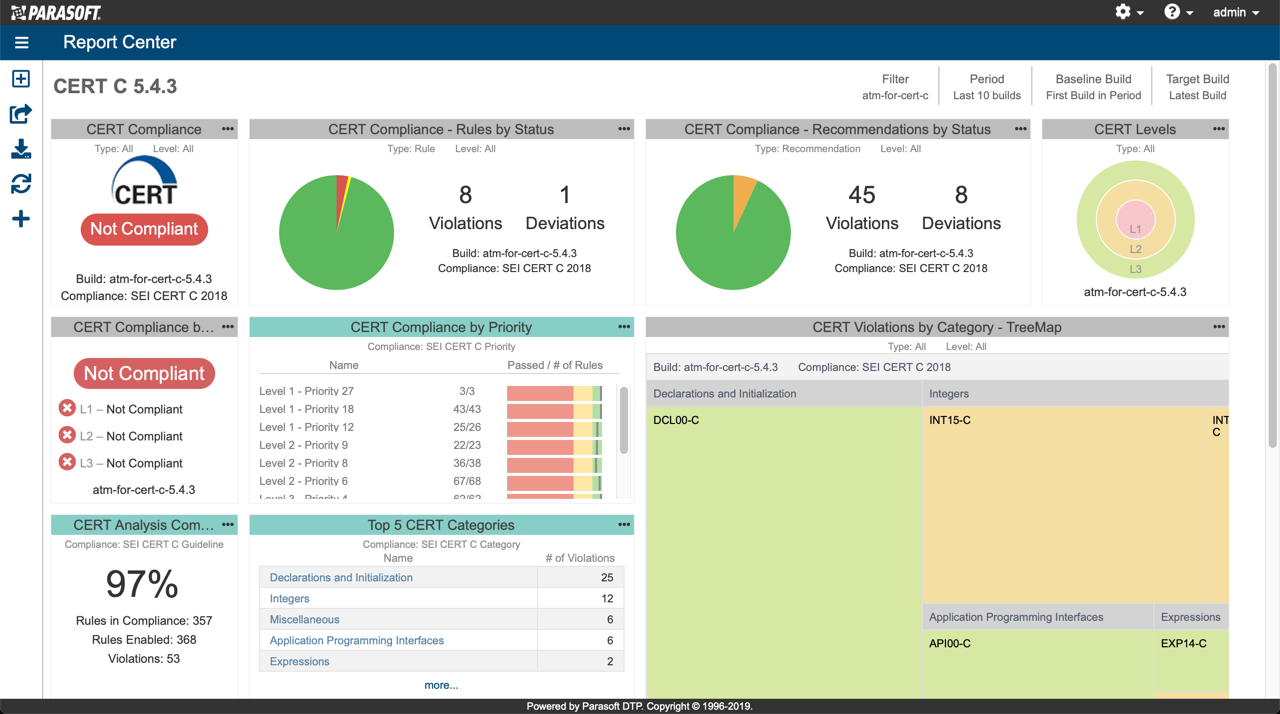
Compliance Reports
Each compliance artifact includes a primary report that you can export to PDF and use to demonstrate compliance during an audit, as well as several sub-reports that you can review to monitor compliance to your policy.
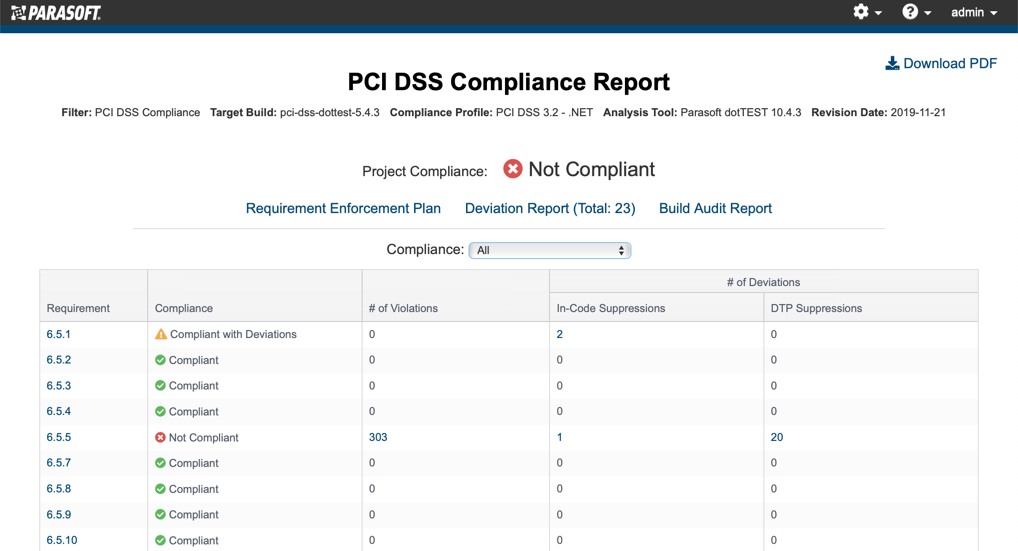
Compliance Percentage Widgets
The compliance percentage widgets provide at-a-glance status of the project and provide the main link to the compliance report.
Managing a Portfolio
Each Parasoft compliance artifact includes widgets specific to those standards. You can create a custom dashboard and add widgets configured to show data from each project using filters (see Creating and Managing Filters in the DTP documentation). Refer to the following DTP documentation for information about creating custom dashboards and manually configuring widgets:
- Adding a Dashboard
- Manually Adding the CERT C Widgets
- Manually Adding the CERT C++ Widgets
- Manually Adding the CWE Widgets
- Manually Adding the OWASP Widgets
In addition, Parasoft DTP ships with portfolio-level widgets, such as the Portfolio - Violations Statistics widget, for displaying SAST results across projects in your portfolio.
Advanced Compliance Monitoring Tools
The out-of-the-box configurations are intended to cover as many workflows as possible, but you can leverage additional functionality to further adapt the DTP solution to your needs.
Security Scoring
The compliance pack includes the Key Performance Indicator artifact that you can execute to calculate KPIs associated with the standard you've selected. KPIs are useful for comparing projects and for estimating risk and effort. This helps you understand the costs and effort associated with complying with your security guidelines. Refer to the following documentation for details on using the KPI functionality:
Resource Groups and Filters
DTP allows you to subset findings associated with a project by creating filters. For each project defined in DTP, a default filter with the same name of the project is created. Filters can have different run configurations, teams, and resource groups.
A resource group is a collection of resources (i.e., files and/or folders) defined by a set of one or more Ant file patterns. Resource groups enable more granular views of the data associated with a filter. After associating a resource group with a filter, the data presented in all widgets, reports, and explorer views for static analysis violations and metrics results will be narrowed according to the defined pattern.
Refer to the DTP documentation for details.
Integrating SCA to Secure Open Source
Software Composition Analysis (SCA) is an important part of incorporating open source (OSS) into your application. SCA checks your software for OSS components and compares them against known security vulnerabilities, such as CVE and NVD. SCA tools report which versions of software you’re running that should be updated or patched. This helps prevent your application from shipping with known vulnerabilities. OWASP Top 10 requires the use of SCA per the A9 “Using components with known vulnerabilities” guideline.
OWASP also makes an SCA tool, called the OWASP dependency check, that identifies vulnerabilities for Java and .NET code. You can deploy the OWASP Dependency Check Pack to DTP, which will enable DTP to accept data from OWASP dependency check and integrate the information into an OWASP Top 10-specific dashboard. The information will be also be included in the OWASP compliance report.

Advanced Configuration and Strategies
Implementing a security compliance initiative is not a one-size-fits-all process. The following adjustments may be required based on your specific needs. This section describes some of the advanced configurations and strategies that you can implement to help you improve your compliance processes.
Combining Security and Quality Checkers
You can combine quality and security checkers by enabling the quality checkers in your security compliance test configuration.
Be aware the adding quality checkers to your security test configuration may have unintended consequences. If your project is subject to safety-critical regulations, for example, and the quality checkers report violations that you had not planned on fixing, you may still be obligated to remediate those violations.
Be aware that violations associated with quality checkers will be included in the report generated by the tool. Security compliance reports, however, only contain output from the checkers associated with security guidelines.
Custom Checkers
If your code includes logic that is not covered by the checkers shipped with Parasoft tools, you can create custom checkers with Parasoft RuleWizard. No coding or knowledge of the parser is required to write or modify a rule, but expertise in understanding parse trees is advantageous.
You will need to add the <ruleId>.rule file to your tool's rules directory, enable the checker in the test configuration, and define it in the rule map. Refer to the DTP documentation for details.
Changing Severities
If the violation severity reported by a checker does not match your policy, you can modify the rule map in DTP to assign a new severity level, as well as change the checker ID or category. Refer to the DTP documentation for details.
Customizing the Compliance Pack
If you need to add or remove checkers that support a security guideline, you also need to modify the compliance profile. A profile is a set of configurations that perform custom calculations in DTP, such as calculating and reporting compliance statuses in DTP widgets.
A set of security compliance-related profiles are automatically deployed to your DTP environment when you install the Security Compliance Pack. The profiles serve as inputs for the compliance reports that you generate as part of a compliance audit. If you need to make adjustments, we recommend preserving the default profiles shipped with the compliance pack.
You can upload, export, and modify profiles using the DTP Enterprise Pack module. Refer to the Enterprise Pack documentation for general information about profiles.
Running What-if Scenarios
What-if scenarios are mechanisms for understanding the outcomes resulting from a given input. In a SAST context, the results of your current build serve as the input and the states of compliance against your short- and long-term goals are the outcomes. What-if scenarios can help you understand the impact, for example, of enabling a new checker or changing the severity of an active checker.
You can run what-if scenarios without executing additional analysis by creating profiles in DTP Extension Designer, which filter results for the current build in order to preview potential changes to your test configuration. You can also run what-if scenarios by incrementally enabling additional checkers in your test configuration and sending the results to different filters.
Using Profiles to Create What-if Scenarios
The Security Compliance Pack includes a default profile for each set of guidelines. Profiles indicate which checkers were expected in the analysis, which tool ran the checkers, and other details, that are included in dashboard widgets and reports. You can create additional profiles and modify the list of checkers to change the scope of the expected results—add additional checkers to the profile, for example, to understand how the current build would perform if analysis ran with the additional checkers.
Do not modify the default profile. Instead, export a copy of the profile and import it into the model, which is an entity that defines the template for the data contained in the profile. The model defines the expected fields in the profile. The profile defines the expected values in the analysis.
Use the following process to create profile-based what-if scenarios that you can apply to your existing results:
- Export a copy of the default profile for you compliance configuration. Profiles are exported as XLSX files, which you can modify before importing or import as-is and modify the profile in the Extension Designer UI.
- Import the profile and enable/disable checkers.
- 3. In the DTP dashboard, add a compliance widget for each profile and specify the compliance profile the encapsulates each what-if scenario. You can configure a widget to track your long-term goal against the profile with the all checkers you want to eventually use, for example, and configure another widget to track your short-term goal against the profile with a subset of checkers enabled.
You can add a Categories in Compliance widget to your dashboard and click into the report for list of checkers enabled in the compliance profile and number of violations for each checker.
Using Filters to Create What-if Scenarios
You can incrementally enable additional checkers in your test configuration and send the results into different DTP filters. A filter is a mechanism in DTP for reporting results based on run configurations, which are sets of metadata, such as the machine name or IP that ran the execution, environment, build ID, and test configuration. Refer to the DTP documentation to learn more about filters.
Use the following process to create filter-based what-if scenarios to apply to builds incrementally:
- Create a duplicate of your primary test configuration.
- Enable (or disable) one or more checkers in the duplicate configuration.
- Add a filter to your project in DTP and configure your tool to send the what-if execution results to the new filter. In this way, you are can keep exploratory analysis results separate from your official compliance data.
Appendix
The following sections describe the supported components for enabling Parasoft's Security Compliance solution.
Supported Languages
Parasoft can analyze the following languages out of the box:
- Java
- .NET-based languages
- C
- C++
- C#
- VB.NET
- HTML
- CSS
- XML
Parasoft supports several other programming languages via the Parasoft Multi-Language Pack:
- Android-based applications
- Apex
- Go
- Groovy
- JavaScript
- Kotlin
- Objective-C
- PHP
- Python
- Ruby
- Scala
- Swift
- Typescript
The Parasoft Multi-Language Pack is available in the marketplace on the Parasoft customer portal.
DTP and Enterprise Pack 2021.1
Standards |
|
|---|---|
Parasoft tools |
|
Continuous integration | Parasoft can report static analysis violations in the following CI systems:
Refer to the Parasoft Findings documentation for details. You can integrate with other CI systems using the command line interface. |
Source control | Refer to the tool documentation for supported SCMs: |
DTP and Enterprise Pack 2020.2
Standards |
|
|---|---|
Parasoft tools |
|
Continuous integration | Parasoft can report static analysis violations in the following CI systems:
Refer to the Parasoft Findings documentation for details. You can integrate with other CI systems using the command line interface. |
Source control | Refer to the tool documentation for supported SCMs: |
DTP and Enterprise Pack 2020.1
Standards |
|
|---|---|
Parasoft tools |
|
Continuous integration | Parasoft can report static analysis violations in the following CI systems:
Refer to the Parasoft Findings documentation for details. You can integrate with other CI systems using the command line interface. |
Source control | Refer to the tool documentation for supported SCMs: |
DTP and Enterprise Pack 5.4.3
Standards |
|
|---|---|
Parasoft tools |
|
Continuous integration | Parasoft can report static analysis violations in the following CI systems:
Refer to the Parasoft Findings documentation for details. You can integrate with other CI systems using the command line interface. |
Source control | Refer to the tool documentation for supported SCMs: |
DTP and Enterprise Pack 5.4.2
Standards |
|
|---|---|
Parasoft tools |
|
Continuous integration | Parasoft can report static analysis violations in the following CI systems:
Refer to the Parasoft Findings documentation for details. You can integrate with other CI systems using the command line interface. |
Source control | Refer to the tool documentation for supported SCMs: |
DTP and Enterprise Pack 5.4.1
Standards |
|
|---|---|
Parasoft tools |
|
Continuous integration | Parasoft can report static analysis violations in the following CI systems:
Refer to the Parasoft Findings documentation for details. You can integrate with other CI systems using the command line interface. |
Source control | Refer to the tool documentation for supported SCMs: |
Glossary of Terms
The following terms are used throughout this guide.
Checker
Also sometimes called 'rules', checkers are pieces of software that check the correctness of code against a specific programming pattern.
Compliance Goal
A compliance goal is a long-term plan for conforming to a software development standard. In contrast to a Compliance Policy, a compliance goal is not generally achievable within the current software release. Compliance goals are encapsulated in a code analysis configuration that, when executed by a Parasoft tool, reports violations that you plan to remediate in a future release.
Compliance Policy
A compliance policy is a measurable and achievable plan for releasing software that conforms to a software development standard. Compliance policies are encapsulated in a code analysis configuration that, when executed by a Parasoft tool, should report no violations.
Compliance
The degree to which the code meets the stated goals of a policy or guideline within a standard. When no static analysis violations are reported, the code is in compliance, regardless of how many checkers are enabled. It is possible for the code to be 100% in compliance with a policy, but fail to reach even partial conformance with a standard if, for example, the policy specifies that only one guideline from the standard should be followed.
Conformance
Conformance is a measure of how completely the code is in compliance with the guidelines within a standard. To be 100% conformant, the code must be in compliance with all guidelines specified in the standard.
Internationally, the underlying concepts associated with "conformance" and "nonconformance" are referred to as "conformity" and "non-conformity." Adhering to the procedures you've defined is conformity or conformance, whereas not adhering to them is nonconformity or nonconformance. Procedures that meet federal (external) requirements are in compliance, whereas procedures that do not meet requirements are in noncompliance.
Deviation
See Suppression
Findings
See Violations.
Guideline
A guideline is a specific rule or principle within a standard that provides guidance on a single programming topic. For example, the OWASP Top 10 standard includes the following guideline:
"A1:2017-Injection: Injection flaws, such as SQL, NoSQL, OS, and LDAP injection, occur when untrusted data is sent to an interpreter as part of a command or query. The attacker's hostile data can trick the interpreter into executing unintended commands or accessing data without proper authorization."
Depending on the standard, guidelines may include example code, risk impact, and other information that help you determine if specific guidelines should be followed for your project.
Rule
A rule in Parasoft refers to a code analysis checker. Others may use the term to mean Guideline.
Standard
A standard is a set of related programming guidelines, such as CERT C, CWE 3.2, and OWASP Top 10.
Suppression
A suppression is a code-level annotation that instructs Parasoft to continue checking for the pattern, but not to report it as a violation in the specific instance. When a violation is marked with a suppression in a compliance context, it is referred to as a deviation from the standard and must be documented with a justification for allowing the violation to remain.
Violations
Parasoft refers to the raw programming errors reported by code checkers as "violations" of the rules codified by the checkers. Parasoft attaches additional information about the violations, such as code authorship, build information, etc., as part of the reporting process. The processes violations are referred to as "findings." Findings can refer to static analysis violations that appear in the code analysis report or violations that have been processed by DTP and downloaded to the developers' IDEs. Subtle differences exist, but violations and findings (as well as other terminology used throughout the software testing industry, including "errors" and "defects") are often used interchangeably.