In this section:
Prerequisites
- Verify that your infrastructure meets the requirements described in Requirements before proceeding with the installation.
- For installations that use an external database, the database server should be installed and running as described in the Database Settings section.
In this section:
Installing DTP on Windows
Run the DTP installer and click Next at the welcome screen. If you intend to install DTP Enterprise Pack, you may be prompted to download the Microsoft Visual C++ Redistributable package before the wizard starts. See Microsoft Visual C++ Redistributable for additional information.
- Read and accept the license agreement when prompted to continue.
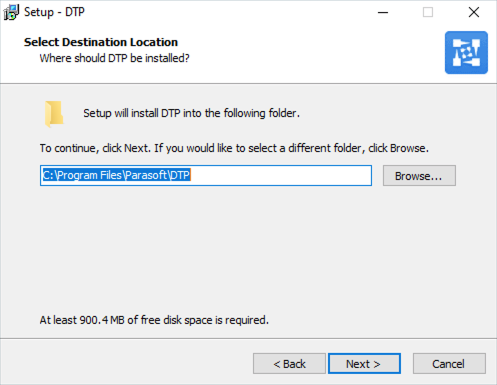
Choose an installation directory and click Next. By default, DTP installs in the C:\Program Files\Parasoft directory.
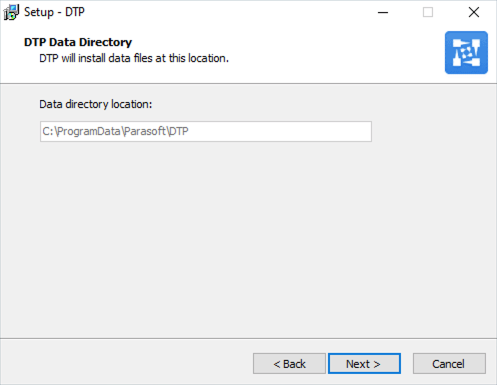
- Data files for DTP are installed in the C:\ProgramData\Parasoft\DTP directory (see Installation Overview for additional information). Click Next to proceed.
- Choose your installation options and click Next when prompted. You can install DTP Enterprise Pack at this time or re-run the installer to add it to your DTP infrastructure later. Enterprise Pack will be installed in the C:\Program Files\Parasoft\DTP\dtpservices directory.

If you are installing the distribution with an embedded database server, it will also appear in the installation options screen: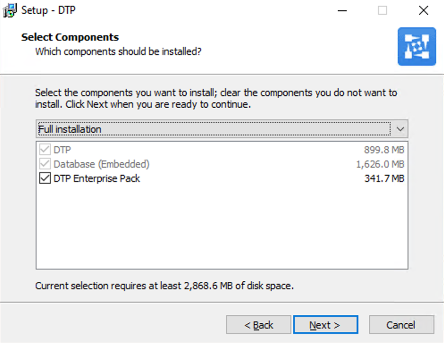
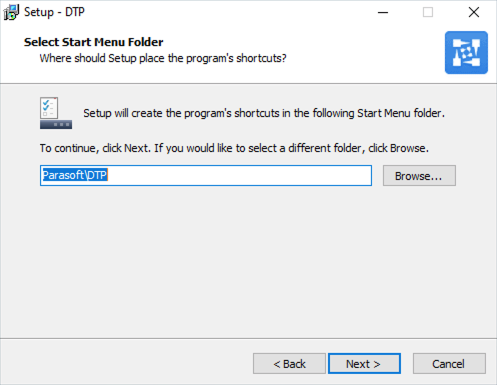
Choose a location for the start menu shortcut and click Next.
Review the installation information and click Install when ready or click Back to choose different installation options.
Click Finish after the installation is complete. You will be prompted to start the installed components.
See Opening and Licensing DTP to begin using DTP.
JDBC Drivers
DTP does not ship with the MySQL and Oracle JDBC drivers necessary to set up a database connection. After starting and licensing DTP, you may see an error when configuring your database connection. Refer to the JDBC Drivers section for instructions on how to install the drivers so that you can connect DTP to your database.
Installing DTP on Linux
Some Linux distributions do not ship with all libraries necessary to install DTP with an embedded database. You should install the libraries before deploying DTP (see the note under step 6).
About Cent OS 7 Installations
The DTP.sh installer requires the package to be unzipped on Cent OS 7. Run the following command to unzip the installer prior to running the DTP.sh:
sudo yum install unzip
- If you are logged in as the root user and are installing the embedded database distribution of DTP on Linux, log out and log back in as another user with administrator privileges.
Extract the DTP installation script from the tarball to your current directory. The following command is an example of a common method:
Linuxtar xvzf parasoft_dtp_[version]_linux.tar.gz
Run the DTP installation script and use the
-ioption to specify the installation directory location and the-doption to specify the application data directory. You must use full paths. For example:Correct./DTP.sh -i /home/<user>/dtp -d /home/<user>/dtp_data
Do not use relative paths to specify the directories:
Incorrect./DTP.sh -i ../../dtp -d ~/var/dtp_data
You will be prompted to specify a location if you run the script without doing so.
If you want to install Parasoft DTP Enterprise Pack, choose
[y]and press Enter when prompted. Enterprise Pack includes Extension Designer, which enables you to derive sophisticated SDLC data analytics and implement granular programming policies. See DTP Enterprise Pack for additional information. A valid DTP Enterprise license is required to use Extension Designer functionality. You can install Enterprise Pack later by re-running the DTP installer and using the-aoption:./DTP.sh -i /home/<user>/dtp -d /home/<user>/dtp_data -a
- If a crontab configuration file is detected during installation, choose
[D]to review the crontab entries or[S]to bypass crontab configuration. The prompt will only appear if the crontab has preexisting entries. Otherwise, the installer will set the crontab entries for DTP automatically. If your DTP distribution includes an embedded database server, the server will automatically start during installation. Some Linux distributions, however, do not ship with all libraries necessary to install embedded database distributions of DTP. The installer will exit after printing the following message to the console:
Installation was not started because the following libraries are missing:

<list of missing libraries>

Use your Linux distribution's package manager to install the missing libraries then reinstall DTP.
For example, you can install libaio.so.1 in Ubuntu with the following command:
	sudo apt-get install libaio1
If the libaio.so.1 is missing from your Red Hat Enterprise Linux distribution, then run:
	sudo yum install libaio.x86_64
Consult the documentation shipped with your Linux distribution for additional information.
Install the libraries as described in your Linux distribution documentation and restart the installation process.
Installation will also stop if you are logged in as the root user (see step 1) and print the following message to the console:
Installation was not started. You cannot be logged in as the root user when installing DTP
with embedded DB. Please log in as another user and reinstall
If you chose to install DTP Enterprise Pack (see step 4), a directory called "dtpservices" will be added to the <DTP_INSTALL> directory. See DTP Enterprise Pack for details.
Initial Startup
Run the DTP Configuration Manager after the installation completes:
DTP_HOME/bin/dtpconsole.sh
The DTP main menu is displayed:DTP - Configuration Manager Copyright (C) by Parasoft Corporation MAIN MENU ========= Options: (1) DTP Server (Report Center, Team Server, License Server) (2) Data Collector (3) DTP Enterprise Pack (4) Status (5) Database configuration (6) System administration (7) Show Machine Id (q) Exit to system
Choose (1) to enter the DTP Server menu.
- Choose (1) to run the service and (q) to return to the menu.
- Choose (5) to enter the Database configuration menu.
- Choose (1) to create a new DTP database. If you are connecting DTP to an existing DTP database, see Connecting to an Existing DTP Database.
- Choose (1) to create and initialize a new DTP database schema. If you are connecting DTP to an existing DTP database that has not yet been initialized, see Configuring the Database Connection.
- Choose (1) to create the new database schema for MySQL or (2) for Oracle and press Enter. Default is MySQL.
- MySQL:
- Specify the hostname or IP address where the database server is located and press Enter. Default is
localhost. - Specify the port number and press Enter. Default is
3306. - Specify a name for the database and press Enter. Default is
DTP. - Specify the root user and press Enter. Default is
root. - Specify the root user password and press Enter.
- Review the configuration settings and press (y) to proceed.
- Specify the hostname or IP address where the database server is located and press Enter. Default is
- Oracle:
- Specify the hostname or IP address where the database server is located and press Enter. Default is
localhost. - Specify the port number and press Enter. Default is
1521. - Choose (1) to use SID as the database specifier type or (2) to use the service name and press Enter. Default is SID.
- Specify the system ID or service name of the database (default is orcl) and press Enter.
- Specify the root user and press Enter. Default is
root. - Specify the root user password and press Enter.
- Review the configuration settings and press (y) to proceed.
- Specify the hostname or IP address where the database server is located and press Enter. Default is
- MySQL:
- Press Enter when the database is created and initialized to return to the dtpconsole menu.
- Choose one of the following options:
- Choose (2) to enter the Data Collector menu.
- Choose (1) to run the Data Collector service and (q) to return to the menu
- Choose (3) to enter the Enterprise Pack menu.
- Choose (1) to run the service and (q) to return to the menu. You can only start and stop DTP Enterprise Pack through the DTP console interface. Additional administration commands for Enterprise Pack applications are available in the dedicated dtpservices.sh in the [DTP_INSTALL]/dtpservices/ directory. See Getting Started with Enterprise Pack.
See Opening and Licensing DTP to begin using DTP.
Connecting to an Existing DTP Database
- Choose (2) from the DTP Database Configuration menu to connect your DTP installation to an existing DTP database.
- Choose (1) to create the new database schema for MySQL or (2) for Oracle and press Enter. Default is MySQL.
- MySQL:
- Specify the hostname or IP address where the database server is located and press Enter. Default is
localhost. - Specify the port number and press Enter. Default is
3306. - Specify a name for the database and press Enter. Default is
DTP. - Specify the root user and press Enter. Default is
root. - Specify the root user password and press Enter.
- Review the configuration settings and press (y) to proceed.
- Specify the hostname or IP address where the database server is located and press Enter. Default is
- Oracle:
- Specify the hostname or IP address where the database server is located and press Enter. Default is
localhost. - Specify the port number and press Enter. Default is
1521. - Choose (1) to use SID as the database specifier type or (2) to use the service name and press Enter. Default is SID.
- Specify the system ID or service name of the database (default is orcl) and press Enter.
- Specify the root user and press Enter. Default is
root. - Specify the root user password and press Enter.
- Review the configuration settings and press (y) to proceed.
- Specify the hostname or IP address where the database server is located and press Enter. Default is
- MySQL:
- Press Enter when the database is connected to return to the dtpconsole menu.
Initializing an Existing Database Schema
- Choose (2) from the DTP Database DTP Create Setup Menu if you are connecting to an existing DTP database that has not been initialized.
- Choose (1) to create the new database schema for MySQL or (2) for Oracle and press Enter. Default is MySQL.
- MySQL:
- Specify the hostname or IP address where the database server is located and press Enter. Default is
localhost. - Specify the port number and press Enter. Default is
3306. - Specify a name for the database and press Enter. Default is
DTP. - Specify the root user and press Enter. Default is
root. - Specify the root user password and press Enter.
- Review the configuration settings and press (y) to proceed.
- Specify the hostname or IP address where the database server is located and press Enter. Default is
- Oracle:
- Specify the hostname or IP address where the database server is located and press Enter. Default is
localhost. - Specify the port number and press Enter. Default is
1521. - Choose (1) to use SID as the database specifier type or (2) to use the service name and press Enter. Default is SID.
- Specify the system ID or service name of the database (default is orcl) and press Enter.
- Specify the root user and press Enter. Default is
root. - Specify the root user password and press Enter.
- Review the configuration settings and press (y) to proceed.
- Specify the hostname or IP address where the database server is located and press Enter. Default is
- MySQL:
- Press Enter when the database is initialized to return to the dtpconsole menu.
Additional Installation Notes
- For Windows installations, we recommend using a third-party zip compression utility, such as WinZip, WinRar, or 7Zip to extract the distribution files for installation. Microsoft Windows' built-in Uncompress utility (from Windows Explorer) has many issues—for example, directory and file name size limitations and performance issues. If you extract the DTP installer using Windows Explorer, you may get a "Path too long" error message. The same error may also result if you open the distribution with 7Zip and drag the DTP folder from the 7Zip UI to the desktop.
- The installed.file.lst file in the installation directory is used to track which installation files are modified and should be included in any backups.