Introduction
The OAuth (Open Authorization) authentication protocol enables users to grant third-party applications access to their private resources without revealing login credentials. It also provides a way to restrict the amount of information that can be accessed.
OAuth introduces the user role (also known as the resource owner) into the traditional client-server authentication model. In the traditional client-server authentication model, the client directly accesses resources hosted on the server. In the OAuth model, the client must first obtain permission from the resource owner before accessing resources from the server. This permission is expressed in the form of a token and matching shared-secret key.
OAuth 2.0 and 1.0a are different implementations and are incompatible. Refer to the OAuth website to learn more: https://oauth.net/2/.
Example Scenario
Assume that a user (resource owner) wants to grant a printing service (client) access to his private photos stored at a photo sharing service (server). Instead of revealing the user's login credentials to the printing service, the user can perform OAuth authentication to grant the printing service permission to access his or her private photos. This would happen in three stages:
- The printing service requests temporary credentials from the photo sharing service.
- Once the printing service receives the credentials, it redirects the user to the photo sharing service's OAuth Authorization URL, then the user provides login credentials. Note that the printing service has no visibility into the user's login credentials at this step. Once the user decides to give the printing service access to the private photos, a confirmation verification code is generated.
- The printing service then exchanges the temporary credentials plus the verification code for an access token. Once the printing service has the access token, they can then obtain and print the user's private pictures from the photo sharing service.
Parasoft Support for OAuth
Parasoft supports OAuth 1.0a and 2.0 security protocols for web server flow and client credentials flow (two-legged scenario). Configuring authentication using OAuth 1.0a and OAuth 2.0 is described below.
OAuth 2.0
The OAuth 2.0 RFC specifies different "flows" or "grant types" for authentication. This documentation describes how to use the three most common flows with SOAtest: the web server (authorization code) with or without PKCE and client credentials.
See https://oauth.net/2/grant-types/ for additional information about OAuth 2.0 flows.
Web Server (Authorization Code) Flow
This grant type is used by confidential and public clients to exchange an authorization code for an access token. After the user returns to the client via the redirect URL, the application will get the authorization code from the URL and use it to request an access token. Refer to the OAuth 2.0 Framework documentation for details about this flow: https://tools.ietf.org/html/rfc6749#section-4.1
To set this up in SOAtest, you will first need to create a test scenario that gets an authorization code to use as a login suite. This login suite, in turn, is called by test scenarios that need a token. The procedure is the same whether you are using an authorization code with Proof Key for Code Exchange (PKCE) or not, though if it is with PKCE there are a couple extra variables that will need to be configured. You can create this login test suite with a convenient wizard or set it up manually. Once you have your login test suite, you can configure your test scenarios to use it to get a token without having to create it each time for every scenario.
Create a Login Test Suite with the Wizard
- Right-click a test suite and choose Add New > Global Property...
- Expand the Authentication list, then choose OAuth 2.0 and click Next.
- Set the Grant Type to
Authorization CodeorAuthorization Code with PKCE, as appropriate and click Next. - Choose Record a new login suite and click Next.
- Enter the URL to start recording from, as appropriate for your login process, and the path to your Chrome executable. Click Finish. The login page for your application opens.
- Log into your application. When you have completed your process, click Stop Recording to complete the recording.
- Enter or select the parent folder to store the login test suite and enter a name for it. Click Finish. A dialog opens to remind you of three important things:
- Your authorization server needs to be configured for a redirect URI that matches the call back URL (by default,
http://localhost:9080/servlet/oauth2/code). - The SOAtest server needs to be running whenever this test is used in order to function correctly. The status of the SOAtest server can be seen on the SOAtest Server view (Parasoft > Show View > SOAtest Server).
- If your authorization server requires a client secret, you will need to enter it manually in the configuration (detailed below). It cannot be extracted by the wizard.
- Your authorization server needs to be configured for a redirect URI that matches the call back URL (by default,
- Click OK to dismiss the dialog. The OAuth 2.0 authentication configuration screen opens with the login suite and the settings extracted by the wizard set automatically.
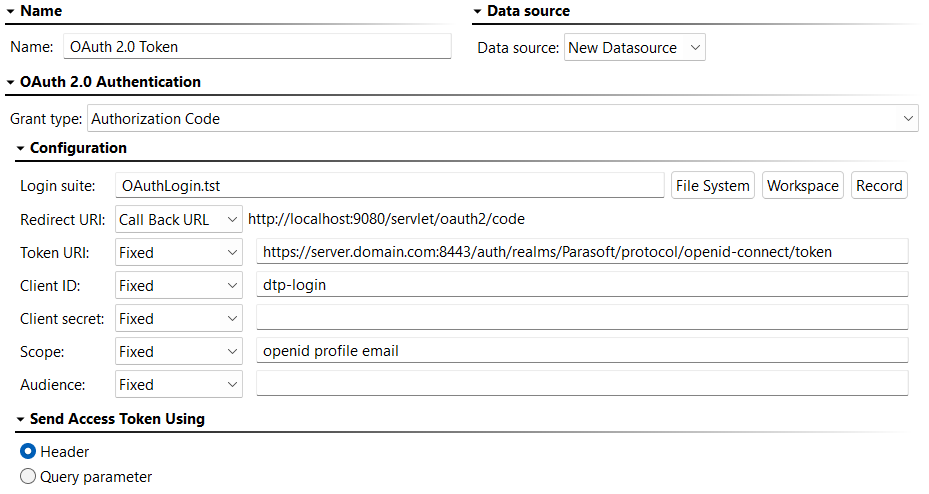
- Enter an easily identifiable name in the Name field.
- Configure the remaining settings as described below. Some of these settings will have been extracted for you automatically and others cannot be extracted and will need to be entered manually. If you change or enter any settings, be sure that they match those in the authorization endpoint URL exactly (when applicable).
- Redirect URI: By default, this is set to use the Call Back Tool and is set to its URL:
http://localhost:9080/servlet/oauth2/code. This is the recommended configuration, but you can change it if necessary. - Token URI: Specifies the access token endpoint on the OAuth 2.0 authorization server.
- Client ID: Specifies the client ID needed for authenticating with the authorization server.
- Client Secret: Enter the client secret needed for authenticating with the authorization server. This cannot be extracted by the wizard and, if it's needed, must be entered manually.
- Scope: This is used by the client to request limited access to the application. A comma-separated list of values specific to the authorization server may be entered or a parameterized value, if appropriate. See https://oauth.net/2/scope/ for additional information. If no scope is specified, the default scope may be returned.
- Audience: Enter the URI of the resource server or a parameterized value, if appropriate. This cannot be extracted by the wizard and, if applicable, must be entered manually.
- Code Verifier (Authorization Code with PKCE only): Select a method for generating the code verifier. By default, this is done automatically, which is recommended. The automatically generated code verifier will comply with OAuth 2.0 standards, being a cryptographically random string using the characters A-Z, a-z, 0-9, and the punctuation characters - . _ ~ (hyphen, period, underscore, and tilde), between 43 and 128 characters long. If you choose a different method, ensure that the result meets the same standards, or the token request might be rejected.
- Challenge Method (Authorization Code with PKCE only): Select whether the code challenge is the plain text version of the code verifier or the SHA-256 version of the code verifier.
- Redirect URI: By default, this is set to use the Call Back Tool and is set to its URL:
- Select whether to send the access token using Header or Query Parameter.
- Save your configuration.
Create a Login Test Suite Manually
Before you begin, verify that the local SOAtest server is running in the SOAtest Server view. If the SOAtest Server view is not visible in your workspace, go to Parasoft > Show View > SOAtest Server. You can start the server by either clicking the Server node then the start icon in the upper-right corner of the panel or by right-clicking the Server node and choosing Start Server. Once you've confirmed the local SOAtest server is running: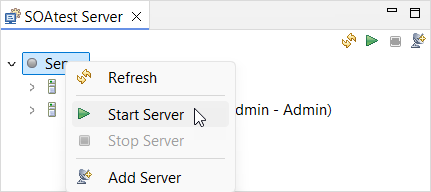
- Right-click on your project folder and choose Add New > Test (.tst) File.
- Specify a name for the test and choose Web > Record web scenario.
- Click Next and choose Record new web scenario.
- Enter the URL for the authorization endpoint URL in the Start Recording From field and click Next.
Do not use the URL of the application under test (AUT), even though it automatically redirects to the authorization endpoint (that is, the login page). You want to use the URL for the authorization endpoint itself, otherwise the AUT will consume the token before you have a chance to use it in your test.
- Enable Add URL variable to your existing environment and click Finish. The login page for your application opens.
- Log into your application. Once authorized, the Service Provider will redirect you to the callback URL with a code as part of a URL parameter.
- Close the browser to complete the recording.
- Run the test once to populate the tests with traffic.
- Right-click the test suite and choose Add New > Test. The Add Test dialog opens.
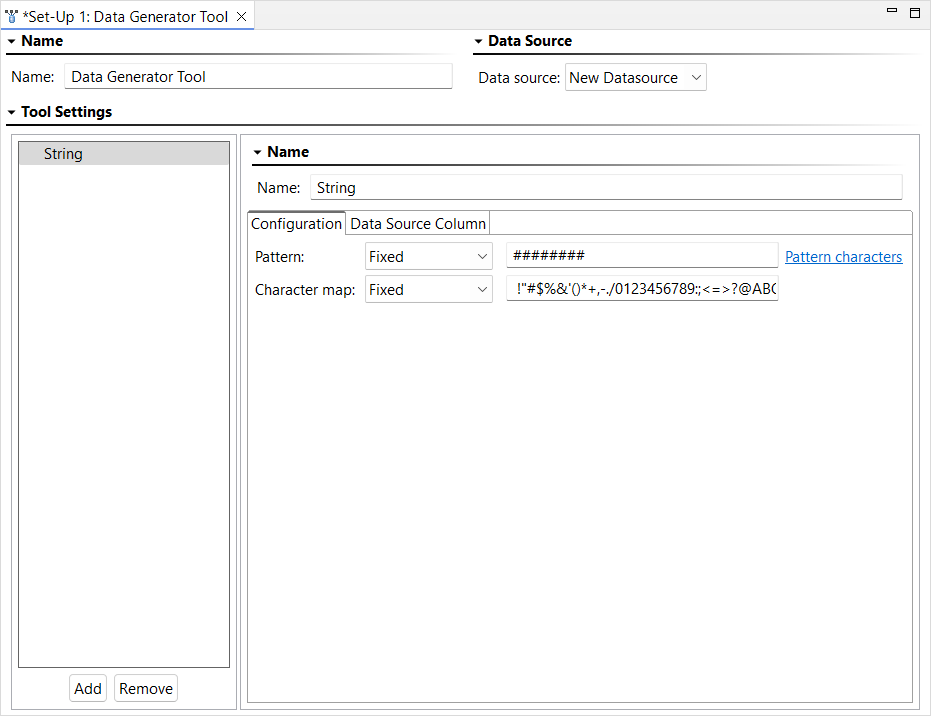
- Choose Set-Up Test > Data Generator Tool and click Finish. The Data Generator Tool opens in the workspace.
- In the Data Generator tool, click Add, choose String, then click Finish.
- Enter a pattern of "########" and enter "OAUTH2_STATE" as the data column name.

- Save your changes.
- Parameterize the authorization endpoint. Setting the parameters of the authentication endpoint in the login suite makes it more adaptable as a general-purpose login suite that is referenced by many tests with the OAuth 2.0 shared authentication feature. To do so:
- Open the test in the recorded scenario that navigates to the authorization endpoint (this is usually the first test) and click the User Action tab.
In the URL field, change the following parameters from their static values to the specified test suite variables, as applicable:
Parameter Variable client_id ${OAUTH2_CLIENT_ID}redirect_uri ${OAUTH2_REDIRECT_URI}scope ${OAUTH2_SCOPE}audience ${OAUTH2_AUDIENCE}state ${OAUTH2_STATE}- If you chose
Authorization Code with PKCEas the Grant Type, see the next step for additional parameterizing requirements.
- If you chose
- Save your changes.
- If you are using an authorization code with PKCE, the authorization endpoint must be configured to accept variables for the
code_challengeandcode_challenge_methodparameters. To do so:- Open the test in the recorded scenario that navigates to the authorization endpoint (this is usually the first test) and select the User Action tab.
In the URL field, change the following parameters from their static values to the specified test suite variables:
Parameter Variable code_challenge ${OAUTH2_CODE_CHALLENGE}code_challenge_method ${OAUTH2_CODE_CHALLENGE_METHOD}- Save your changes.
- Right-click the test suite and choose Add New > Test. The Add Test dialog opens.
- Choose Standard Test > Call Back Tool and click Finish. The Call Back Tool opens in the workspace.
- Choose OAuth 2.0 as the protocol and Parameterized as the state. Choose
OAUTH2_STATEas the column name.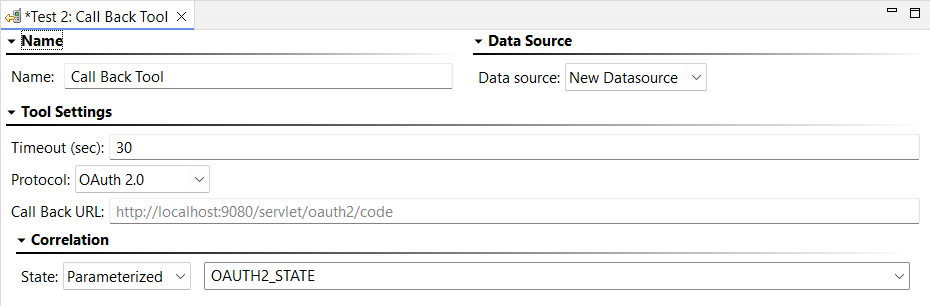
- Save your changes.
- Right-click the Call Back Tool node and choose Add Output. The Add Output dialog opens.
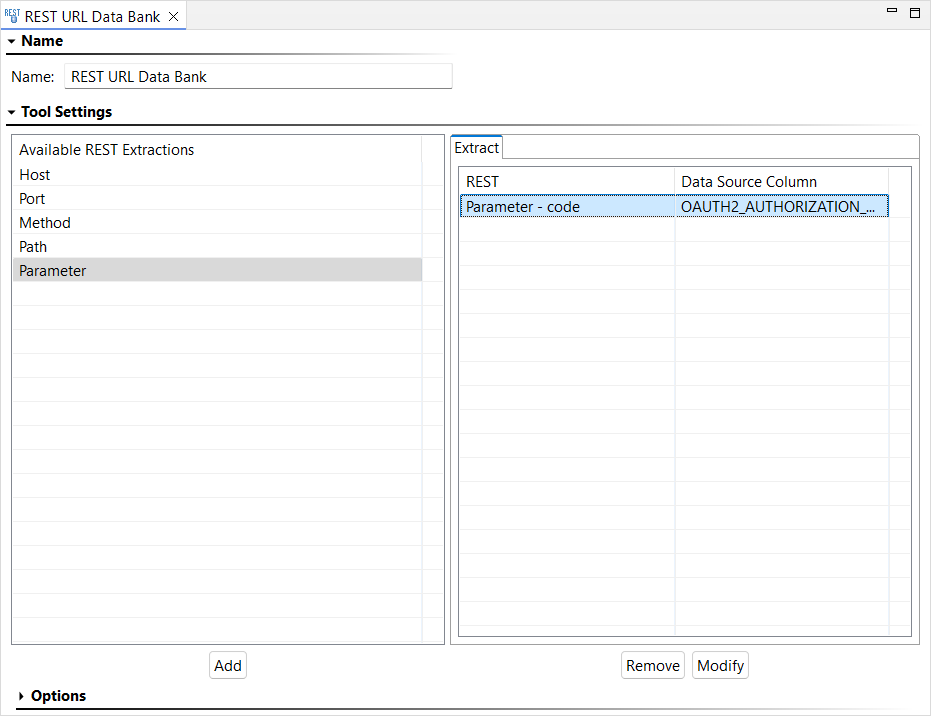
- Choose Incoming Request > Transport Header > REST URL Data Bank and click Finish. The REST URL Data Bank output opens in the workspace.
- Select Parameter and click Add. Double-click the default parameter that is added and enter "code" for the parameter name and "OAUTH2_AUTHORIZATION_CODE" for the custom column name.
- Save your changes.
If you parameterized the authorization endpoint by setting one or more of the variables described above, but still want to be able to run the web scenario independently, you can set default values for parameterized values on the Variables tab. For more information, see "Defining Variables" on the Configuring Test Suite Properties - Test Flow Logic, Variables, etc. page.
Create a Test Scenario
Right-click the project you want to create your test scenario in and choose Add New > Test (.tst) File. Finish creating this scenario as appropriate for your application and testing needs. If you already have a scenario that you want to use, you can skip this step.
Load Testing
If you intend to load test this scenario, you should configure the test suite to run the tests as a group (open the test suite and go to the Execution Options > Test Execution tab). If the test suite is configured with the "Tests are individually runnable" option enabled instead, each virtual user will run one of the tests in the suite in isolation, with no OAuth 2.0 access token reuse, and Load Test will have to repeatedly execute the login suite in order to get new access tokens.
- Right-click your test scenario and choose Add New > Test. Create a new REST Client in your test scenario, setting the Method to
GETand the URL to your AUT. - If the shared authentication you created earlier is the only one created for this test suite, it will be used automatically. Otherwise, click Authentication under Security, then select Custom from the first dropdown menu in the Authentication pane and choose it.
- Run the scenario and confirm that the OAuth 2.0 token was acquired and used successfully.
Client Credentials Flow
This grant type is used by clients to obtain an access token outside of the context of a user. This is typically used by client applications to access resources about themselves rather than to access a user's resources. Refer to the OAuth 2.0 Framework documentation for details about this flow: https://tools.ietf.org/html/rfc6749#section-4.4.
Set up a Shared OAuth 2.0 Authentication for the Test Suite
- Right-click the test suite and choose Add New > Global Property...
- Expand the Authentication list, then choose OAuth 2.0 and click Next.
- Set the Grant Type to
Client Credentialsand click Finish. The OAuth 2.0 authentication configuration screen opens.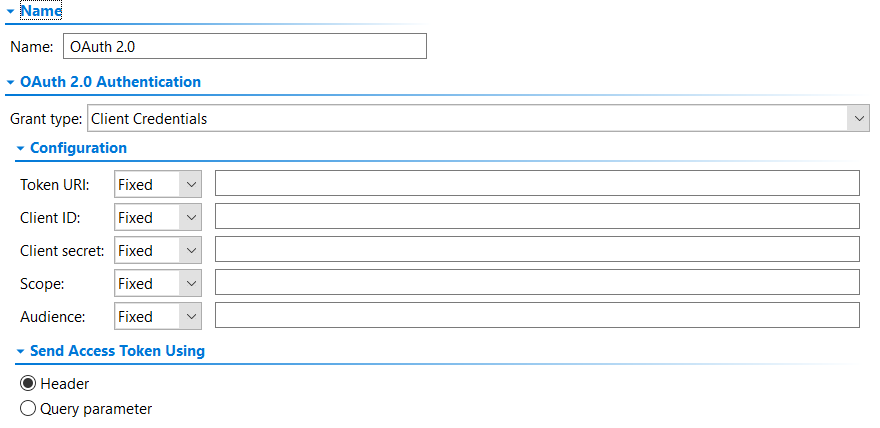
- Enter an easily identifiable name in the Name field.
- Configure the remaining settings:
- Token URI: Enter the access token endpoint on the OAuth 2.0 authorization server.
- Client ID: Enter the client ID needed for authenticating with the authorization server.
- Client Secret: Enter the client secret needed for authenticating with the authorization server.
- Scope: (Optional) Specify the scope of the access token. If multiple parameters are needed, separate them with commas. See https://oauth.net/2/scope/ for additional information. If no scope is specified, the default scope may be returned.
- Audience: (Optional) Enter the URI of the resource server.
- Select whether to send the access token using Header or Query Parameter.
- Save your configuration.
Create a Test Scenario
- Right-click your test suite and select Add New > Test. Create a new REST Client in your test suite.
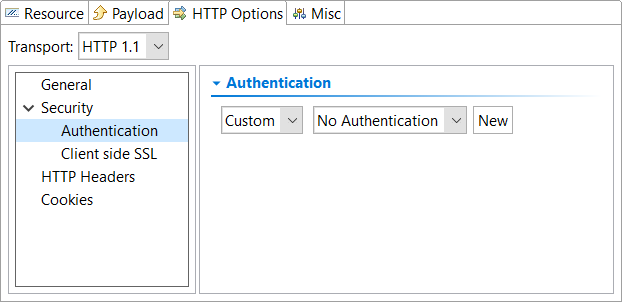
- Click the HTTP Options tab and choose either HTTP 1.0 or HTTP 1.1 from the Transport menu.
- If the shared authentication you created earlier is the only one created for this test suite, it will be used automatically. Otherwise, click Authentication under Security, then select Custom from the first dropdown menu in the Authentication pane and choose it.
- Click the Resource tab and specify your REST call method and endpoint, including any expected parameters.
- The OAuth 2.0 access token will be automatically injected.
- Run the scenario and verify the expected HTTP request header that was sent. Example Authorization header:
Authorization: Bearer 2YotnFZFEjr1zCsicMWpAA
Load Test Considerations
If you intend to load test a scenario, you should enable "Tests run as a group" in its parent Test Suite (which can be found on the Execution Options > Test Execution tab). This option allows each virtual user (VU) to run the entire scenario, so each VU is able to acquire and reuse its own OAuth 2.0 access token. If "Tests are individually runnable" is enabled instead, each VU will run one of the tests from the suite in isolation with no access token reuse, with each test acquiring its own token, which will result in repeatedly executing the Login suite in order to get new access tokens.
Troubleshooting
Errors relating to OAuth 2.0 can be generally sorted into two types: an error getting the OAuth 2.0 authorization code or an error getting the access token. Before you begin to troubleshoot, review the errors in the Quality Tasks view to determine which type of problem you're having.
If the problem is getting the authorization code:
- Try running the Login suite directly to make sure it works as expected.
- If you parameterized the authorization endpoint in your Login suite, you can still run it independently by setting default values for parameterized values on the Variables tab. For more information, see "Defining Variables" on the Configuring Test Suite Properties - Test Flow Logic, Variables, etc. page.
- Check the Console view for messages while the test is running.
If the problem is getting the access token:
- Check the traffic associated with any OAuth 2.0 errors by right-clicking them in the Quality Tasks view and choosing View Associated Traffic.
OAuth 1.0a
Authenticating against OAuth 1.0a includes the following general steps:
- Obtain and authorize a request token from the service provider.
- Exchange the request token for an access token.
- Sign OAuth requests to access protected resources.
The following example uses the REST Client to send request messages to the server. You can alternatively use the Messaging Client in the same manner.
Obtain and Authorize a Request Token from the Service Provider
- Create a new REST Client and configure the settings for the location where the Request Token will be obtained.
- Click the HTTP Options tab and choose either HTTP 1.0 or HTTP 1.1 from the Transport menu.
- Click Authentication under Security.
- Select Custom from the first dropdown menu in the Authentication pane.
- If an OAuth 1.0 shared authentication configured to obtain a request token has been set for the test suite (see "Specifying Client Options" on the Configuring Test Suite Properties - Test Flow Logic, Variables, etc. page), you can select it from the second drop-down menu and skip to step 11.
- Click New, then select OAuth 1.0 and click Finish. An OAuth 1.0 authentication is added to the Authentications node for the test suite (if this is the first custom authentication added to the test suite, the Authentications node is created automatically).
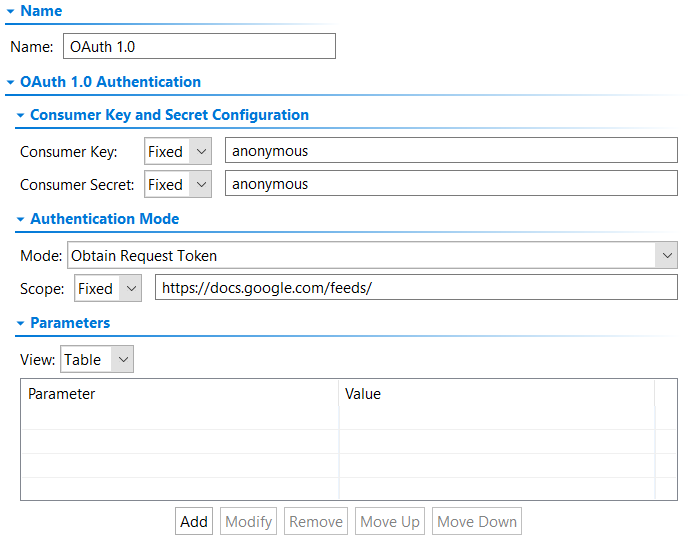
- Enter an easily identifiable name in the Name field.
- Enter the consumer key and consumer secret in the Consumer Key and Consumer Secret fields.
- Choose "Obtain Request Token" from the Mode menu.
- (Optional) Specify a scope in the Scope fields.
- (Optional) Add additional OAuth parameters under Parameters.
- Attach a Text Data Bank to the Response Traffic of the REST Client and extract the Request Token and the Request Token Secret. The token is usually denoted as
oauth_token.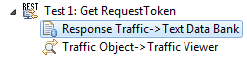
- Go to File > New > Test (.tst) File from the main menu and choose your project.
- Enter a name for the file and click Next.
- Choose Web > Record web scenario and click Next.
- Choose Record new web scenario and click Next.
- In the Start Recording From field, enter the URL to obtain the verification code. Add an
oauth_tokenparameter and specify the value of the request token obtained in the step 10.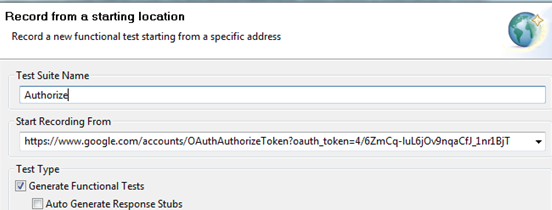
Once the browser launches, it will display the login page of the server that is hosting the protected resource. - Sign in by providing the user's login credentials (Username/Password). Once authorized, the browser will redirect you to a new page with a verification code.
- After you see the verification code, exit the recording by closing the browser.
- Attach a Browser Data Bank to the Browser Contents (rendered HTML) and extract the value of the verification code.
- Open the Browser Playback tool and replace the literal Request Token string with the Request Token data source column generated by the Text Data Bank (step 10). Use the
${varName} syntax, as shown below.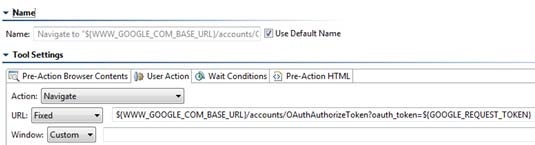
Exchange the Request Token for an Access Token
- Create a new REST Client and configure the settings for the location where the Request Token should be exchanged for the Access Token.
- Click the HTTP Options and choose either HTTP 1.0 or HTTP 1.1 from the Transport menu.
- Click Authentication under Security.
- Select Custom from the first dropdown menu in the Authentication pane.
- If an OAuth 1.0 shared authentication configured to exchange the request token for an access token has been set for the test suite (see "Specifying Client Options" on the Configuring Test Suite Properties - Test Flow Logic, Variables, etc. page), you can select it from the second drop-down menu and skip to step 10.
- Click New, then select OAuth 1.0 and click Finish. An OAuth 1.0 authentication is added to the Authentications node for the test suite (if this is the first custom authentication added to the test suite, the Authentications node is created automatically).
- Enter the consumer key and consumer secret in the Consumer Key and Consumer Secret fields.
- Choose Exchange Request Token for Access Token from the Mode menu.
- Parameterize the Request Token and Request Token Secret fields from the Text Data Bank extractions.
- Parameterize the Verification Code field from the Browser Data Bank.
- Attach a Text Data Bank to the Response Traffic of the REST Client and extract the Access Token (usually denoted as oauth_token) and the Access Token Secret (usually denoted as oauth_token_secret).
Sign OAuth Requests to Access Protected Resources
- Create a new REST Client and configure the settings for the location where the Request Token should be exchanged for the Access Token.
- Click the HTTP Options and choose either HTTP 1.0 or HTTP 1.1 from the Transport menu.
- Click Authentication under Security.
- Select Custom from the first dropdown menu in the Authentication pane.
- If an OAuth 1.0 shared authentication configured to sign the request for OAuth authentication has been set for the test suite (see "Specifying Client Options" on the Configuring Test Suite Properties - Test Flow Logic, Variables, etc. page), you can select it from the second drop-down menu and skip to step 9.
- Click New, then select OAuth 1.0 and click Finish. An OAuth 1.0 authentication is added to the Authentications node for the test suite (if this is the first custom authentication added to the test suite, the Authentications node is created automatically).
- Enter the consumer key and consumer secret in the Consumer Key and Consumer Secret fields.
- Choose "Sign Request for OAuth Authentication" from the Mode menu.
- Parameterize the Access Token and Access Token Secret fields from the Text Data Bank extraction.
- Request the user's private resources. This should be possible because the Access Token has been obtained.