This section explains how to configure and apply the Call Back Tool that supports asynchronous HTTP testing by listening for the asynchronous server response.
Understanding the Call Back Tool
SOAtest supports asynchronous HTTP testing, including SCP (SOAP Conversation Protocol), WS-Addressing, custom protocols, JMS, TIBCO, IBM MQ, and SonicMQ. After you configure the Call Back Tool, SOAtest sets up a server to manage the Call Back Messages. It uses the keys you specify in the tool configuration to recognize incoming messages.
Configuring the Call Back Tool
Before you begin, verify that the local SOAtest server is running in the SOAtest Server view. If the SOAtest Server view is not visible in your workspace, go to Parasoft > Show View > SOAtest Server. You can start the server by either clicking the Server node then the start icon in the upper-right corner of the panel or by right-clicking the Server node and choosing Start Server. Once you've confirmed the local SOAtest server is running: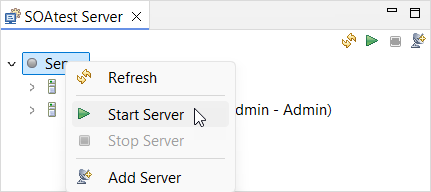
- Ensure that there is a SOAP invocation from a SOAP Client tool.
- Right-click the main test suite node and go to Add New > Test. The Add Test wizard opens.
- Choose Standard Test > Call Back Tool from the Add Test wizard and click Finish. A Call Back Tool test node appears in the test suite.
- Double-click the Call Back Tool test node. The Call Back Tool opens in the workspace.
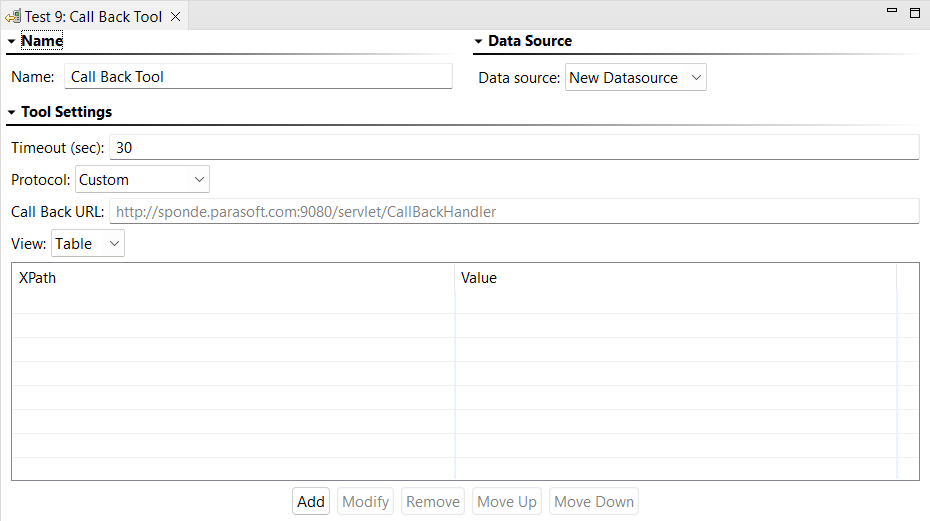
- Enter the name of the test in the Name field.
- If there is a Data Source in the project that contains parameters you want to use as call back values, choose it from the Data Source menu. If there are no data sources in the project, this option will not appear.
- Specify the length of delay (in seconds) after which SOAtest should consider your requests to be timed out in the Timeout (sec) field.
- Choose the asynchronous protocol to be used from the Protocol menu. Note that some of the options available are specific use cases for the HTTP protocol (for example, SCP or WS-Addressing). The rest of the settings for the tool will be specific to the protocol selected.
- Custom: Choose for custom message correlation over HTTP. The Call Back Tool will pick up any messages at the call back URL that match the text value of elements at specified XPaths. For example, assume you have the following message:
<root><id>2</id><name>Java</name></root>
You can define an XPath of/root/idwith value2. The XPath will select theidelement. The Call Back Tool will then check if the text content matches the configured value of2. The Call Back Tool will not pick up any received messages that have a different text value for theidelement.
If selected, the Call Back URL field will show the server location of the Call Back Tool. Enter your XPath/value key sets by clicking Add (if the view is set to Table) or directly (if the view is set to Literal). - IBM MQ: Choose for the IBM MQ protocol. If selected, see IBM MQ for more information about the relevant settings.
- JMS: Choose for the JMS protocol. If selected, see Configuring JMS options for the Call Back Tool for more information about the relevant settings.
- No correlation: Choose to use the first message in
http://localhost:9080/servlet/NoCorrelationCallBackHandler. If this "protocol" is selected and there is no message at that location, the test will fail once it times out. - OAuth 2.0: Choose for the OAuth 2.0 protocol. The Call Back URL field will show the server location of the Call Back Tool. Enter a correlation to parameter in the original URL to login page of the authorization server.
- The primary use for this option is to incorporate the Call Back Tool as part of a login test suite where the user navigates in their web browser to the login page of their authorization server, provides their login credentials, and then is redirected back to an application (SOAtest in this case) with the resulting authorization code. The Call Back URL shows the URL that should be used for the
redirect_uriquery parameter when navigating to the login page. After login, the authorization server will redirect the user's browser back to this URL but with additional query parametersstateandcode. You want to configure the Call Back Tool to correlate on the value of thestateparameter, which should match the value of thestateparameter that was in the original URL to login page of the authorization server. Thecodecan be extracted by chaining a REST URL Data Bank to the tool's Incoming Request > Transport Header output. For more detail about setting up this kind of login test suite, see OAuth Authentication.
- The primary use for this option is to incorporate the Call Back Tool as part of a login test suite where the user navigates in their web browser to the login page of their authorization server, provides their login credentials, and then is redirected back to an application (SOAtest in this case) with the resulting authorization code. The Call Back URL shows the URL that should be used for the
- SonicMQ: Choose for the SonicMQ protocol. If selected, see SonicMQ Transport for more information about the relevant settings.
- SCP: Choose to use SCP over HTTP. If selected, the Call Back URL field will show the server location of the Call Back Tool. Double-click the key set to enter a value for the call back message (the key is automatically set to
conversationID). - TIBCO: Choose for the TIBCO protocol. If selected, see Configuring TIBCO options for the Call Back Tool for more information about the relevant settings.
- WS-Addressing: Choose to use WS-Addressing over HTTP. If selected, the Call Back URL field will show the server location of the Call Back Tool. Double-click the key set to enter a value for the call back message (the key is automatically set to
MessageID).
- Custom: Choose for custom message correlation over HTTP. The Call Back Tool will pick up any messages at the call back URL that match the text value of elements at specified XPaths. For example, assume you have the following message:
- Save your changes.
- Right-click the Call Back Tool test node and select Add Output. The Add Output wizard opens.
- Select the desired tool from the Add Output wizard to create an output for the Call Back message from the server. For example, you can select the Diff tool to create a regression control on the Call Back message from the server.
Configuring TIBCO options for the Call Back Tool
If TIBCO is selected as the Protocol for the Call Back Tool, a TIBCO Properties panel appears at the bottom of the tool configuration panel. SOAtest can listen on a local TIBCO DAEMON or a remote one. That is, the bus daemon could be running on the local machine or somewhere else. The following options are available:
- The Timeout field represents the amount of time SOAtest should block (wait) until a message becomes available on the specified Reply Subject value.
- Daemon: Specifies the server name or the server’s IP followed by a colon (:) and the port number (for example,
10.10.32.34:7500orhost_name:7500). - Network: Specifies the network where the transport objects are located. The network parameter consists of up to three parts separated by a semicolon (;) in the form of
network;multicast groups;send address(for example,lan0; 224.1.1.1; 244.1.1.6). For more information, please refer to the Network Selection section of the TIBCO Rendezvous documentation. - Service: Specifies TIBCO’s service name.
TIBCO messages, when generated and accessed via one of the programming language APIs, can put content under named fields. Content (SOAP messages, XML, text, and so on) must be placed under a TIBCO message "field". To retrieve desired content from the message, the Reply Field Name must be provided. The field name is determined by the application that generates a TIBCO message, so to determine what that field is, one would need to know the field name that is used by the application (if unknown, the source code of the application that sends the TIBCO message should include the field name).
The Message Delivery field indicates what type of messages the Call Back Tool should look for on the bus. This should correspond to the delivery type established by the message sender.
Additional information on the Field Name can be found in the TIBCO Rendezvous docs under TIBCO Rendezvous Concepts > Fundamentals > Messages and Data> Fields.
For more information on the Reply subject field and its meaning in TIBCO, refer to TIBCO docs under TIBCO Rendezvous Concepts > Fundamentals > Names and Subject-Based Addressing.
Configuring JMS options for the Call Back Tool
If JMS is selected as the Protocol for the Call Back Tool, a JMS Properties panel is shown at the bottom of the Call Back Tool workspace. The following options are available:
Connection Settings
Connection Settings contains Settings and Properties tabs for JNDI Initial Context.
The Properties tab is optional and allows you to specify additional properties to be passed to the JNDI javax.naming.InitalContext constructor (in addition to the Provider URL and Initial Context factory properties that are specified in the Settings tab). Property values, which can be added by clicking Add and completing the Add JMS Property dialog, can be set to a fixed value, a parameterized value, a scripted value, or a unique value (an automatically generated, random, unique value; no two test invocations will use the same value).
The Settings tab contains the following:
- If you created a Shared Property for JMS Connections, a menu will be available from which you can choose Use Local Settings or Use Shared Property.
- If you select Use Shared Property, a second menu appears from which you select the desired global JMS settings that the SOAP Client tool will use. For more information on global JMS settings, see Global JMS Connection Properties.
- If you select Use Local Settings, or if no shared property is specified, you can configure the rest of the options for Connection Settings.
- Provider URL: Specifies the value of the property named
javax.naming.Context.PROVIDER_URLpassed to the JNDIjavax.naming.InitialContextconstructor. - Initial Context: Specifies a fully qualified class name string, passed to the JNDI
javax.naming.InitialContextconstructor as a string value for the property namedjavax.naming.Context.INITIAL_CONTEXT_FACTORY. - Connection Factory: Passed to the
lookup()method injavax.naming.InitialContextto create ajavax.jms.QueueConnectionFactoryor ajavax.jms.TopicConnectionFactoryinstance.
In addition to the Settings tab, the Connection Settings also include:
- Queue or Topic Connection Authentication: Allows you to provide a username and password to create a queue connection. Enable Perform Authentication and enter the Username and Password to authenticate the request. If the correct username and password are not used, the request will not be authenticated. The username and password provided here is passed to the
createQueueConnection()method in thejavax.jms.QueueConnectionFactoryclass in order to get an instance ofjavax.jms.QueueConnection.
Queue/Topic
The Queue/Topic settings contain the following options:
- JMS Address: Specifies the queue name (if point to point is used) or topic name (if publish and subscribe is used) for where the message will be sent to.
Messaging Model
Messaging Model options specify how messages are sent between applications. Choose either Point to Point or Publish and Subscribe.
Incoming Message Correlation
The Incoming Message Correlation settings contain the following options:
- When Match incoming JMSCorrelationID with is selected, the term JMSCorrelationID = '[correlationId]' will be appended to the selector expression, where correlationId is retrieved from the JMSCorrelationID property in the Message Properties section. The option becomes enabled only if such a property is added to the Message Properties section. Effectively, this results in the test blocking until a message with the specified correlation id becomes available in the queue (or topic) and it will only retrieve that particular message, rather than retrieving any message in the queue (or topic). The test will timeout after the timeout amount elapses and if there is no message that watches the selector criteria.
- The criteria can be specified with a fixed value, a parameterized value (from a data source), or a scripted value.
- Additional Selector Expression Terms: (Optional) Enter a value to act as a message filter. For tips on specifying a selector, see Using Message Selector Filters.