In this section:
Introduction
Message Responders are tools that determine which response should be sent when a the virtual asset receives a request. Virtual assets can host several several Message Responders. You can configure responders to send specific messages to specific requests based on a set of correlation criteria. You can manually configure different request/response use cases or automate them based on data sources, error conditions, delays, and so forth.
The Virtualize desktop supports a variety of Message Responder types (see Virtualization Tools), but CTP currently supports Literal and Sequence Message Responders. This functionality is intended to provide a fast way to create new Message Responders that can be configured by specifying a literal message or series of literal messages to meet your needs. For more advanced functionality, open the related .pva in the Virtualize Desktop.
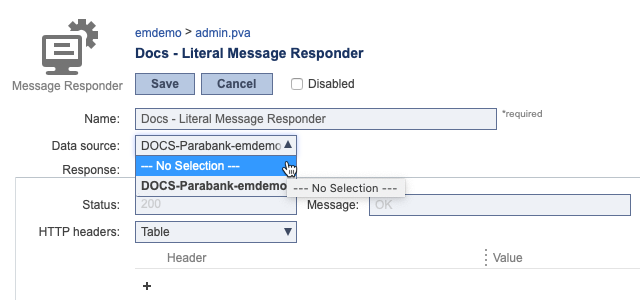
Adding a Message Responder
This section describes how to add a message responder and configure common settings.
- Choose a .pva or responder suite where you want to add the new Message Responder.
- Choose Add Literal Message Responder or Add Sequence Message Responder from the action menu.

- (Optional) Modify the name of the newly-created tool.
- (Optional) If the virtual asset is associated with multiple data sources, choose the data source you to use for your responses from the Data source drop-down menu. Data sources has the data used to parameterize the responder. Refer to Parameterizing with Data Source and Data Bank Values for information about data sources.
- (Optional) Configure the response code and message. By default, a
200code andOKmessage are used, but you can click in either field and enter a new message.- The Message field will automatically populate with standard messages when common response codes are entered into the status field.

- You can override the pre-populated message.
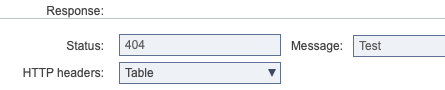
- The default
200status code will be used if the value of the Status field is deleted. The Message field is not required.
- The Message field will automatically populate with standard messages when common response codes are entered into the status field.
- (Optional) Add HTTP headers in the Response area.
- Click Add.
- Specify a header name (this is case insensitive) and value. You can enter values in either table mode or literal mode.
Literal example: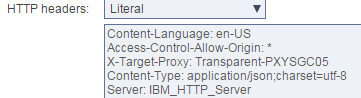
Table example: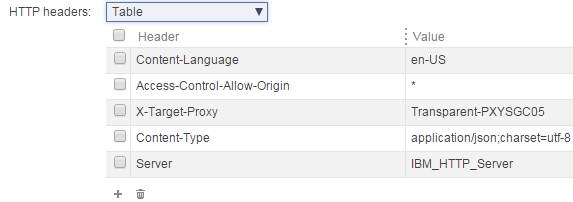
- Choose the payload format, content type, and input mode. See Configuring Literal Message Responders or Configuring Sequence Message Responders for details.
- Configure correlations as described in Configuring Responder Correlations.
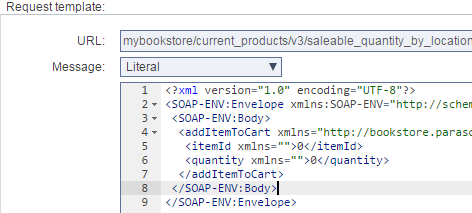
- (Optional) Specify a request message template. This template will be used to automatically populate the expected response when generating XPath parameters in Virtualize (e.g. in the message request XPath dialogs for data source correlation and responder correlation or in the multiple response XPath dialog).
- When a Message Responder is created from traffic logs, the Request Message Template is generated automatically. The largest request message identified in the Traffic Log is used for this purpose.
- When a Message Responder is NOT created from traffic logs, the template will be empty. In this case, you can manually modify the Request Message Template through the Literal Editor or XML Editor (e.g., by copying in a sample request message that correlates with the response message you’re configuring). See Editing XML Messages for details and tips.
- If the request message template is empty, it will be updated when you first select a value from the XPath builder (described in Specifying XPaths).
- The completed Request Message Template is used to populate the views in the Edit XPath Function dialogs available from the Message Responder in Virtualize desktop. The XML Data Bank and XML Transformer output in Virtualize desktop will also use the template if it is attached to the Message Responder as a Request output.
- Save the new tool configuration.
The new responder will be added at the end of the selected responder suite.
Configuring Literal Message Responders
Literal Message Responders are the most common type of responder. They enable quick and easy input of response messages. Each responder responds to incoming request messages that match its Responder Correlation criteria. Responses can be configured in a variety of modes, ranging from simple fixed messages to dynamic parameterized messages using a data source.
- Add a Literal Responder and configure the common settings as described in Adding a Message Responder.
- In the Response section, set the appropriate format. You can choose the following format:
- JSON
- XML
- Form URL Encoded
- Other (choose this option for literal text messages)
- Sequence Responses. If you select Sequence Responses, refer to Configuring Sequence Message Responders for details response configuration and usage details.
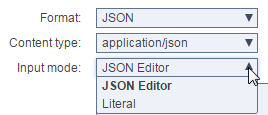
- Choose the media type from the Content type drop-down menu. The available content types are dependent on the selected format.
- Choose an input mode from the Input mode drop-down menu. The available input modes are dependent on the selected content type.
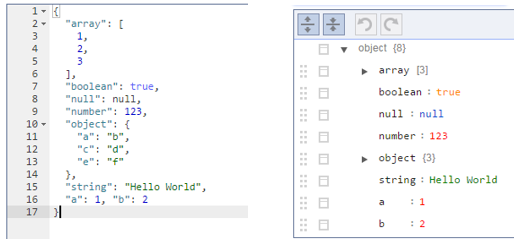
For all formats except Sequence Responses, specify the payload in literal text editor, the JSON editor, or the XML editor (see Editing JSON Messages and Editing XML Messages for details).
Using Variables
If you’re familiar with Virtualize or SOAtest, you can use the standard ${var_name} notation to reference variables and data source values that are defined for the responder suite. Start typing a dollar sign and curly brace (
${) into field and the available variables will appear in a tooltip.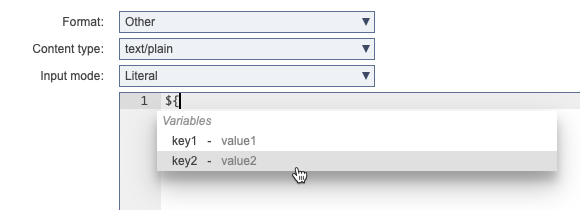
See Working with Variables for additional information.
JSON fields require a special notation for parameterizing a number or boolean field:
${number:<value>}or${boolean:<value>}For example, to parameterize a number field with the column Count, you would use
${number:Count}.(Optional) Specify a request URL template. Enter a URL that is typical/representative of the URLs that the application under test would serve (and the responder should simulate). If the responder is created through the traffic wizard, this field will be populated with the URL from one of the requests in the traffic corresponding to this responder.
The value specified here will be used to configure URL Paths and URL Parameters correlation settings for responder correlations and data source correlations.
- Save your changes.
When an incoming request matches the correlation criteria configured for the responder, the CTP will send the configured response in the format specified.
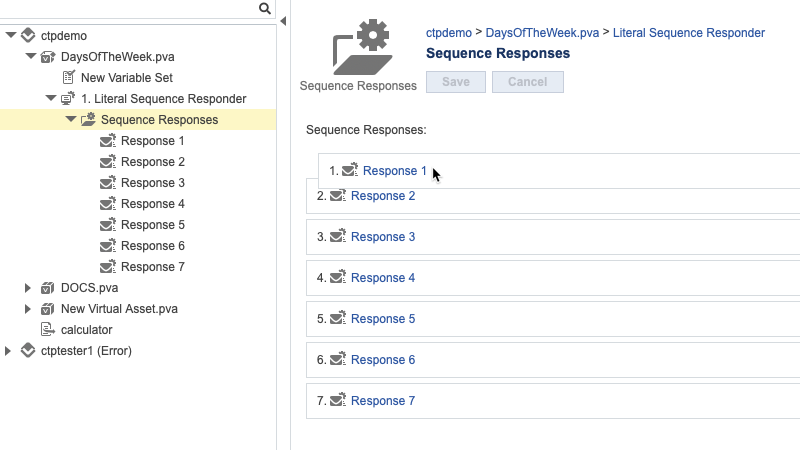
Configuring Sequence Message Responders
Sequence Responder enables you to configure a sequence of literal response messages. An individual message is sent each time the responder is invoked starting with the first message in the configuration. By default, the responder loops back to the first message once all the message responses have been served. Each Message Responder responds to incoming request messages that match its Responder Correlation criteria. Responses can be configured in a variety of modes, ranging from simple fixed messages to dynamic parameterized messages using a data source.
- Add a Sequence Message Responder and configure the common settings as described in Adding a Message Responder.
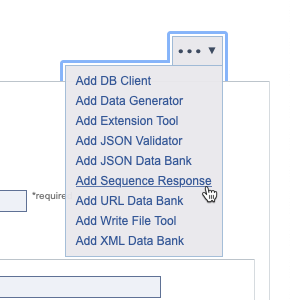
- Choose Add Sequence Response from the actions menu.
- Specify a name for the response and configure the response message. Responses inherit responder status and transport headers from the parent responder, but you can enable the Override responder status and Override responder transport header options to specify different values (see steps 5 and 6 in #Adding a Message Responder for additional information.
Choose a message format for the response. You can choose the following format:
- JSON
- XML
- Form URL Encoded
- Other (choose this option for literal text messages)
- Choose the media type from the Content type drop-down menu. The available content types are dependent on the selected format.
- Choose an input mode from the Input mode drop-down menu. The available input modes are dependent on the selected content type.
Specify the response payload in the editor, the JSON editor, or the XML editor (see Editing JSON Messages and Editing XML Messages for details).
Using Variables
If you’re familiar with Virtualize or SOAtest, you can use the standard ${var_name} notation to reference variables and data source values that are defined for the responder suite. Start typing a dollar sign and curly brace (
${) into field and the available variables will appear in a tooltip.See Working with Variables for additional information.
JSON fields require a special notation for parameterizing a number or boolean field:
${number:<value>}or${boolean:<value>}For example, to parameterize a number field with the column Count, you would use
${number:Count}.Click Save to add the response.
- Repeat steps 2-8 until you've created all responses required for your scenario.
- After adding all responses, you can click on the parent folder and click and drag the responses to change their order if necessary.
- Save your changes.
When consecutive requests that match the correlation criteria are sent to the PVA, CTP will send the responses in the order specified starting with the first response. Sequence Responders retain their state, so whichever response is next in the configuration will be sent whenever the PVA is hit with the next request. You can reset the state by making any change and saving the asset to redeploy it.