In this section:
About the Plugin
The Environment Manager Test Type allows you to perform Environment Manager provisioning actions from within HP Quality Center. This test type can be included in a test plan to perform Environment Manager provisioning actions, such as:
- Setting up your testing environment prior to testing
- Performing environment maintenance for the Application Under Test during testing
- Tearing down your testing environment to free up limited resources when testing completes
Server-side Installation
The plugin can be installed on the following versions of HP ALM Quality Center.
Quality Center 11
Extract the contents of environment_mananger_test_type.zip to the <HP Deployment Location>\application\20qcbin.war folder. Refer to the HP ALM Installation Guide for the HP Deployment Location.
Windows Server 2003 Installation
The installation directory for on Windows Server 2003 is C:\Documents and Settings\All Users\Application Data\HP\ALM
- Run the HP Server Deployment Wizard, which redeploys Quality Center with the necessary test type updates.
- Using Internet Explorer with Administrator privileges, log into Quality Center as Site Administration.
- Choose Tools> Update Test Types to make the custom test type available for use in the active projects.
- Log out of Quality Center.
Quality Center 10
- Create a temporary scratch directory on the Quality Center server machine. You can create the scratch directory in the Quality Center application directory (for example, C:\Program Files\HP\Quality Center\application\my_scratch_files).
- Open Quality Center’s jboss\server\default\deploy directory and copy the 20qcbin.war file to your scratch directory.
- Unzip environment_manager_test_type.zip into your scratch directory. Two folders are created: CustomTestTypes and Extensions.
- Update 20wcbin.war with CustomTestTypes and Extensions. You can do this using the jar command from the Java JDK. For example:
jar uvf 20qcbin.war CustomTestTypes Extensions
Because war files use the zip file format, a zip application could also be used to update 20qcbin.war. - Make a backup copy of the original 20qcbin.war file in the jboss\server\default\deploy directory. You could make a copy the original file rename it to 20qcbin.war.bak.
- Copy the new 20qcbin.war file from your scratch directory to the jboss\server\default\deploy directory.
- Restart Quality Center. In most cases, you could the Windows Services console to restart Quality Center (i.e., Start> Administrative Tools> Services).
- Add Parasoft Environment Manager to the list of test type options.
- Open a browser and enter the URL http://<server:port>/qcbin/start_a.htm
- Click the HP Quality Center link and log into Quality Center.
- Choose Tools> Customize and click Project Entities.
- Expand Test> System Fields.
- Choose Type and click Goto List.
- Click New Item and enter Parasoft Environment Manager for the item name.
- Click OK and close the Project Lists box.
- Click Save and log out of Quality Center.
Client-side Installation
The Microsoft Visual C++ 2008 SP1 Redistributable Package (x86) must be installed on any client machines that you want to use the Parasoft Environment Manager test type. The Parasoft Environment Manager test type will not function without the Visual C++ libraries from Microsoft. You can download the installer from the Microsoft Download Center at http://www.microsoft.com/en-us/download/details.aspx?id=5582.
Additionally, each client machine should be configured to permit Parasoft software to execute.
- Re-register each client that uses QC:
- Run Internet Explorer with Administrator privileges.
- Navigate to http://<HP QC server>:<HP QC port>/qcbin/start_a.jsp?common=true
Install Parasoft-branded add-ins when prompted.
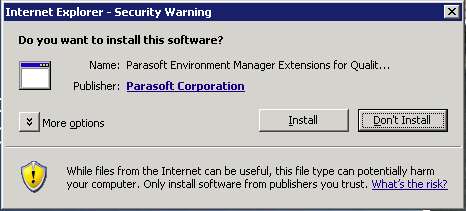
Responding to Security Warnings
If the dialogs ask whether to run software from Parasoft, choose the Always run software from Parasoft Corporation option. If the dialogs refer to "unknown publisher" instead of "Parasoft Corporation"
- Close Internet Explorer and install the Thawte Code Signing Intermediate CA: https://search.thawte.com/support/ssl-digital-certificates/index?page=content&actp=CROSSLINK&id=AR1493
- Restart Internet Explorer and log in again.
- Close the browser after client registration is complete.
- Open Internet Explorer again and navigate to the client login (http://<server:port>/qcbin/start_a.htm).
- Click the HP Quality Center link. Internet Explorer will open several Security Warning dialogs.
Respond to the dialogs as described in the above box.
Clicking Run without enabling the Always run software from Parasoft Corporation option is sufficient to enable the integration—but Internet Explorer will continue to open these security warning dialogs every time that you log in to Quality Center.
Using the Environment Manager Test Type
Quality Center 11
- Log into Quality Center and choose the Test Plan module. The Test Plan module allows you to set up your automated test and custom scripts for Quality Center.
- Choose the Test Plan folder for your Environment Manager Test Type instance and click New Test from the toolbar.
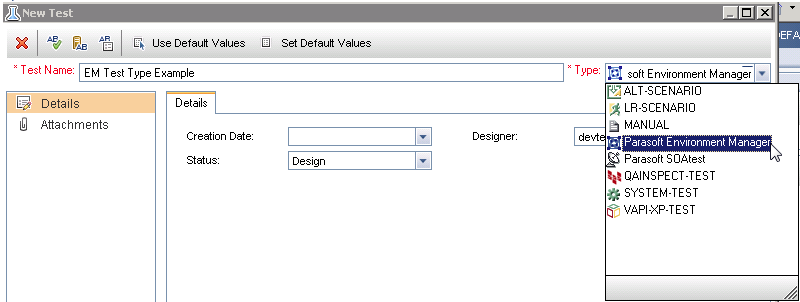
- Enter a name for the test type instance in the Test Name field and choose Parasoft Environment Manager from the Type menu.
- Configure the remaining optional fields and click OK.
- Navigate to the Test Script tab and modify the controls (see Available Controls) to perform the desired provisioning action.

- Click Save.
- Navigate to the Test Lab module and add the test to the desired Test Set.
Quality Center 10
Log into Quality Center and choose the Test Plan module. The Test Plan module allows you to set up your automated test and custom scripts for Quality Center.
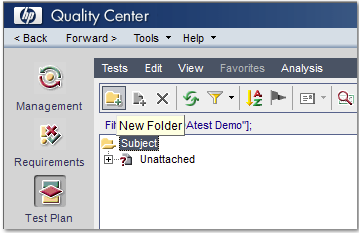
- In the Test Plan tree, choose Subject and click New Folder in the toolbar.
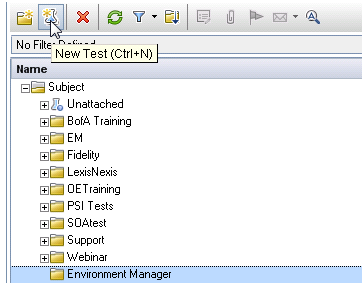
- Enter a name for the folder and click the New Test icon in the toolbar.
- Choose Parasoft Environment Manager from the Test Type drop-down menu.
- Enter a name in the Test Name field and click OK.
- Choose the new test and open the Test Script tab.
- Modify the test using the available controls (outlined below).
Available Controls
Protocol | Specifies the web protocol used when making requests to Environment Manager (Disabled). |
|---|---|
Host | Specifies the Environment Manager host. |
Port | Specifies the Environment Manager port. |
Username | Specifies the username to use when authenticating with Environment Manager. |
Password | Specifies the password to use when authenticating with Environment Manager. |
System | Select the Environment Manager system to provision. This list is populated by querying the specified Environment Manager for all available systems. The Environment Manager Connection settings must be configured before this dynamic dropdown is clicked. |
Environment | Specify the Environment that you want to provision. This list is populated by querying the specified Environment Manager for all environments that live in the selected system. The Environment Manager Connection settings must be configured, and a system must be selected before this dynamic dropdown is clicked. |
Instance | Select the environment instance that you want to provision. This list is populated by querying the specified Environment Manager for all environment instances associated with the selected environment. The Environment Manager Connection settings must be configured, and an environment must be selected before this dynamic dropdown is clicked. |
Abort on provisioning failure | If checked, Environment Manager will abort its provisioning action upon any provisioning failures. |
Using the Environment Manager Vapi-XP JavaScript
The Environment Manager Vapi-XP JavaScript is an alternative to using the Environment Manager Test Type in instances where the test type cannot be installed. The Vapi-XP JavaScript works in the same fashion as the test type–a host, port, username, and password must be defined. However, the Environment ID and Environment Instance ID to provision must be manually looked up on Environment Manger and configured in the script as there are no convenient drop down menus to make the selection. Once properly configured the provisioning results are reported exactly as they are in the test type solution.
Finding the IDs
- Open a browser and navigate to Environment Manager (or CTP).
- The ID is visiable in the URL.

- Choose API Documentation from the help link.

- Click on the GET /v2/enviroments/{environementId}/instances operation and enter the ID.
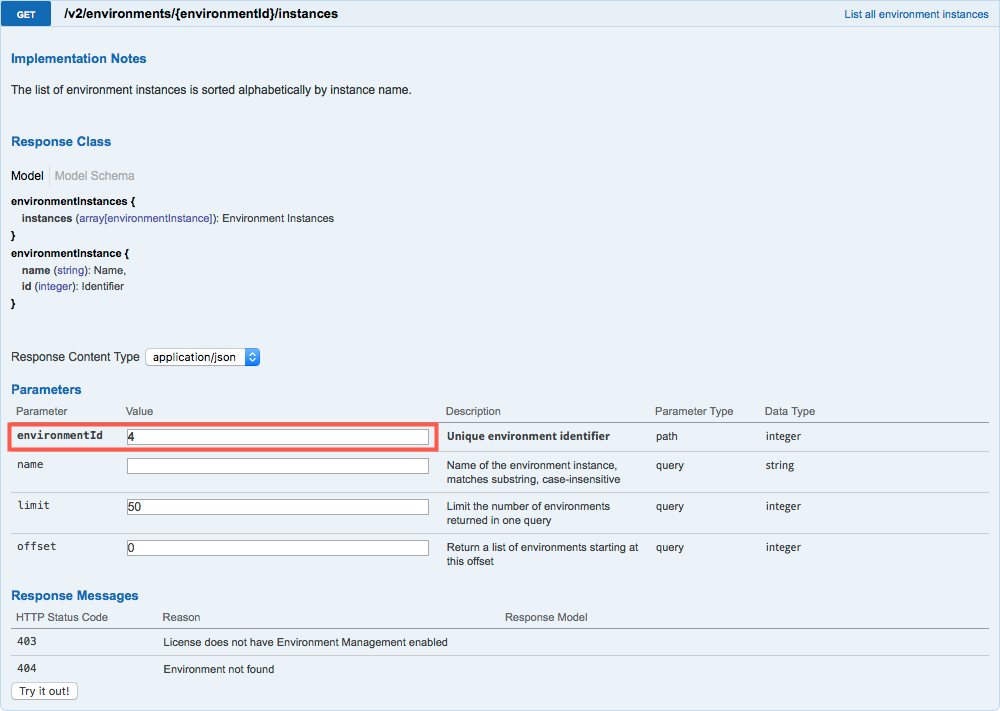
- Click Try it out! and find the instance ID you want to provision in the response.

Configuring the Vapi-XP Test
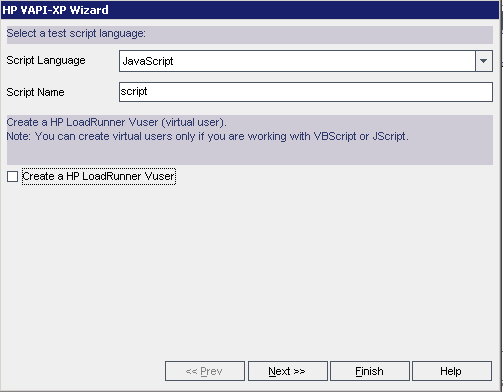
- Create a new Vapi-XP Test in HP ALM QC and set the Script Language to JavaScript.
- Enter a Script Name and click Next >>
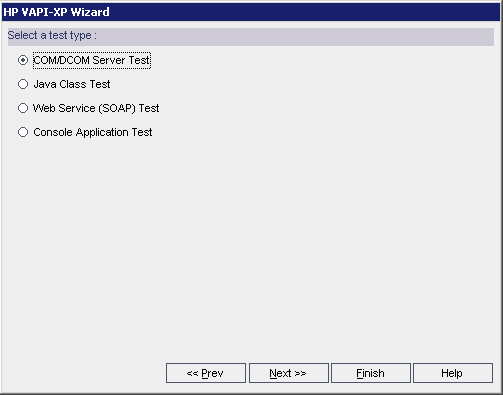
- Enable the COM/DCOM Server Test option and click Finish.
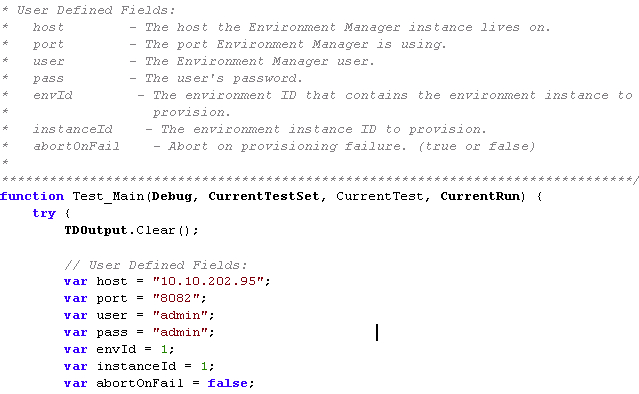
- Copy the contents of EnvironmentManager-VAPI.js contained in the ZIP distribution into the Test Script editor.
- Configure the User Defined Fields with the Environment Manager credentials and the IDs collected previously.
- Save the test script and add it to the desired Test Set in the Test Lab.