After adding a data source to a test suite, the data source values can be used in conjunction with SOAtest tools to further extend the functionality of the test suite. Data sources can be used to parameterize values in tools such as SOAP Client, Messaging Client, Browser Playback Tool, DB Tool, Diff Tool, and so on. The SOAP Client and Messaging Client tools can be configured to send data source values as part of a request to the server. The Diff tool can then be configured to compare the responses to another set of values in the data source.
For example, consider the functional testing of a service that receives the names of U.S. capital cities and returns the names of corresponding states. In this case, a data source with two columns of differing values—the first column containing cities as values, and the second column containing states as values—would be added to the test suite. The SOAP Client tool could be configured to send requests that draw inputs from the first column. The Diff tool would then be configured to compare the actual responses to the inputs in the second column. Using the SOAP Client and Diff tools in this way is a very powerful option in functional testing since each value in each row of the data source would be cycled through and checked.
Understanding Data Source Iteration
It is important to understand how the test Execution Options will affect Data Source iteration. For more information on Test Execution settings, see Specifying Execution Options (Test Flow Logic, Regression Options, etc.). The following Execution Options will affect Data Source Iteration:
- Individually Runnable: When Individually Runnable is selected in the Execution Options of a test suite, each test in the test suite will iterate through every row of the data source before moving on to the next test.
- Scenario: When Individually Runnable is not selected, every test in the test suite will execute before iterating to the next data source row.
For example, if a Test Suite contains Test A and Test B that both use a Data Source with three rows, the following execution patterns would occur:
- Individually Runnable: Test A: Row 1, Test A: Row 2, Test A: Row 3, Test B: Row 1, Test B: Row 2, Test B: Row 3
- Scenario (Non-Individually Runnable): Test A: Row 1, Test B: Row 1, Test A: Row 2, Test B: Row 2, Test A: Row 3, Test B: Row 3
If an XML Data Bank is used to pass values between test cases in a Test Suite, this will automatically put the Test Suite in "Scenario Mode" regardless of whether Individually Runnable is selected. The Data Source iteration will behave as if Individually Runnable is not selected. For more information on using an XML Data Bank see XML Data Bank.
Configuring the SOAP Client and Diff Tools to Use Data Sources
To configure the SOAP Client and Diff tools to send and compare data source values:
- If you have not already done so, add the data sources you want to use as described in Adding a Data Source.
- Double-click the desired SOAP Client node in the Test Case Explorer and choose the appropriate data source from the Data Source combo box in the right GUI panel.
- The Data Source combo box will not display unless a data source was previously added to the test suite. If there is only one data source available, the SOAP Client tool will default to that data source. If there is more than one data source available, the SOAP Client tool will default to the first data source listed in the Tests tab.
- Complete the rest of the fields in the Project Configuration panel for the SOAP Client node as explained in SOAP Client.
- Select the SOAP Client node and click the Add Test or Output toolbar button. An Add Output wizard displays.
- From the Add Output wizard, select Request> SOAP Envelope from the left pane, and select Diff from the right pane and click Finish. A Diff node is added to the SOAP Client Node.
- Double-click the Diff node to open the tool configuration panel.
- Choose the appropriate data source from the Data Source box. The data source you choose must be the same data source specified for the SOAP Client.
- In the Regression control source box, choose Data Source.
- In the Data Source Column box, choose the column from the combo box that you would like the Diff tool to compare responses to.
- Complete the rest of the Diff tool configuration settings as explained in Diff.
You can now perform a functional test by selecting the SOAP Client node and clicking the Test toolbar button. The results will display in the right GUI panel.
Parameterizing Arrays of Varying Size
SOAtest also allows you to map hierarchical data structure in data sources.
Suppose that you have a web service that collects information to construct family trees. The information sent looks like the following:
<ns1:Person> <ns1:Name>GrandPa</ns1:Name> <ns1:Age>85</ns1:Age> <ns1:Child> <ns1:Name>Daddy</ns1:Name> <ns1:Age>55</ns1:Age> <ns1:Child> <ns1:Name>FirstSon</ns1:Name> <ns1:Age>25</ns1:Age> </ns1:Child> <ns1:Child> <ns1:Name>SecondSon</ns1:Name> <ns1:Age>22</ns1:Age> </ns1:Child> </ns1:Child> </ns1:Person> </ns1:People> |
It represents a family tree as follows:
- GrandPa
- Daddy
- FirstSon
- SecondSon
- Daddy
How do you set up an “Array Data Source” that can be used to vary the number of children and grand-children in the XML? First, you setup the data source, then you use it to parameterize the form input as described in the following sections.
Setting up the Data Source
Suppose we want to send family tree information for the following 2 families.
- GrandPa
- Daddy
- FirstSon
- SecondSon
- Daddy
- GrandMa
- Mommy
- FirstDaughter
- SecondDaughter
- FirstAunt
- SecondAunt
- FirstCousin
- SecondCousin
- Mommy
To set up the data source for this scenario:
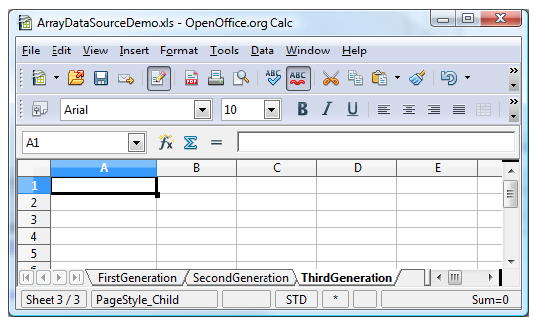
- Create an Excel Spreadsheet with 3 sheets named: FirstGeneration, SecondGeneration, ThirdGeneration.
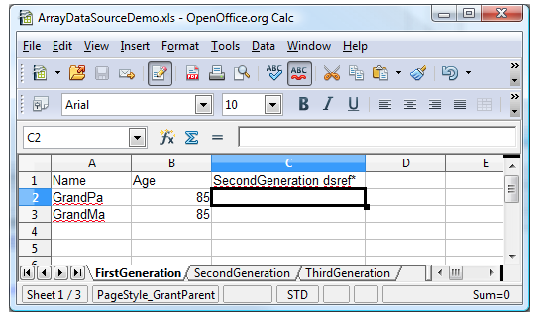
- Fill out the FirstGeneration sheet.
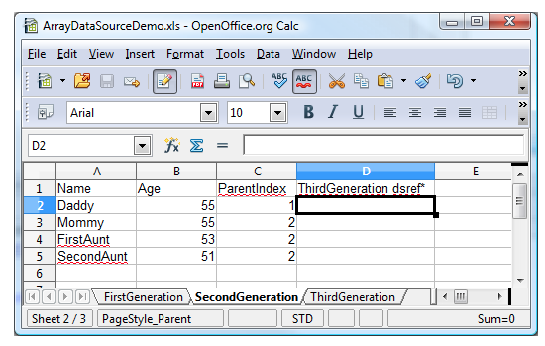
Notice the SecondGeneration dsref* column. This is how we denote that the children of the FirstGeneration will be from the SecondGeneration sheet. (dsref* denotes Data Source REFerence.) - Fill out the SecondGeneration sheet.
Notice the ThirdGeneration dsref* column. Notice also the ParentIndex column. The value of the ParentIndex column indicates which FirstGeneration the SecondGeneration is related to.
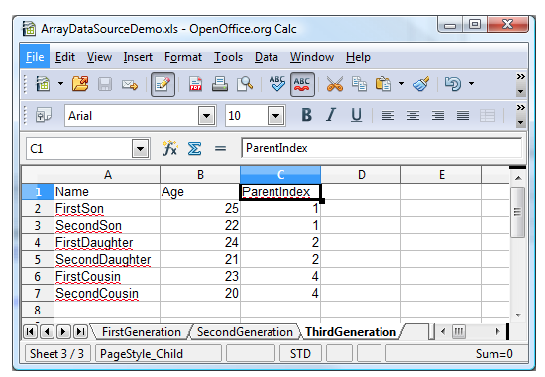
For example, Daddy is related to the first FirstGeneration or GrandPa. Mommy, FirstAunt, and SecondAunt are related to the second FirstGeneration or GrandMa. - Fill out the ThirdGeneration Sheet.
Notice again the ParentIndex column. Notice that there is no ParentIndex 3 because FirstAunt does not have any children.
Parameterizing Form Input
The next step to varying the number of children and grandchildren in the XML is to parameterize the form input as follows:
- Create a new .tst file called
ArrayDataSource.tst. - Add an Excel Data Source that points to the Excel spreadsheet created in previous steps. Select FirstGeneration as the sheet.
- Create a new Messaging Client.
- Configure the Messaging Client as follows:
- Set Schema URL to
http://soatest.parasoft.com/ParentChildGrandChild.xsd - Seе RtouterEndpoint to
http://ws1.parasoft.com:8080/examples/servlets/Echo
- Set Schema URL to
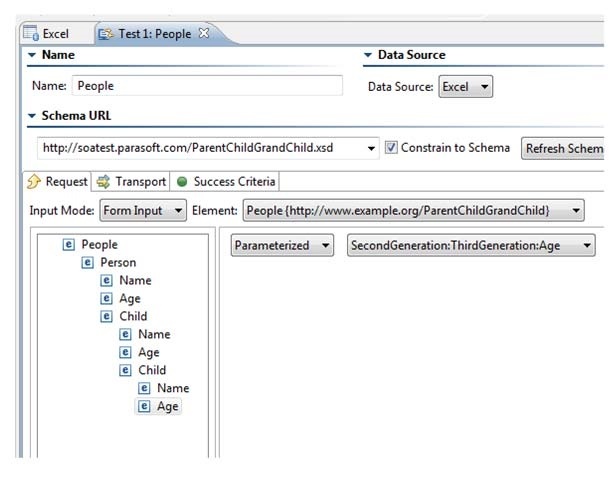
- Set up the Form Input as follows:
People- Person
- Name – Parameterized to: Name
- Age - Parameterized to: Age
- Child
- Name - Parameterized to: SecondGeneration:Name (Name column in SecondGeneration Sheet)
- Age - Parameterized to: SecondGeneration:Age (Age column in SecondGeneration Sheet)
- Child
- Name - Parameterized to: SecondGeneration:ThirdGeneration:Name (Name column in ThirdGeneration Sheet)
- Age - Parameterized to: SecondGeneration:ThirdGeneration:Age (Age column in ThirdGeneration Sheet)
- Person
- Run the test.
In the Traffic Viewer, the XML should reflect the family information in the data source.
