Sections include:
Configuring Actions
To view and modify the action taken by a specific scenario step:
- Double-click the scenario step whose actions you want to configure.
- In the configuration panel that opens in the right side of the GUI, open the User Action tab.
- Review the existing actions (initially, the ones captured during recording) and modify the settings as needed to specify the actions you want performed. You can choose from the available pre-set actions, or define a custom one.
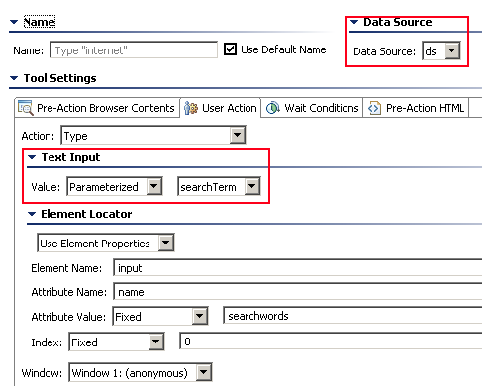
Using Data Sources to Parameterize User Actions
You can use data sources to parameterize user actions—for instance, to have a type action iterate through a set of different values stored in an Excel spreadsheet.
Identifying Elements Associated with User Actions
The element that is the source of a user action will be highlighted with a solid blue border in the scenario step’s Pre-Action Browser Contents tab.
Changing the Target of a User Action
To quickly change the target of a user action, right-click the related element in the Pre-Action Browser Contents tab, then choose the appropriate Modify command.

If the user action that you want to change is not associated with a specific element (for instance, a "close" or "navigate" action), you can right-click anywhere in the Pre-Action Browser Contents tab, then choose Change User Action.
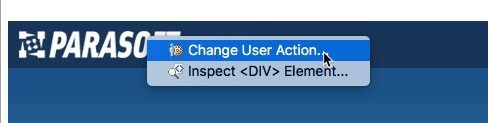
This opens the User Action tab, which allows you to modify the target.

Inspecting the HTML for Elements
As you create and modify user actions for page elements, you may want to inspect the HTML to determine if you are adding actions to the appropriate elements.
To see the HTML for a given element by right-click that element, then choose Inspect <Element> from the shortcut menu.

Common Configuration Controls
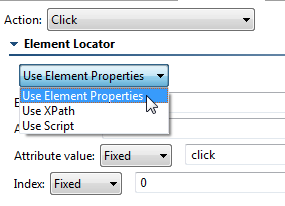
The configuration section for many preset user actions contains an "Element Locator" section. This section allows you to specify the element associated with the action via element properties, XPath, or script.
Use XPath allows you to enter an XPath to be used as an identifier.
Use Script allows you to enter a script that defines the desired user action.
Use Element Properties allows you to specify properties via the following controls:
- Element: Specifies the element name (for example, "img", "div", or "a") that the action should apply to. To allow any element, enter "Any" into this field.
- Attribute Name: Specifies the attribute name to identify the element (for example, "title", "id", or "name"). You can configure this value using one of the following mechanisms.
- Attribute Value: Specifies the expected value for the attribute supplied by the Attribute Name field.
- If you want to specify a fixed value, select the Fixed option, then specify the desired value in the text box.
- If you want to use values defined in a data source, select the Parameterized option, then specify the data source column that contains the values you want to use. Note that this option is only available if the project contains at least one data source.
- If you want to use the return value of a custom method, select the Script option. Click the Edit button to create or edit the method(s) and choose the desired method for use from the Method drop-down menu in the popup dialog. If there are two or more methods, you can also select a different method for use from the drop-down menu in the form panel.
- Index: Specifies the element that matches the previous criteria. Entering "0" means that the first element that matches the "Element," "Attribute Name," and "Attribute Value" criteria will be used. Entering "1" means that the second element that matches will be used, and so on.
- If you want to specify a fixed value, select the Fixed option, then specify the desired value in the text box.
- If you want to use values defined in a data source, select the Parameterized option, then specify the data source column that contains the values you want to use. Note that this option is only available if the project contains at least one data source.
- If you want to use the return value of a custom method, select the Script option. Click the Edit button to create or edit the method(s) and choose the desired method for use from the Method drop-down menu in the popup dialog. If there are two or more methods, you can also select a different method for use from the drop-down menu in the form panel.
Also, note that many actions allow you to configure Window Name. This allows you to specify the name of the window you would like the action to occur in. Leaving this field blank indicates that the default window will be used.