This topic explains configuration options for using HTTP 1.0 with selected supporting tools and provisioning action tools.Sections include:
Configuring HTTP 1.0 Settings
When selecting HTTP 1.0 as the transport protocol, you can specify whether you want the client’s requests to use Keep-Alive connections (required for NTLM and Digest HTTP authentication). It will also be reused for a single invocation of a test suite from the GUI or the command line. You will be able to add, modify, and remove custom HTTP headers to the SOAP request from within the Transport tab of an appropriate tool.
After selecting HTTP 1.0 from the Transport drop-down menu within the Transport tab of an appropriate tool, the following options display in the left pane of the Transport tab:General
General page options include:
- SOAP Action: Specifies how the server processes the request. This field is disabled if the Constrain to WSDL check box is selected. For SOAP Client only
Method: Specifies which method is used to processes the request. This field is disabled if the Constrain to WSDL check box is selected. The method to invoke can be specified as a fixed value, parameterized value, or scripted value. For details about parameterizing values,
see Parameterizing Tests with Data Sources, Variables, or Values from Other Tests and Parameterizing Tools with Data Source Values, Variables, and Extracted Values.
With fixed values, you can access data source values using ${var_name} syntax. You can also use the environment variables that you have specified. For details about environments, see Configuring Testing in Different Environments and Configuring Virtualize Environments.
For details about scripting values, see Extensibility and Scripting Basics.Message Exchange Pattern: Expect Synchronous Response: Specifies whether a response body is expected. An HTTP response header is always expected. If this option is not selected, then the product sends a one-way message and waits for a notification header (typically "HTTP/1.0 202 Accepted").
- Connection Settings: Specifies Keep-Alive or Close connections for the transport protocol selected.
- Keep-Alive connection: Adds a "Connection: Keep-Alive" header to request a keep-alive connection if the server supports it. This is required for NTLM and Digest HTTP authentication.
- Close connection (default): Outputs no additional HTTP headers and performs a regular HTTP 1.0 exchange. This is the default behavior for HTTP 1.0.
- Redirect Settings (for messaging clients only—e.g., REST, SOAP, Messaging, EDI clients): Specifies whether to automatically follow HTTP redirects. Disable this option if you want to perform an action or validation on the original request/response traffic (instead of working only with the final request/response pair).
- Compression Settings (for messaging clients only—e.g., REST, SOAP, Messaging, EDI clients): Specifies whether to compress requests and decompress responses.
- Gzip request payload: Gzips the request payloads being sent over the network. Data sent to attached tools will not be compressed. Note that compression does not apply to SOAP Clients configured to send attachments or in MTOM mode.
- Decompress gzip-encoded response payload: Decompresses response payloads that have "Content-Encoding: gzip" as a header field. Attached tools will receive the uncompressed data.
URL Parameters
URL Parameters page options include:
- URL Parameters: Allows you to add parameters to the URL for a GET request. After clicking the Add button, you can specify Parameters/Value pairs in the dialog that opens. If a data source is available, you can parameterize the values as well.
Security
Security> Client side SSL page options include:
- Use Client Key Store: Specifies the key store used to complete the handshake with the server.
Security> HTTP Authentication page options include:
- Perform Authentication: To set up basic, NTLM, Digest, or Kerberos authentication, select the Perform Authentication check box, then select Basic, NTLM, Kerberos, or Digest from the Type drop-down list.
- For Basic, NTLM, or Digest, enter the Username and Password to authenticate the request.
- For Kerberos, enter the Service Principal to authenticate the request. If the correct username and password, or the correct service principal, are not used, the request will not be authenticated.
- Use Global Preferences: Alternatively, you can select Use Global Preferences if you have set Global HTTP Authentication Properties within the Security Preferences. For more information, see Security Settings.
Security> OAuth Authentication page options include:
- Perform Authentication: Enabling this option indicates that OAuth Authentication should be performed. An Authentication field containing OAuth specific information will be added to the HTTP Header.
- Consumer Key and Secret Configuration: The Consumer Key and Consumer Secret are the credentials that the client uses to validate itself with the server. The Consumer Key is unique to each client using it. Both of these are required at all steps.
- OAuth Authentication Mode: Specifies what step of the OAuth Scenario you'd like to perform.
- Obtain Request Token: Requests the Request Token from the server using the Consumer Key and Secret.
- Scope: Restricts what information may be accessed. This information in embedded into the Consumer Key.
- Exchange Request Token for Access Token: Exchanges the Request Token plus the verification code for the Access Token.
- Request Token: Specifies Temporary Request Token credentials obtained from the server (used to exchange for the Access Token).
- Request Token Secret: Specifies Temporary Request Token credentials obtained from the server (used to exchange for the Access Token).
- Verification Code: Specifies the verification code provided by the server; this confirms that the resource owner will grant permission.
- Sign Request for OAuth Authentication: Uses the specified Access Token and Access Token Secret to give the client access to the user's private resources.
- OAuth Parameters: Allows you to specify additional parameters on the OAuth Token— for example, the timestamp and nonce.
For details on using OAuth authorization, see Using OAuth Authentication.
HTTP Headers page options include:
- Add: Click to add a custom HTTP header. The header name is case insensitive.
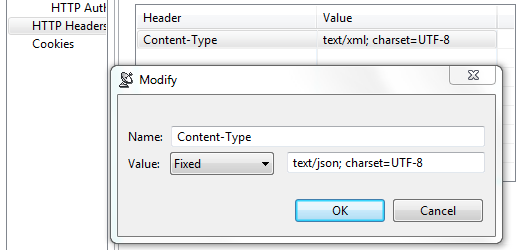
- Modify: Click to modify the selected HTTP header. A dialog box will display, allowing you to modify the Name and Value of the header. If the tool is using a data source, values for the header can be accessed from the data source.
- Remove: Click to delete the selected HTTP header.
These controls are used to override header fields. For example, you can override the Content-Type header field by specifying the desired name and value via these controls.
The following header fields, which are added by default, can be overridden via these UI controls.
Host
The value will contain the host name and port number from the HTTP endpoint or resource URL.
Content-Type
The media type of the outgoing message. This header is only sent if the outgoing message contains a body which is controlled by the HTTP method. A body is sent for POST, PUT, and DELETE methods and not for GET, OPTIONS, HEAD, or TRACE.
The default value is determined based on the type of message being sent. The content-type of an SOAP message will vary depending on the SOAP version, "text/xml" for SOAP 1.1 or "application/soap+xml" for SOAP 1.2. Other XML messages will use "text/xml" by default. JSON messages will use "application/json". A message configured using the Table view will use "application/x-www-form-urlencoded". A message sent with MIME attachments will contain a "multipart" content-type with "start" and "boundary" parameters. Messages belonging to EDI, Fixed Length, CSV, or Custom message formats will have the media type for the message format.

Content-Length
The size of the outgoing message in bytes.
The following HTTP headers are configured conditionally. They are configured outside of this table or have values that must be dynamically generated.
SOAPAction
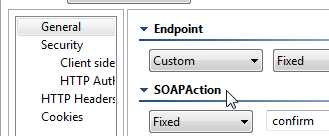
This HTTP header is sent for SOAP 1.1 only. It is set in the SOAPAction field of the General page
Authorization
This header is constructed automatically based on the HTTP Authentication and OAuth settings specified in your preferences (under Security> HTTP Authentication and OAuth). The value for NTLM, Digest, and Kerberos authentication will vary depending on various factors, including dynamically-generated challenge responses and security tokens.
Connection
This header is added to the message with value of Keep-Alive if Keep-Alive connection is enabled. This header is not sent if Close connection is enabled (this is the default). Keep-Alive must be enabled for NTLM and Digest HTTP authentication.
Proxy-Authorization
This header is constructed based on the Proxy Authentication settings in the preferences and whether the server indicated that proxy authentication is required.
Cookies
Cookies page options include:
- Reset existing cookies before sending request: Allows you to clear the current cookies so that next HTTP invocations start a new session.
Using OAuth Authentication
Parasoft supports both OAuth 1.0a and 2.0 security protocols for Web Server Flow and Client Credentials Flow (2-legged scenario). OAuth Authentication can be configured for HTTP 1.0/HTTP 1.1 transport.
For the REST client, it is configured under the HTTP Options tab. For the Messaging Client, it is configured under the Transport tab.
About OAuth
OAuth (Open Authorization) is an authentication protocol that provides users a method to grant third-party applications access to their private resources without revealing login credentials. It also provides a way to restrict the amount of information that can be accessed. This protocol was implemented to handle the problem of exposing login credentials to third-party applications.
OAuth is based on the traditional client-server authentication model, but introduces a third role to this model: the user (also known as the resource owner). In the traditional client-server authentication model, the client directly accesses resources hosted by the server. In the OAuth model, the client must first obtain permission from the resource owner before accessing resources from the server. This permission is expressed in the form of a token and matching shared-secret key.
For example, assume that a user (resource owner) wants to grant a printing service (client) access to his private photos stored at a photo sharing service (server). Instead of revealing the user's login credentials to the printing service, the user can perform OAuth authentication to grant the printing service permission to access his private photos.
This would happen in three stages:
- The printing service requests temporary credentials from the photo sharing service.
- Once the printing service receives the credentials, it redirects the user to the photo sharing service's OAuth Authorization URL, then the user provides login credentials. Note that the printing service has no visibility into the user's login credentials at this step. Once the user decides to give the printing service access to the private photos, a confirmation verification code is generated.
- The printing service then exchanges the temporary credentials plus the verification code for an access token. Once the printing service has the access token, they can then obtain and print the user's private pictures from the photo sharing service.
Using OAuth 1.0a
Using OAuth 1.0a involves the following general steps:
- Obtain and authorize a request token from the service provider
- Exchange the request token for an access token
- Sign OAuth requests to access protected resources
The following example uses the REST Client to send request messages to the server. Note that the Messaging Client can use OAuth 1.0a in the same manner.
Obtain and authorize a request token from the service provider
- Create a new REST Client and configure the settings for the location where the Request Token will be obtained.
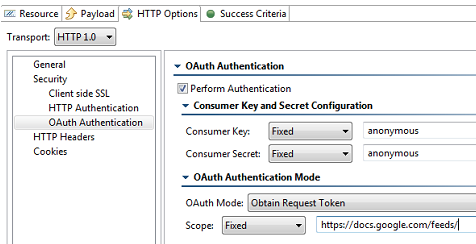
- Under the HTTP Options tab, select either HTTP 1.0 or HTTP 1.1, and enable OAuth Authentication by checking Perform Authentication. This will enable the other fields necessary to complete the OAuth Authentication.
- Under Consumer Key and Consumer Secret, add the key and secret
- Select Obtain Request Token for the OAuth Mode.
- (Optional) Provide a scope in the Scope field.
- (Optional) Add additional OAuth parameters under OAuth Parameters.
- Attach a Text Data Bank to the Response Traffic of the REST Client and extract the Request Token, usually denoted as oauth_token, and the Request Token Secret.

- Create a new Web browser recording. Under the Start Recording From field, enter the URL to obtain the verification code (the step where the user is redirected to provide login credentials to the server). The URL should take in an oauth_token parameter; use the value of the Request Token obtained in the previous step.
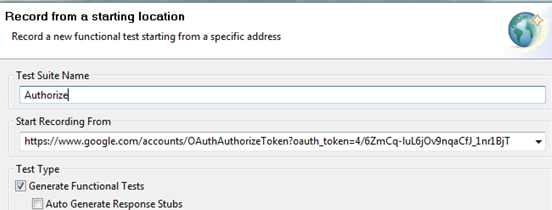
Once the browser launches, it will display the login page of the server that is hosting the protected resource. - Sign-in by providing the user's login credentials (Username/Password). Once authorized, the browser will redirect you to a new page with a verification code.
- After you see the verification code, exit the recording by closing the browser.
- Attach a Browser Data Bank to the Browser Contents (rendered HTML) and extract the value of the verification code.
- Open the Browser Playback tool and replace the literal Request Token string with the Request Token data source column generated by the Text Data Bank (step #7). Use the ${varName} syntax, as shown below.

Exchange the request token for an access token
- Create a new REST Client and configure the settings for the location where the Request Token should be exchanged for the Access Token.
- Under the HTTP Options tab, select either HTTP 1.0 or HTTP 1.1, and enable OAuth Authentication by checking Perform Authentication. This will enable the other fields necessary to complete the OAuth Authentication.
- Under Consumer Key and Consumer Secret, add the key and secret.
- Select Exchange Request Token for Access Token for the OAuth Mode.
- Parameterize the Request Token and Request Token Secret fields from the Text Data Bank extractions.
- Parameterize the Verification Code field from the Browser Data Bank.
- Attach a Text Data Bank to the Response Traffic of the REST Client and extract the Access Token (usually denoted as oauth_token) and the Access Token Secret (usually denoted as oauth_token_secret).
Sign OAuth requests to access protected resources
- Create a new REST Client and configure the settings for the location where the Access Token should be used to access the private resources.
- Under the HTTP Options tab, select either HTTP 1.0 or HTTP 1.1, and enable OAuth Authentication by checking Perform Authentication. This will enable the other fields necessary to complete the OAuth Authentication.
- Under Consumer Key and Consumer Secret, add the key and secret.
- Select Sign Request for OAuth Authentication for the OAuth Mode.
- Parameterize the Access Token and Access Token Secret fields from the Text Data Bank extraction.
- Request the user's private resources. This should be possible because the Access Token has been obtained.
Using OAuth 2.0
OAuth 2.0 has been significantly simplified in comparison to its predecessor (OAuth 1.0a). Since OAuth 2.0 is a completely new protocol, it is not backwards compatible with OAuth 1.0a. However, it does share the same the overall architecture and approach to providing users a method to grant third-party applications access to private resources without revealing login credentials.
To learn more about the changes being introduced in OAuth 2.0, see the working draft at http://tools.ietf.org/html/draft-ietf-oauth-v2-20.
Using OAuth 2.0 involves the following general steps:
- Request authorization
- Obtain access token
- Access protected resources
The following example uses the REST Client to send request messages to the server. Note that the Messaging Client can use OAuth 2.0 in the same manner.
Request authorization
- Create a Web browser recording by entering the desired URL under the Start Recording From field and specifying the OAuth URL parameters. Once authorized, the Service Provider will redirect you to the callback URL with a code as part of a URL parameter.
- Close the browser to complete the recording.
- Extract the code by creating a Text Data Bank on the Request -> Validate Header. Be sure to choose the browser data from the HTTP Traffic, then select the redirected URL containing the code.

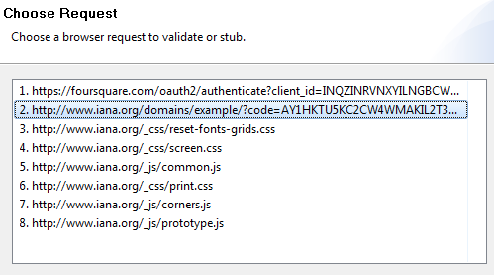

Obtain access token
- Create a new REST Client and provide the URL with the necessary parameters. One of the URL parameters should be called
code. This value should be parameterized against the Text Data Bank extraction from the previous step.
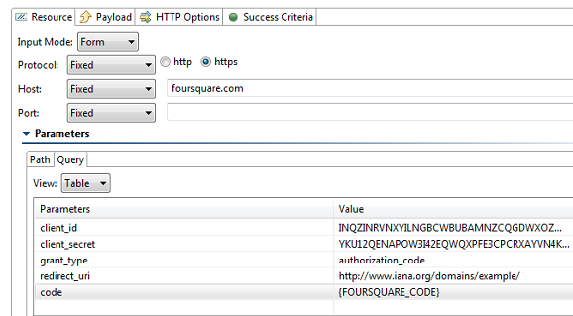
- Depending on the Response format, attach the appropriate Data Bank (i.e. Text, JSON) to the REST client and extract the Access Token.
Access protected resources
- For every REST API call, create a new REST Client and provide it the desired URL with the necessary URL parameters. One of the URL parameter should be called oauth_token and will have the value of the Access Token extracted in the previous test step.
