This topic explains how to generate JUnit tests that represent the actions recorded in a web browser.
Sections include:
About JUnit Test Generation
SOAtest can generate JUnit tests that represent a new or previously-recorded web scenario. You can set up a functional test against a Web application, then use the generated JUnit test cases to validate test results using the JUnit framework. This gives you the flexibility of a test script and the easy-to-use interface of SOAtest—without having to learn a new test scripting language.
The resulting class files are JUnit based and depend on the following jar files.
From <Parasoft Test install dir>/plugins/com.parasoft.xtest.libs_<version>:
- grtlogger.jar
From <Parasoft Test install dir>/plugins/com.parasoft.xtest.libs_<version>/Parasoft:
- application_api.jar
- autoconf.jar
- common.jar
- lic_client.jar
- preference_api.jar
- util.jar
From <Parasoft Test install dir>/plugins/com.parasoft.xtest.libs.base_<version>:
- bcprov.jar
- commons-collections.jar
- commons-httpclient.jar
- commons-logging.jar
- mail.jar
- xercesImpl.jar
From <Parasoft Test install dir>/plugins/com.parasoft.xtest.libs.base_<version>/Parasoft:
- logging_api.jar
From <Parasoft SOAtest install dir>/eclipse/plugins/com.parasoft.xtest.libs.web_<version>/root/lib-java-mod:
- FESI.jar
From <Parasoft SOAtest install dir>/eclipse/plugins/com.parasoft.xtest.libs.web_<version>/root:
- com.parasoft.api.jar
- parasoft.jar
- webking.jar
- wizard.jar
From <Parasoft SOAtest install dir>/eclipse/plugins/com.parasoft.xtest.license.eclipse.core.web_<version>/lib:
- license_web.jar
Prerequisite
Before you start generating JUnit tests, perform this one-time configuration:
- Switch to the Java perspective (choose Window> Open Perspective> Other> Java).
- Create a new project in the workspace and name it
MyJUnitTest. - In the Package Explorer, right-click the new MyJUnitTest project, then choose Properties from the shortcut menu.
- Select Java Build Path, then go to the Libraries tab and click Add External JARs.
- Add to the build path of the project ALL jar files that live in <Parasoft Test install dir>/plugins/com.parasoft.xtest.libs_<version>.
- Add to the build path of the project ALL jar files that live in <Parasoft Test install dir>/plugins/com.parasoft.xtest.libs_<version>/Parasoft.
- Add to the build path of the project ALL jar files that live in <Parasoft Test install dir>/plugins/com.parasoft.xtest.libs.base_<version>.
- Add to the build path of the project ALL jar files that live in <Parasoft Test install dir>/plugins/com.parasoft.xtest.libs.base_<version>/Parasoft.
- Add to the build path of the project ALL jar files that live in <Parasoft SOAtest installation dir>/eclipse/plugins/com.parasoft.xtest.libs.web_<version>/root.
- Add to the build path of the project ALL jar files that live in /eclipse/plugins/com.parasoft.xtest.license.eclipse.core.web_<version>/lib.
- From the Java Build Path> Libraries tab:
- Click Add Library.
- Select JUnit, then click Next.
- Ensure that the JUnit library version is set to JUnit 4, then click Finish.
Generating JUnit Tests from a Scenario as You Record It
To generate JUnit tests from a scenario as you record it:
- Return to the SOAtest perspective.
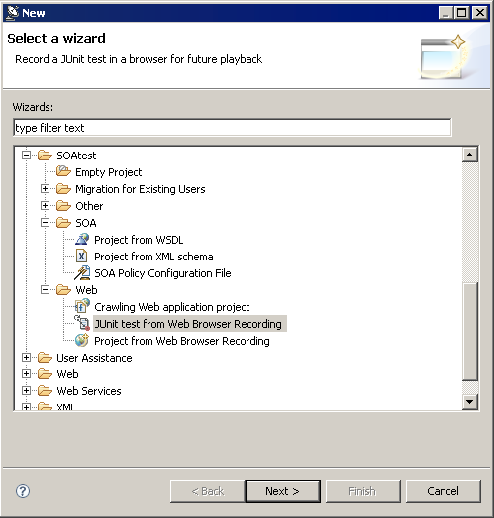
- Open the pull-down menu for the New toolbar button (top left), choose Other, select SOAtest> Web> JUnit test from Web Browser Recording, then click Next.
- Complete the Record and Generate JUnit Test wizard page as follows:
Start Recording From: Enter the URL of the site on which you would like to perform functional testing.
Recording Apps that "Live" on the Same Machine as SOAtest
To record applications that "live" on the same machine as SOAtest, do not use localhost. Instead, use the machine name (e.g., mymachine.parasoft.com) or the IP address (e.g., 10.10.11.11).
- Browser: Specifies which browser you want to record the test.
- Class Name: Enter a class name for the generated JUnit test class (for example,
MyJUnit). - Package Name: This value is optional. If the package name does not correspond to the folder structure dictated by the output location, SOAtest will generate the necessary sub-folders. Enter
MyConvertedUnitTests. - Generate into Output Location Specifies the destination folder for the generated test class file. Enter
${project_loc:MyJUnitTest}/src.
- Click the Finish button. The designated start page will open in the selected browser.
Specify the functionality that you want to capture by following it in the browser(s). You can click links, complete and submit forms, use the navigation bar to enter open URLs, access shortcuts, go forward or back, and so on.
Note
To ensure that recording works properly, you must wait until the page has fully loaded before performing some action. You must wait each time the page or some part of the page gets reloaded before performing an action.
Tip- Completing Forms
To complete forms, enter the values directly into the GUI controls as if you were actually navigating the site. For instance, type in your user name and password, select radio buttons, check or clear check boxes, and so on.
As you record sessions, please note:
- Password recall and auto-completion in Internet Explorer’s (Internet Options Advanced settings) are not supported during recording.
- Google Toolbar's Auto Fill feature is not supported.
- A "type" test may not be recorded if you type the beginning of a term into a field, but then click on a suggestion from a drop down.
6. Close the browser window(s).
A JUnit test class will be added to the specified output location. A new project will not be created or added to the Test Case Explorer.
Generating JUnit Tests from a Previously-Recorded Scenario
To generate JUnit tests that represent a previously-recorded test scenario:
- Return to the SOAtest perspective.
- In the Test Case Explorer, right-click the web scenario that you want to generate JUnit tests for, then choose Generate JUnit Tests from the shortcut menu.
- Complete the Generation Options dialog, then click Finish. Available options are:
- Class Name: Enter a class name for the generated JUnit test class. Enter
MyJUnitfor the class name - Package Name: This value is optional. If the package name does not correspond to the folder structure dictated by the output location, SOAtest will generate the necessary sub-folders. Enter
MyConvertedUnitTests. - Generate into Output Location: Specifies the destination folder for the generated test class file. Enter
${project_loc:MyJUnitTest}/src.
- Class Name: Enter a class name for the generated JUnit test class. Enter
Tip- Managing Multiple Tests
Many users find it convenient to put all tests into the same project. However, you may create multiple projects if you prefer.
Executing the Generated Tests
To execute the generated tests:
- Go to the Java perspective.
- Refresh the MyJUnitTest project. You should see a node representing the generated test.
- Right-click MyJUnit.java and choose Run As> JUnit Test.
You can also execute these tests from the command line as described in the JUnit documentation.
Configuring License Information for JUnit Test Execution
License information is required to run JUnit tests generated by SOAtest. The license information can be set in two ways:
- If you want to use the same license as the local SOAtest installation, simply verify that the license information is configured properly under Parasoft> Preferences> Parasoft> License. The license information will then be detected by WebBrowser from the installation root passed to the constructor, i.e.
<SOAtest install root>/plugins/com.parasoft.xtest.libs.web_<version>/root/. If you want to run the tests from a machine that does not have a local installation of SOAtest—or if you want to use a different license information than one being used for the local SOAtest installation—you can control the licensing information without having to open SOAtest and modify the preferences from the UI. To do this, you pass the license information using the following constructor:
WebBrowser( String installRoot,
	int browserType,
	String ffExePath,
	String licenseServerLocation, int licenseServerPort,
	int licenseServerTimeout )
- If you are using a Parasoft License Server to manage licensing, you must use the above constructor.
Adding Assertion Statements to the Generated Tests
Each JUnit class generated by SOAtest consists of one test function that mimics the test sequence of a SOAtest test. Whenever the server returns a response, the test will make an assignment to the Response object declared within the test function. You should insert assertion statements after these assignments to validate that the response from the server is expected.
We have created comment blocks where we recommend assertion placements within the test function.
For example:
public void testA() throws Exception {
	WebConversation wc = new WebConversation();

	WebRequest req = new GetMethodWebRequest("http://mole/tests/");
	WebResponse resp = wc.getResponse(req);
	//Begin assertions

	//End assertions

	WebLink link = resp.getLinkWith("popup.html");
	link.click();
	resp = wc.getCurrentPage();
	//Begin assertions

	//End assertions

	WebForm form = resp.getFormWithName("childrenForm");
	resp = form.submit();
	//Begin assertions

	//End assertions
}
In the above JUnit test function, the blocks appear each time that the WebResponse object was assigned with a new value.