This topic explains the how you can access and manipulate test case output.
Sections include:
Understanding Outputs
You can have multiple tools perform operations on the result of one tool by adding multiple outputs to the appropriate tool node. Or, you can you can have one output perform an operation on the result of another output by adding an additional output to an existing output node. To specify one or more output(s) for a tool added to a test suite.
Test suite tests based on a SOAP Client tool typically use outputs to operate on the messages that the SOAP Client tool returns.
For example, if you wanted to test whether a certain SOAP remote procedural call always returned the same response for a given input, you might create a SOAP Client tool that sent the specified input, then use a Diff tool to verify the response. You could also use outputs to send the HTTP traffic from this test to the Results window so you could view the traffic.
Or, if you wanted to test whether a Web service returned values in a correct format, you might create a SOAP Client tool, then use a Coding Standards output to apply a set of rules that checked if the output matched a certain required pattern. If it did, you could attach a regression control to the Coding Standards; SOAtest would then alert you if the Web service failed to match that required pattern in subsequent tests.
Or, if you have an Extension tool that retrieves XML-format data, you could customize that tool so that it always sends its output to a RuleWizard rule which verifies whether the data is correct. If you want to apply a transformation tool such as XSLT and would like the transformed source code saved in a file, you need to chain a File Writer tool to the original tool.
You can also use outputs to save the results of file transformations. For example, you could the XSLT tool to transform a set of files, then send the resulting files to a Write File output so that they would be saved.
You can add one output at a time, or add multiple outputs at once (e.g., to rapidly add XML Signer tools to a large number of SOAP Client tools in a test suite).
Adding a Single Output
To add a single output:
- Select the Test Case Explorer tree node that represents the test that you want to add an output for.
- Click the Add Test or Output toolbar button.
- The Add Test wizard opens and displays a list of available tools.
- To learn about a particular tool, select it and review the description that displays.
- (Web tests only) Specify whether you want to use data from the browser contents (rendered HTML) or the original HTTP Traffic, then click Next.
- Browser contents refers to the real-time data model that the browser constructed from all of the HTML, JS, CSS, and other files it loaded. Choose Browser contents if you want to validate values that appear in the browser (i.e., use the final DOM that the browsers construct from the server code). This option allows you to:
- Add a Browser Validation Tool to validate values that appear in the browser.
- Add an Extension Tool for complex validations that require significant scripting.
- Add a Browser Data Bank that extracts a value that appears in the browser .
- HTTP traffic refers to the individual HTTP messages that the browser made in order to construct its data model. Choose HTTP traffic if you want to use the content returned by the server as is (before any browser processing). This option allows you to validate individual http requests/responses.
- Browser contents refers to the real-time data model that the browser constructed from all of the HTML, JS, CSS, and other files it loaded. Choose Browser contents if you want to validate values that appear in the browser (i.e., use the final DOM that the browsers construct from the server code). This option allows you to:
- In the left pane of the Add Output wizard, select the node that specifies the output type (from the original tool) that you want to use as an input for the added output tool.
- In the right pane, select the tool you want to use.
- Click Finish.
- Double-click the node added for that tool, then review and modify settings as needed in the tool configuration panel that opens on the right.
Adding Multiple Outputs
To add multiple outputs:
- Select the appropriate node(s) to indicate where the output should be added. You can select any number of test suites and/or tools.
- Do one of the following:
- Right-click the selection and choose Add Multiple Outputs.
- Click the Add test or output toolbar button.
- Complete the wizard that opens, then click Finish.
- Use the For each drop-down to indicate the tool to which the output should be attached.
- In the panel below the tool name, select the node that specifies the output type (from the original tool) that you want to use as an input for the added output tool.
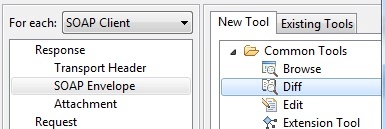
- To add multiple output tools that you can configure independently of one another, select the desired output tool type from the New Tools tab. This will create multiple unique instances of each output tool. If one of those tools is modified, the others will not be impacted.
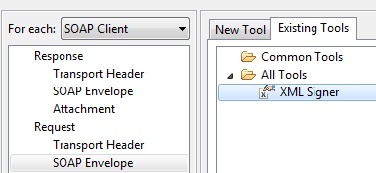
- To apply the exact same tool configuration in all cases, ensure that the output exists as a global tool (discussed in Adding Global Test Suite Properties), then select that global tool from the Existing Tools tab. This will create multiple references to a single global tool. If this global tool is modified, all referenced outputs will be modified.
- To add multiple output tools that you can configure independently of one another, select the desired output tool type from the New Tools tab. This will create multiple unique instances of each output tool. If one of those tools is modified, the others will not be impacted.
SOAP Client Output Options
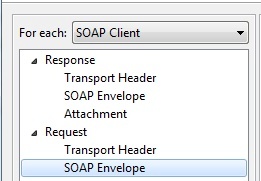
In the left pane of the Add Output wizard are three sub-menus: Response, Request, and Both. In the right pane of the Add Output wizard are New or Existing Output tools that you may select
- Response: Sends the SOAP response to the following choices:
- Transport Header: Allows you to add the desired New/Existing Output tool to the HTTP Header or JMS properties specified as the Transport of the SOAP Client tool.
- SOAP Envelope: Allows you to add the desired New/Existing Output tool to the SOAP envelope:
- Attachment: Allows you to add the Attachment Handler tool as the output.
- Request: Sends the SOAP request to the following choices:
- Transport Header: Allows you to add the desired New/Existing Output tool to the HTTP Header or JMS properties specified as the Transport of the SOAP Client tool.
- SOAP Envelope: Allows you to add the desired New/Existing Output tool to the SOAP envelope:
- Both: Sends both the SOAP response and SOAP request to the following choices:
- Traffic Object: Allows you to add an Extension, Traffic Viewer, or WS-I tool as an output.
- Traffic Stream: Sends the HTTP traffic (SOAP request and SOAP response) to the selected location. Available options include:
- File: Sends the output to a file. If you choose this option, be sure to select the new FileStreamWriter output node, then specify where you want the file written in the control panel that opens. Moreover, if you want to ensure that this file’s path is always relative to your test file, enable the Persist as Relative Path to Test option in that same panel.
- Results: Sends output to the GUI Message panel.
- stderr: Sends standard error to a console window.
- stdout: Sends standard output to a console window.
Messaging Client Output Options
In the left pane of the Add Output wizard are three sub-menus: Response, Request, and Both. In the right pane of the Add Output wizard are New or Existing Output tools that you may select.
- Response: Sends the HTTP response to the following choices:
- Transport Header: Allows you to add the desired New/Existing Output tool to the HTTP Header or JMS properties specified as the Transport of the Messaging Client tool.
- HTTP Response: Allows you to add the desired New/Existing Output tool.
- Request: Sends the HTTP request to the following choices:
- Transport Header: Allows you to add the desired New/Existing Output tool to the HTTP Header or JMS properties specified as the Transport of the SOAP Client tool.
- SOAP Envelope: Allows you to add the desired New/Existing Output tool to the SOAP envelope:
- Both: Sends both the HTTP response and HTTP request to the following choices:
- Traffic Object: Allows you to add an Extension, Traffic Viewer, or WS-I tool as an output.
- Traffic Stream: Sends the HTTP traffic (HTTP request and HTTP response) to the selected location. Available options include:
- File: Sends the output to a file. If you choose this option, be sure to select the new FileStreamWriter output node, then specify where you want the file written in the control panel that opens. Moreover, if you want to ensure that this file’s path is always relative to your test file, enable the Persist as Relative Path to Test option in that same panel.
- Results: Sends output to the GUI Message panel.
- stderr: Sends standard error to a console window.
- stdout: Sends standard output to a console window.
General Tool Output Options
You can typically send the output of most tools (other than the SOAP Client tool) directly to a tool of your choice. In addition, you can send SOAP Client output to tools if you first choose the XML Request output option.
Some tools (such as Coding Standards) have 2 outputs:
- Messages about the test.
- The transformed source produced during the test.
In these cases, you will see the following options:
- Messages: Sends the previous tool’s result messages to the specified tool.
- Transformed Source: Sends the source code created/modified by the previous tool to the next specified tool. For example, you would use this option if you wanted to send the file that results from an XSLT tool to the Validate XML tool.


