In this section:
To help you ensure that your security measures work flawlessly in terms of authentication, encryption, and access control, SOAtest contains a vast array of security tools and options that fully supports the industry standard WS-Security specification.
In the example given in the WS-Security test suite, examples of encryption/decryption, digital signature, and the addition of SOAP Headers are shown. The following are key security tools and options that SOAtest supports:
- XML Encryption Tool: The XML Encryption tool allows you to encrypt and decrypt entire messages or parts of messages using Triple DES, AES 128, AES 192, or AES 256. In WS-Security mode, Binary Security Tokens, X509IssuerSerial, and Key Identifiers are supported.
- XML Signer Tool: The XML signer tool allows you to digitally sign an entire message or parts of a message depending on your specific needs. In some cases, it may be important to digitally sign parts of a document while encrypting other parts.
- XML Signature Verifier Tool: The XML verifier tool allows for the verification of digitally signed documents using a public/private key pair stored within a key store file.
- Key Stores: The use of key stores in SOAtest allows you to encrypt/decrypt and digitally sign documents using public/private key pairs stored in a key store. Key stores in JKS, PKCS12, BKS, PEM, and UBER format can be used.
- Username Tokens, SAML Tokens, X509 Tokens, or Custom Headers: SOAtest supports sending custom SOAP Headers and includes templates for Username Tokens and SAML tokens.
When you complete this section of the tutorial, your test suite should resemble the test suite entitled "WS-Security" in the SOAtestTutorial.tst file.
Unlimited Strength Java Cryptography Extension
In order to perform security tests using the XML Signature Verifier, XML Signer, or XML Encryption tools, or if using Key Stores, you will need to download and install the Unlimited Strength Java Cryptography Extension. For details, see JCE Prerequisite.
Message Layer Security with SOAP Headers
In this example we will use a bookstore web service, which requires a Username and Password to be submitted within the SOAP Header element according to the WS-Security specification. SOAtest provides the ability to add Custom Headers and also provides pre-defined templates for creating Username Tokens and SAML Tokens. The following example uses a Username Token.
- Right-click the project from the previous exercises, then choose Add New > Test (.tst) File from the shortcut menu.
- Enter a name for the file, then click Next.
- Select Empty and click Finish. An empty test suite folder is created.
- Double-click the new Test Suite: Test Suite node that was added.
- Enter
WS-Securityin the Name field in the configuration panel on the right. - Click Save on the tool bar to save the WS-Security test suite.
- Copy the Excel: Books data source that you added in the Functional Test lesson and paste it into this test suite.
- Click the Test Suite: WS-Security node and click Add Test Suite on the tool bar.

- Choose Empty and click Finish. An empty test suite folder is created.
- Double click the test suite to open its editor and name the suite
Username Tokens. - Click Save on the tool bar to save the Username Tokens test suite.
- Click the Test Suite: Username Tokens node and click Add Test or Output on the tool bar.

- In the Add Test wizard, click Standard Test in the left pane and SOAP Client in the right pane, then click Finish. A SOAP Client tool is added to the test suite.
- Double-click the Test 1: SOAP Client node beneath the Test Suite: Username Tokens node.
- Complete the SOAP Client tool’s configuration panel as follows:
- Enter
SOAP Client – getItemByTitle operationin the Name field. - Click the WSDL tab and enter the following in the WSDL URI field:
http://localhost:8080/parabank/services/store-wss-01?wsdl
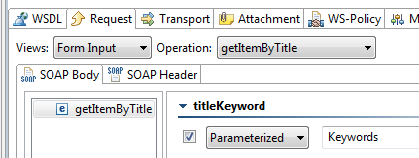
- Click the Request tab and select getItemByTitle from the Operation dropdown.
- Enable the titleKeyword element, then select Keywords as its Parameterized value.
- Enter
- Click Save on the tool bar to save the modified test.
- Run the test by clicking Run Tests on the tool bar. Notice that the test fails because it did not have the required Security Header.
To add the required SOAP Header:
- Double-click the Test 1: SOAP Client - getItemByTitle operation node.
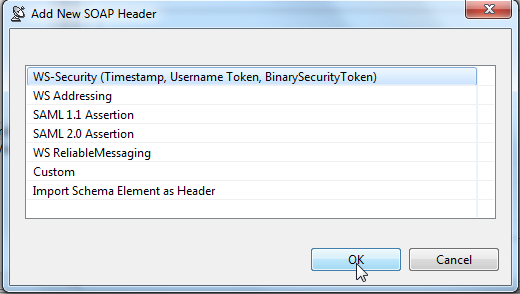
- Click the SOAP Header tab in the tool’s configuration panel, then click Add. An Add New SOAP Header dialog opens.
- Choose WS-Security and click OK.
- Double-click the new entry added to the SOAP Header table. A dialog will open.
- Click the Timestamp tab and disable Send Timestamp.
- Click the Username Token tab and complete the following:
- Enter
soatestin the wsse:Username field. - Enter
soatestin the wsse:Password field.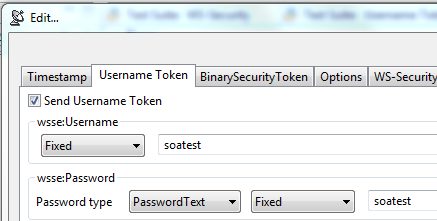
- Enter
- Click OK.
- Click Save on the tool bar to save the modified test.
- Run the test by clicking Run Tests on the tool bar. The test now succeeds.
- Double-click the Traffic Viewer node to view the SOAP Header sent in the request and verify that the service returned information about the specified books.
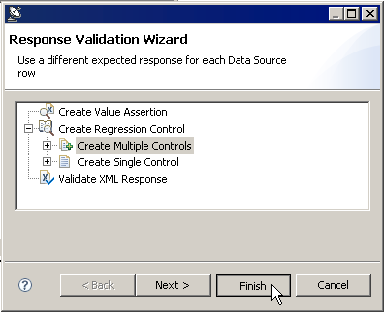
- To create a regression control that will alert you to any changes in the server response in the future, right click Test 1: SOAP Client – getItemByTitleOperation and choose Create/Update Regression Control.
- In the Response Validation Wizard, select Create Regression Control> Create Multiple Controls, then click Finish.
If you run the test a few more times you will notice that it fails because the price element has changed. Follow the steps from previous exercises to ignore the dynamically changing price value.
Using the XML Encryption Tool
In this example, we will use a bookstore service similar to the service used in previous examples, except that:
- Request bodies must be encrypted using the key store soatest.pfx which is located in the
examples\keystoresdirectory. - Responses are encrypted as well and can be decrypted using the same key store.
First you will need to set up the key store:
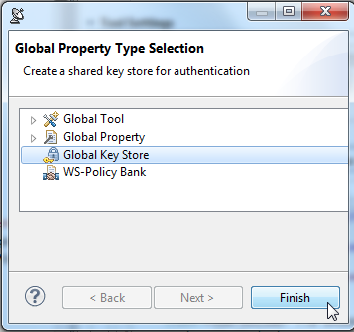
- Click the Test Suite: WS-Security node, then click Add Property on the tool bar.
- In the Global Property Type Selection dialog, choose Global Key Store and click Finish.
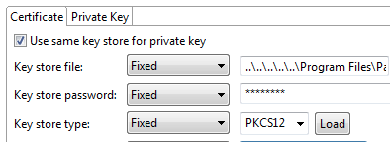
- Complete the Key Store configuration panel as follows:
- Enter
PKCS12 Keystorein the Name field in the GUI panel. - Make sure Use same key store for private key is enabled.
- Click Filesystem and navigate to the location of the key store soatest.pfx.
- For Windows:
C:\Program Files\Parasoft\SOAtest\<SOATEST_VERSION>\examples\keystores. - For Others:
<SOATEST_INSTALL_DIR>\examples\keystores.
- For Windows:
- Enter
securityin the Key Store Password field. - Select PKCS12 from the Key Store Type dropdown.
- Click Load.
The list of available certificate aliases within the keystore are populated into the Certificate Alias dropdown. - Choose soatest in the Certificate Alias field.
- Click the Private Key tab at the top of the Key Store configuration panel and click Load.
- Choose soatest for the Private Key Alias and enter
securityfor the Private Key Password.
- Enter
- Click Save on the tool bar.
Now we are ready to set up a test using the XML Encryption tool. To better organize our security tests, we will create a new folder for the encryption test.
- Click the Test Suite: WS-Security node, then click Add Test Suite on the tool bar.

- Choose Empty and click Finish. An empty test suite folder is created.
- Enter
Encryption/Decryptioninto the Name field in the right GUI panel. - Click Save on the tool bar.
- Click the Test Suite: Encryption/Decryption node and click Add Test or Output on the tool bar.
- Choose Standard Test in the left pane and SOAP Client in the right pane, then click Finish. A SOAP Client tool is added to the test suite.
- Complete the SOAP Client tool’s configuration panel as follows:
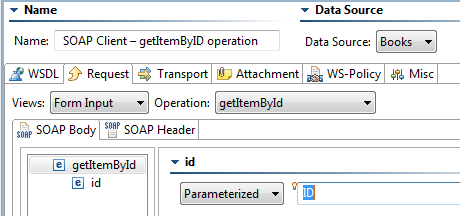
- Enter
SOAP Client – getItemByID operationin the Name field. - Open the WSDL tab and enter the following in the WSDL URI field:
http://localhost:8080/parabank/services/store-wss-03?wsdl - Click the Request tab.
- Choose getItemById from the Operation dropdown.
- For the id element, select ID as its Parameterized value.
- Enter
- Click Save on the tool bar.
- Right-click the Test 1: SOAP Client - getItemByID operation node and select Add Output. The Add Output wizard opens.
- Choose Request > SOAP Envelope in the left pane and XML Encryption in the right pane, then click Finish. An Encryption Tool is chained to the SOAP Client.
- Complete the Request SOAP Envelope -> XML Encryption tool’s configuration panel as follows:
- Enable Encrypt.
- Enable WS-Security Mode.
- Choose AES 256 from the Symmetric (Block Encryption) dropdown.
- Click WS-Security and ensure that X509BinarySecurityToken is selected in the Form box.
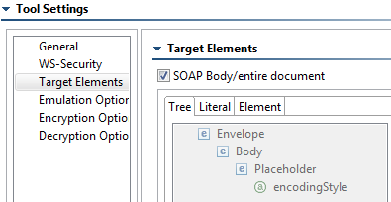
- Click Target Elements and verify that SOAP Body/entire document is enabled. This will encrypt the XML Body element.
The XML Request is now set up to be encrypted when the request is sent to the service. - Click Save on the tool bar to save the modified test.
Now you can add an XML Encryption tool to the XML Response of the SOAP Client test to enable Decryption of the XML response.
- Right-click the Test 1: SOAP Client - getItemByID operation node and choose Add Output. The Add Output wizard opens.
- Choose Response > SOAP Envelope in the left pane and XML Encryption in the right pane, then click Finish. An Encryption Tool is chained to the SOAP Client.
- Complete the Response SOAP Envelope -> XML Encryption tool’s configuration panel as follows:
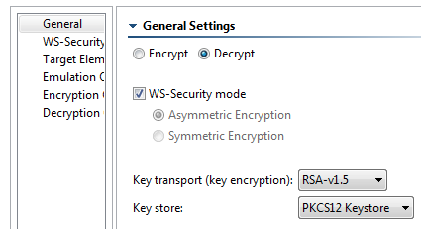
- Enable Decrypt.
- Choose the PKCS12 Keystore from the Key Store dropdown.
- Click Save on the tool bar to save the modified test.
- Run the test by clicking Run Tests on the tool bar.
- Double-click the Traffic Viewer node to view the encrypted data.
- Right-click the Test 1: SOAP Client - getItemByID operation node and select Create/Update Regression Control.
- In the dialog that opens, choose Create Regression Control > Create Multiple Controls, then click Finish.
Regression controls are created and automatically chained to the Response SOAP Envelope -> XML Encryption. Notice that the decrypted responses are shown in the Regression Control.
Finally, you want to ignore dynamic values from the XML Response so that the Regression Control does not fail each time.
- Double-click the XML Document -> Diff node and complete the following in the right GUI panel:
- Set the Diff Mode to XML.
- Select Form XML as the Diff Mode. When the Form XML tab is selected, a popup will appear asking whether to override with values from Literal XML view. Click Yes.
- Right-click the price element and select Setup Ignored XPath. An Ignore XPath Setting dialog appears. Click OK to ignore modifications to the textcontent of the price element.
- Repeat the previous step for the CipherValue element.
- Right-click on the DataReference element and select Setup Ignored XPath. An Ignore XPath Setting Dialog appears. Enable Attribute to ignore changes to the attributes of the
DataReferenceelement. Click OK. - Click Literal XML to switch back to Literal XML view.
- In the dialog that asks whether to override with values from Form XML view, click Yes.
- Click Save on the tool bar to save the modified test.
- Run the test by clicking Run Tests on the tool bar.
Using the XML Signer Tool
In the next example, we will use a bookstore service which requires request bodies to be signed with the certificate in the key store soatest.pfx. Responses from this service are signed as well and can be verified using the same key store. We will use the same key store settings from the previous example.
- Click the Test Suite: WS-Security node and click Add Test Suite on the tool bar.

- Choose Empty and click Finish. An empty test suite folder is created.
- Enter
Sign/Verifyinto the Name field in the right GUI panel, then click Save on the tool bar. - Click the Test Suite: Sign/Verify node and click Add Test or Output on the tool bar.

- Choose Standard Test in the left panel and SOAP Client in the right panel, then click Finish. A SOAP Client tool is added to the test suite.
- Complete the SOAP Client tool’s configuration panel as follows:
- Enter
SOAP Client – addItemtoCartoperation in the Name field. - Click the WSDL tab and enter the following in the WSDL URI field:
http://localhost:8080/parabank/services/store-wss-02?wsdl - Click the Request tab.
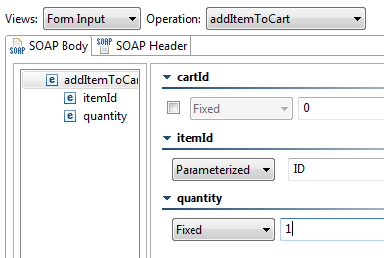
- Choose addItemtoCart from the Operation dropdown.
- For the itemId parameter, select ID as its Parameterized value.
- For the quantity parameter, enter
1as its Fixed value. - Leave the cartId parameter disabled. This will automatically generate a new cartId.
- Enter
- Click Save on the tool bar to save the modified test.
- Right-click the Test 1: SOAP Client - addItemtoCart operation node and select Add Output. The Add Output wizard opens.
- Choose Request > SOAP Envelope in the left panel and XMLSigner in the right panel, then click Finish. An XML Signer Tool is chained to the SOAP Client.
- Complete the XML Signer tool’s configuration panel as follows:
- Select PKCS12 Keystore from the Key Store dropdown.
- Select RSAwithSHA1 (PKCS1) – http://www.w3.org/2000/09/xmldsig#rsa-sha1 from the Algorithm dropdown.
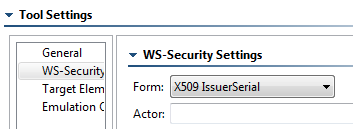
- Choose WS-Security and select X509IssuerSerial from the Form dropdown.
- Choose Target Elements and verify that SOAP Body/entire document is enabled. The XML Request is now set up to be signed when the request is sent to the service.
- Click Save on the tool bar to save the modified test.
Now you can add an XML Verifier Tool to the XML Response of the SOAP Client test to enable Signature Verification of the XML response:
- Right-click the Test 1: SOAP Client - addItemtoCart operation node and select Add Output. The Add Output wizard opens.
- Choose Response > SOAP Envelope in the left pane and XML Signature Verifier in the right pane, then click Finish. An XML Signature Verifier Tool is chained to the Test 1: SOAP Client - addItemtoCart operation node.
- Complete the XML Signature Verifier tool’s configuration panel as follows:
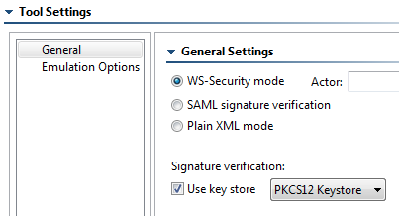
- Enable Use Key Store and choose PKCS12 Keystore from the dropdown.
- Ensure that WS-Security Mode is enabled.
- Click Save on the tool bar to save the modified test.
- Run the test by clicking Run Tests on the tool bar.
- Double-click the Traffic Viewer node to view the signed data. Since the test succeeds, this tells us that the server accepted our signed request and the server’s signed response was successfully verified.
XML Encryption and Signature Combined
In this example, we will create a more complex test using a book store service which combines the security requirements of the previous two exercises. This service requires request bodies to be signed and encrypted using the key store soatest.pfx. The responses from this service are signed and encrypted as well and can be decrypted and verified using the same key store.
- Click the Test Suite: WS-Security node and click Add Test Suite on the tool bare.

- Choose Empty and click Finish. An empty test suite folder is created.
- Type
Encryption and Signature Combinedinto the Name field in the right GUI panel, then click Save on the tool bar. - Click the Test Suite: Encryption and Signature Combined node and click Add Test or Output on the tool bar.

- In the Add Test Wizard, choose Standard Test in the left pane and SOAP Client in the right pane, then click Finish. A SOAP Client tool is added to the test suite.
- Complete the SOAP Client tool’s configuration panel as follows:
- Enter
SOAP Client – getItemByTitleoperation in the Name field. - Click the WSDL tab and enter the following in the WSDL URI field:
http://localhost:8080/parabank/services/store-wss-04?wsdl - Click the Request tab.
- Choose getItemByTitle from the Operation dropdown.
- Enable titleKeyword and enter
Linuxas its Fixed value.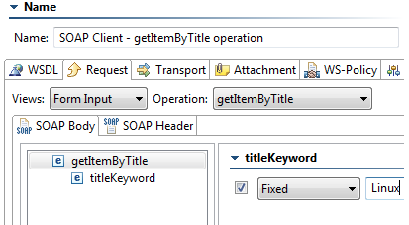
- Enter
- Right-click the Test 1: SOAP Client - getItemByTitle operation node and select Add Output. The Add Output wizard opens.
- Choose Request > SOAP Envelope in the left pane and XML Signer from the right pane, then click Finish. An XML Signer Tool is chained to the SOAP Client.
- Complete the XML Signer tool’s configuration panel as follows:
- Choose PKCS12 Keystore from the KeyStore dropdown.
- Choose RSAwithSHA1 from the Algorithm dropdown.
- Click WS-Security and choose X509BinarySecurityToken from the dropdown.
- Click Target Elements and ensure that SOAP Body/entire document is enabled. The XML Request is now set up to be signed when the request is sent to the service.
Next you can add an XML Encryption Tool to the XML Response of the XML Signer Tool to encrypt the signed document.
- Right-click the Request SOAP Envelope > XML Signer node and select Add Output. The Add Output wizard opens.
- Choose XML Encryption and click Finish. An XML Encryption Tool is chained to the XML Response of the XML Signer Tool.
- Complete the XML Encryption Tool tool configuration panel as follows:
- Ensure that Encrypt is enabled.
- Choose PKCS12 Keystore from the KeyStore dropdown.
- Choose AES256 from the Symmetric dropdown.
- Click WS-Security and choose X509BinarySecurityToken from the Form dropdown.
- Click Target Elements and verify that the SOAP Body/entire document is enabled. The XML Request is now set up to be signed when the request is sent to the service.
- Click Save on the tool bar to save the modified test.
- Run the test by clicking Run Tests on the tool bar.
- Double-click the Traffic Viewer node to view the server response.
Automatically Generating WS-Security Tests with WS-SecurityPolicy
Parasoft enables automatic test creation to enforce runtime security policies. This helps you automatically generate the correct tests with the correct settings so the services can be invoked instantly. Furthermore, by managing the policies at the project test level, you can more easily create and manage various policy variations in order to test the services properly, both positive and negative.
SOAtest recognizes WS-SecurityPolicy assertions in the WSDL when using the WS-PolicyAttachment standard. In order to automatically generate tests from a WSDL with WS-SecurityPolicy assertions, complete the following:
- Click the Test Suite: WS-Security node and click Add Property on the tool bar.

- In the Global Property Type Selection dialog, choose WS-Policy Bank and click Finish. A WS-Policy Banks node is added to the Test Case Explorer.
- In the WSDL Policies configuration panel on the right side of the GUI, enter
http://localhost:8080/parabank/services/store-wss-04?wsdlin the WSDL URL field and click Refresh WSDL. The Global Policies are populated.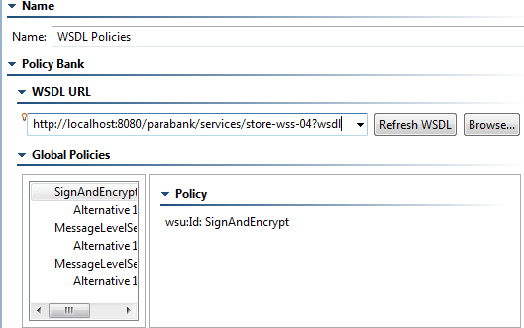
Notice how there are policy nodes that include the WS-SecurityPolicy configuration that corresponds to the WS-SecurityPolicy assertions in the WSDL.
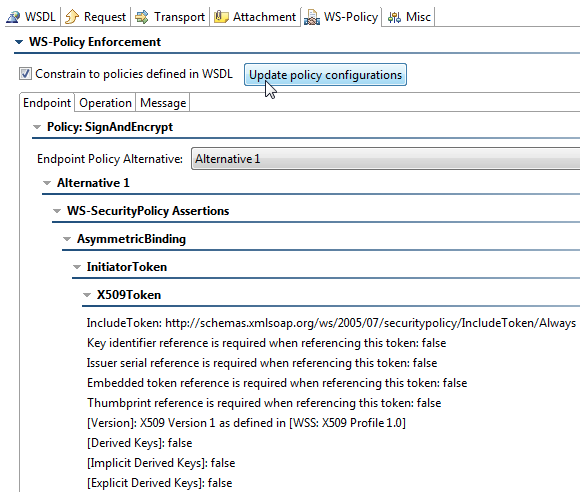
Notice that tests generated with the same WSDL now have WS-Policy properties that match the WSDL Policies. If you want SOAtest to automatically configure the signer and encryption tool on the request (because the policy dictates so), you could enable Constrain to policies defined in WSDL and click Update policy configurations.
Since a keystore has already been added to the test suite, the tests are ready to run. If you have not added a keystore, one needs to be configured. For more information on adding a keystore, see Using the XML Encryption Tool.