This topic explains how to customize a test suite’s properties (such as its name and how individual test cases are run). In this section:
Accessing the Test Suite Configuration Panel
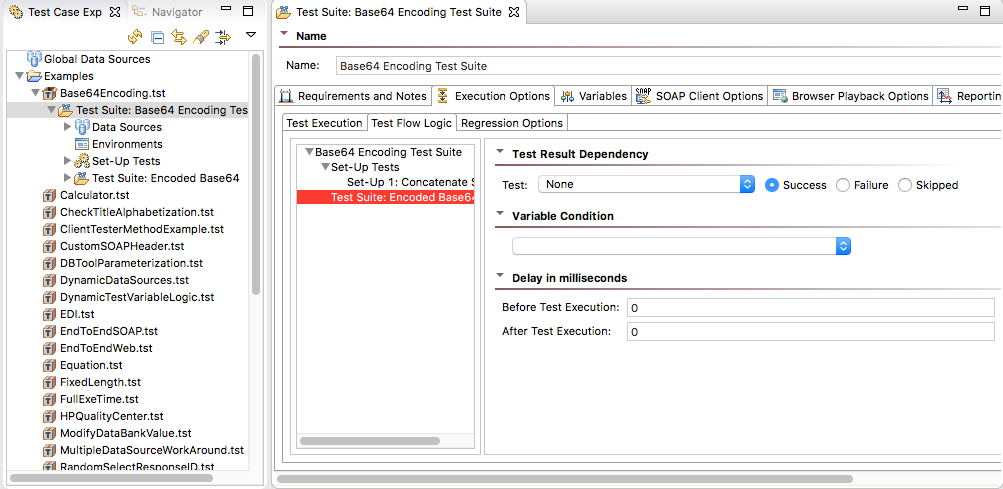
Double-click a test suite in the Test Case Explorer to access and modify its properties.
Associating Comments, Requirements, Tasks, Defects, and Feature Requests with Tests
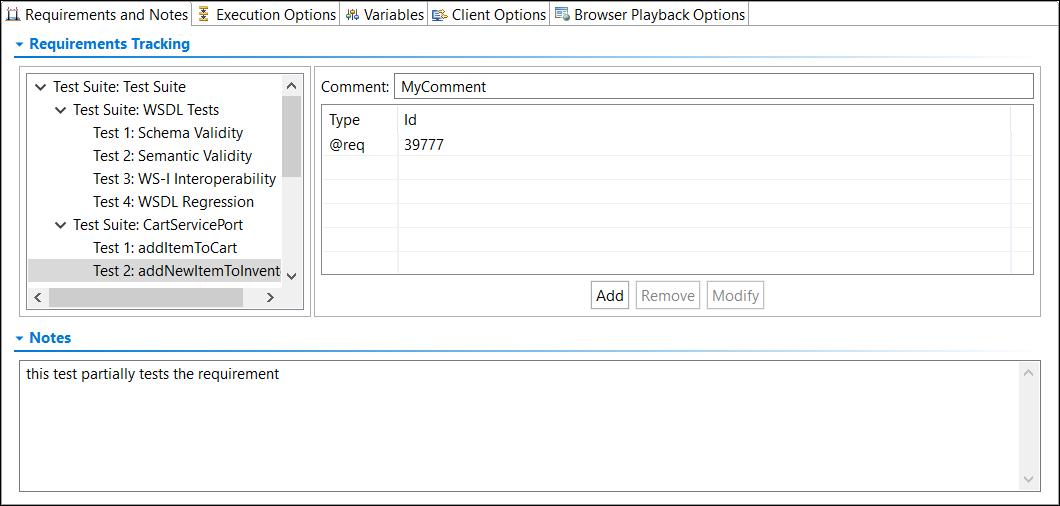
The Requirements and Notes tab of the test suite configuration panel allows you to associate requirements, defects, tasks, feature requests, and comments with a particular test in the test suite. The username of the last user to modify the test suite is also shown here. This username is taken from the Parasoft preferences; go to Parasoft > Preferences and click Parasoft if you want to change your username.
The HTML report will indicate the artifacts that are associated with each referenced test. For example, here is a report that references a test with an associated comment:
The requirements you define will appear in Structure reports and in a connected DTP system (if applicable). This helps managers and reviewers determine whether the specified test requirements were accomplished. For more information on Structure Reports, see Creating a Report of the Test Suite Structure.
Adding Associations and Comments
- Double-click the test suite node in the Test Case Explorer and click the Requirements and Notes tab.
- Choose the scope that the association and/or comments apply to in the Requirements Tracking section. You can apply this information to test suites, nested test suites, and tests.
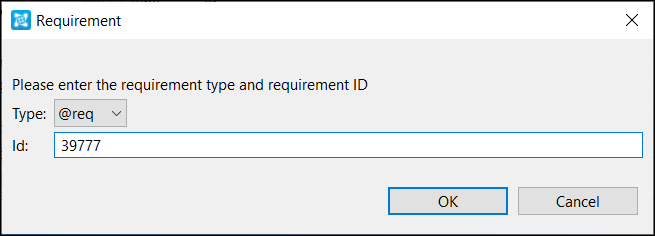
- Click Add and choose a tag from the Type dropdown menu. DTP will use this information to associate the test suite’s test cases to the specified element type. You can create custom tags as described in Associating Tests with Development Artifacts. Default tags are:
- @pr: for defects.
- @req: for requirements.
- @task: for tasks.
@test: for tests.
Configuring Custom Defect/Issue Tracking Tags
You can configure defect/issue tracking tags to match the language that your organization uses to refer to defects or to feature requests. For details, see Indicating Code and Test Correlations.
- Enter an ID for the requirement and click OK.
If you enable the Preferences > Reports > Report contents option for Requirement/defect details, associations specified here will be shown in the HTML report. If a URL is specified, the HTML report will include hyperlinks. - To add a comment (for example, "this test partially tests the requirement" or "this test fully tests the requirement"), enter it into the Comment field. Comments specified here will be visible in HTML reports.
- To add more detailed notes for the test suite, enter them into the Notes field.
Specifying Execution Options (Test Flow Logic, Regression Options, etc.)
You can configure how tests in the suite execute, including whether:
- Tests run sequentially or concurrently
- Tests can run independently or in groups
- Test execution details are dependent on results from other tests
- The entire test suite should loop until a certain condition is met
- Regression controls are created for specific tests and the controls map to data sources.
These options are configured in the Execution Options tab, which has three sub-tabs: Test Execution, Test Flow Logic, and Regression Options.
Test Execution
You can customize the following options in the Test Execution sub-tab of the Execution Options.
Execution Mode
Enable the Tests run sequentially option to run each test and child test suite of this test suite separately one at a time.
Enable the Tests run concurrently option to run all tests and child test suites of this test suite at the same time. Tests will run simultaneously.
Test Relationship
These options determine how SOAtest iterates through the rows of your data sources.
Enable the Tests are individually runnable option (default) to iterate through all data source rows for each test. When an individual test executes, it will use every row of the data source before the next test or test suite is executed. When a child test suite is executed, SOAtest will wait for all of its children to finish before the next test or test suite is executed.
Enable the Tests run as group option (default for scenarios) to runs all tests for each row of the data source. In this case, a data source row is chosen, and each test and child test suite is executed for that row. Once all children have executed, a new row is chosen and the process repeats. The Abort scenario on option becomes active when Tests run as group is enabled (see details about the Abort scenario on option).
Enable the Tests run all sub-groups as part of this group option to run tests contained in this test suite as direct children of this test suite. SOAtest will then iterate through them as a group. The Abort scenario on option becomes active when Tests run as group is enabled (see details about the Abort scenario on option).
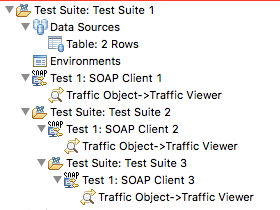
For example, consider the arrangement in the following test suite:
In this case, we assume that Tests are individually runnable is enabled for Test Suite 2 and Test Suite 3, the Table has 2 rows of data, and a test is run under each of the Test Relationship options for Test Suite 1. The following table demonstrates the order that tests would run for different choices of Execution Options of Test Suite 1. This also assumes that Run individually is enabled for Test Suite 2 and Test Suite 3.
| Run individually | Run as group | Run all subgroups as part of this group |
|---|---|---|
| SOAP Client 1 row 1 | SOAP Client 1 row 1 | SOAP Client 1 row 1 |
| SOAP Client 1 row 2 | SOAP Client 2 row 1 | SOAP Client 2 row 1 |
| SOAP Client 2 row 1 | SOAP Client 2 row 2 | SOAP Client 3 row 1 |
| SOAP Client 2 row 2 | SOAP Client 3 row 1 | SOAP Client 1 row 2 |
| SOAP Client 3 row 1 | SOAP Client 3 row 2 | SOAP Client 2 row 2 |
| SOAP Client 1 row 2 | SOAP Client 1 row 2 | SOAP Client 3 row 2 |
| SOAP Client 2 row 1 | ||
| SOAP Client 2 row 2 | ||
| SOAP Client 3 row 1 | ||
| SOAP Client 3 row 2 |
Enable the Abort Scenario option and choose either Fatal Error or Any Error from the dropdown menu to stop running tests under the specified conditions. If the previous test resulted in a fatal error, enable Abort Scenario on Fatal Error. This option is only available when both Tests run Sequentially is selected and Tests are individually runnable is not selected. This case occurs when a set of tests in a test suite are dependent on each other, cannot be run apart from each other, and must run sequentially. If the option is enabled, and if a test within the scenario being run has a fatal error, the rest of the tests in the scenario will not be run. If it is disabled, even if a fatal error occurs, the remaining tests in the scenario will be run.
Advanced Options
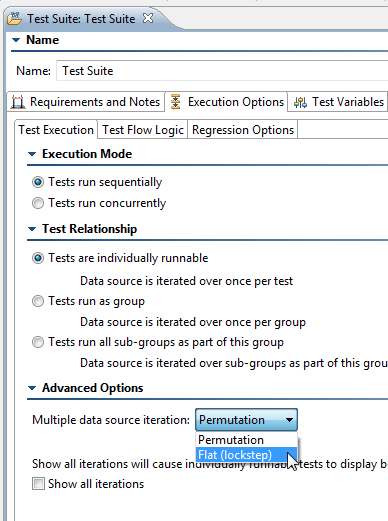
Choose an option from the Multiple data source iteration dropdown menu to determine how SOAtest will iterate when multiple data sources are used within a single test suite whose tests are NOT individually runnable. If all data sources do not have the same number of rows, iteration will stop at the last row of the smallest data source. Available options are:
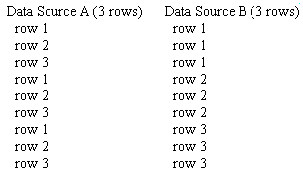
- Permutation: Test execution will permute over rows in different data sources. For example, iteration of two data sources (A & B), each with 3 rows, would look like the following:
- Flat (lockstep): Test execution will iterate over rows in different data sources together at the same time. For example, iteration of two data sources (A & B), each with 3 rows, would look like the following:
This option is available only in the top-level (parent) suite in your project .tst file. You need to expand the Advanced Options section to see it.
Enable the Show all iterations option to count and show all data source iterations, including those for individually runnable tests (enabled by default). When this option is disabled, SOAtest does not show all of the data source iterations for individually runnable tests. In other words, if a test was parameterized on a data source with 50 rows, SOAtest would report that as a single test run. As a result, if there are failures on multiple data source rows, there could be more failures than test runs.
Test Flow Logic
SOAtest allows you to create tests that are dependent on the success or failure of previous tests, setup tests, or tear-down tests. This helps you create an efficient workflow within the test suite. In addition, you can also influence test suite logic by creating while loops and if/else statements that depend on the value of a variable.
Options can be set at the test suite level (options that apply to all tests in the test suite), or for specific tests.
Test Suite Logic Options
In many cases, you may want to have SOAtest repeatedly perform a certain action until a certain condition is met. Test suite flow logic allows you to configure this.
Understanding the Options
To help you automate testing for such scenarios, SOAtest allows you to choose between two main test flow types:
- While variable: Repeatedly perform a certain action until a variable condition is met. This requires variables, described in Defining Variables, to be set.
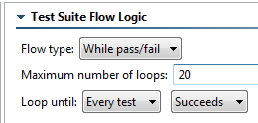
- While pass/fail: Repeatedly perform a certain action until one test (or every test) in the test suite either passes or fails (depending on what you select in the "loop until" settings). Note that if you choose this option (for instance, with it set to loop until one of the tests succeeds) and the overall loop condition is met, then tests that had failures will be marked as a success. If the overall loop condition is not met, then the individual tests that failed will be marked as failed. The console will show which tests passed and which tests failed, regardless of whether or not the loop condition is met.
For example:
- A user submits some data to a web service, and then that submission results in other data being inserted into a database at a later time. The time at which the data is inserted into the database varies. To check this in SOAtest, you could define a DB tool with a chained assertor that fails while the data is not present. The test would then need to loop on this DB tool until it succeeds.
- In a web application, the user enters some data and clicks a "Submit Query" button. If the data is not available, the application just shows a "data loading" message. The user repeatedly clicks the button until some data appears. To check this in SOAtest, you could setup a Browser Playback tool that performs a click action on the button, then chain to it a Browser Validation Tool that validates whether some element is present. The test would need to loop until the element appears.
- In a web application, search results are often present in a "paged" format, meaning that the results are distributed over multiple pages. If the result that you are looking for is not on the currently displayed page, you need to click the "Next" link until it appears. To check this in SOAtest, you could configure a Browser Playback tool that performs a click action on the "Next" link, with a Browser Validation tool that validates if the desired result is present. The test would then need to loop until the result appears.
Setting the Options
To configure test flow logic options that apply across the test suite:
- Open the Execution Options > Test Flow Logic tab, then select the top-level node.
- Select the desired flow type.
- You can choose from while variable or while pass/fail loop flow (see above for an explanation of the different types) or none (if you do not want execution flow to depend on a condition being met).
- (Optional) Customize the Maximum number of loops setting, which determines the maximum number of loops to run if the specified condition is never met.
- If you chose while/pass fail flow specify the loop conditions by going to Loop until, choosing either Every test or One test, then choosing succeeds or fails, depending on which outcome you want to occur before the test suite proceeds.
- If you chose while variable flow, set the while and do conditions as follows.
- while: Select the desired variable from the dropdown list. The items in this list depend on the variables you added to the Variables tab.
- If the variable you select was defined as a boolean value, you will be able to select from either true or false.
- If the variable you select was defined as an integer, a second dropdown menu displays with == (equals), != (not equal), < (less than), > (greater than), <= (less than or equal to), >= (greater than or equal to). In addition, a text field is available to enter an integer.
- do: Allows you to determine the action for the variable in the while loop. The following options are available:
- Nothing: If the variable condition is met, do nothing.
- Increment: (For integer values only) If the variable condition is met, increment the variable.
- Decrement: (For integer values only) If the variable condition is met, decrement the variable.
- Negate: (For boolean values only) If the variable condition is met, negate the variable.
- while: Select the desired variable from the dropdown list. The items in this list depend on the variables you added to the Variables tab.
Test Flow Logic Tutorial
For a step-by-step demonstration of how to apply while pass/fail test flow logic, see Looping Until a Test Succeeds or Fails - Using Test Flow Logic.
Test-Specific Logic Options
The following options are available for specific tests:
- Test Result Dependency: If the current (selected) test should run only if another test succeeds, fails, or is skipped, then specify the name of that dependent test here. For example, if Test 4 depends on the results of Test 1, select Test 4 in the left panel, then choose Test 1 from the dropdown menu. Then, specify the condition under which the current test should run. Options are:
- Success: Select if the subsequent test case should be run according to the success of the test case selected in the Test dropdown menu. If the test case selected in the Test dropdown menu does not succeed, the subsequent test case will not run.
- Failure: Select if the subsequent test case should be run according to the failure of the test case selected in the Test dropdown menu. If the test case selected in the Test dropdown menu does not fail, the subsequent test case will not run.
- Skipped: Select if the subsequent test case should be run if the test case selected in the Test dropdown menu was skipped. If the test case selected in the Test dropdown menu is not skipped, the subsequent test case will not run.
Set-Up and Tear-Down Tests
If any set-up or tear-down tests are available, they display in the left GUI panel and you will be able to configure test logic as follows:
- The execution of a test can be dependent on a set-up test.
- A setup test can now be dependent on a previous set-up test.
- A tear-down test can be dependent on a regular test, set-up test, or previous tear-down test.
This functionality allows you to stop a test (or run a test) if a setup test fails.
- Variable Condition: Allows you to determine whether or not a test is run depending on variables added to the Variable table (for more information on adding variables, see Defining Variables). If no variables were added, then the Variable Condition options are not available. The following options are available if variables were defined:
- Variable Condition dropdown: Select the desired variable from the dropdown list. The items in this list depend on the variables you added to the Variable table.
- If the variable you select was defined as an integer, a second dropdown menu displays with == (equals), != (not equal), < (less than), > (greater than), <= (less than or equal to), >= (greater than or equal to). In addition, a text field is available to enter an integer. For example:
If x != 13 (x does not equal 13), the test will run, however, if x does equal 13, the test will not be run. - If the variable you select was defined as a boolean value, you will be able to select from either true or false. For example:
If variable x1 is false, the test will run, however, if x1 is true, the test will not be run.
- If the variable you select was defined as an integer, a second dropdown menu displays with == (equals), != (not equal), < (less than), > (greater than), <= (less than or equal to), >= (greater than or equal to). In addition, a text field is available to enter an integer. For example:
- Variable Condition dropdown: Select the desired variable from the dropdown list. The items in this list depend on the variables you added to the Variable table.
- Delay in milliseconds: Lets you set a delay before and/or after test execution.
Regression Options
The Regression Options controls options allow you to customize how data sources are used in regression tests and which test suite have regression controls. Note that this tab is not applicable for web scenarios tests. Available options are:
- Use data source row numbers: (Default value) Associates data source row numbers to the data generated by the Diff control. For example, Row N in a data source will be associated with the Row N control in the Diff tool, regardless of what data source values are used. When this option is selected, there is no dependency between the data source values and the corresponding Diff regression control (in the context of multiple regressions).
Update Regression Controls After Changes
- Use data source column names and values: Associates data source column names and values to the data generated by the Diff control. For example, a request that used A=1, B=2 in a SOAP Client will be associated with the Diff control that has been labelled "A=1, B=2" and so on. When this option is selected, you can add and remove data source rows as you wish and the Diff will still map the content to the correct control, as long as the column names and values are unchanged. For more information on using data sources, see Parameterizing Tests with Data Sources, Variables, or Values from Other Tests.
- Regression Controls Logic: This table allows you to configure which tests in a test suite SOAtest should create regression controls for. From each test entered in the table, you can select Always or Never. Regression controls will be updated accordingly the next time you update the regression controls for the test suite.
Defining Variables
The Variables tab allows you to configure variables that can be used to simplify test definition and create flexible, reusable test suites. After a variable is added, tests can parameterize against that variable.
Understanding Variables
You can set a variable to specific value, then use that variable throughout the current test suite to reference that value. This way, you don’t need to enter the same value multiple times, and if you want to modify the value you only need to change it in one place.
As an alternative to manually setting a variable to a specific value, you can have a data bank tool (for example, XML Data Bank) or Extension tool set the value of that variable "on-the-fly."
Moreover, if you have a referenced test suite (a test suite that is referenced by a parent test suite, see Using Test Suite References for details), variables can be used to access data sources from the parent test suite.
Variables are available as parameterized values within tool configuration panels (using the ${env_name} convention), as well as through scripting with com.parasoft.api.ExtensionToolContext.getValue(String) and setValue(String, String). Values are of type string, integer, boolean.
During test execution, variables that are defined in a test suite are visible to all tests within that test suite and any tests that are executed after that test suite, regardless of whether the tests are in the same test suite or a child suite or parent suite. For example, assume that you have the following test suite structure and are executing tests in order:
- Test Suite: grandparent
- Test Suite: parent
- Test Suite: A
- Test Suite: B
- Test Suite: C
- Test Suite: parent
Any test variables that are defined in test suite A will be visible to any tests within A, B, or C; variables defined in B will be visible only to B and C.
Adding New Variables
- Click Add.
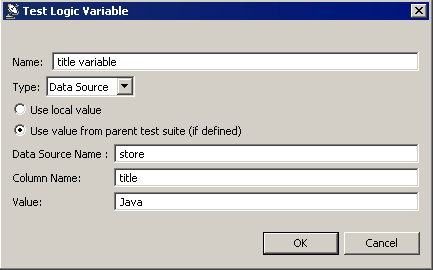
- Enter a new variable name in the Name field.
- Select either Integer, Boolean, String, or Data Source from the Type dropdown.
- Specify whether you want to use a local value or use a value from a parent test suite.
- Use value from parent test suite (if defined): Choose this option if the current test suite is a "referenced" test suite and you want it to use a value from a data source in the parent test suite. See Using Test Suite References for details on parent test suites.
- Use local value: Choose this option if you always want to use the specified value, even if the current test suite has a parent test suite whose tests set this variable. Note that if you reset the value from a data bank tool or Extension tool, that new value will take precedence over the one specified here.
- (For data source type only) Specify the name of the data source and column where the appropriate variables are stored. The data source should be in the parent test suite (the test suite that references the current test suite).
- Enter the variable value in the Value field. If you chose Use local value, the variable will always be set to the specified value (unless it is reset from a data bank tool or Extension tool). If you chose Use value from parent test suite, the value specified here will be used only if a corresponding value is not found in the parent test suite.
- Click OK.
Using Variables
Once added, variables can be:
- Used via the "parameterized" option in test fields. For instance, if you wanted to set a SOAP Client request element to use the value from the
title variablevariable, you would config-ure it as follows: - Referenced within text input fields via the {var_name} convention. In the data source editor, you would use the
soa_envprefix to reference environment variables. For example,${soa_env:Variable}/calc_values.xlsx - Reset from a data bank tool (for example, an XML Data Bank as described in Configuring XML Data Bank Using the Data Source Wizard).
- Reset from an Extension tool (as described below in Setting Variables and Logic Through Scripting).
- Used to define a test logic condition as described below in Test Flow Logic.
Setting Variables and Logic Through Scripting
Very often, test suite logic and variables will depend on responses from the service itself. Using an Extension tool, you can set a variable in order to influence test flow execution. For example, if Test 1 returns a variable of x=3, then Test 2 will run.
Via the TestSuiteVariable API, you can access a variable and either set it to a value or get a value from it. Using this value, you can configure test flow logic. See com.parasoft.api Interface TestSuiteVariable in the Extensibility API Javadocs for more information. The Javadocs can be accessed by choosing Parasoft > Help or Help > Help Contents (depending on your installation) then opening the Parasoft SOAtest Extensibility API book.
For example, you can enter the following into an Extension tool to set a variable:
from com.parasoft.api import Application

def setVar(input, context):
	context.setValue("x", input.toString())
To get a value from a TestSuiteVariable object x:
varValue = context.getValue("x")
Where varValue will be returned as a string.
For instance, you can add an XML Transformer tool to a test and extract a certain value from that test. Then, you can add an Extension output to the XML Transformer and enter a script to get the value from the Transformer. Finally, you can set up a second test to run only if the correct value is returned from the first test.
Monitoring Variable Usage
To configure SOAtest to show what variables are actually used at runtime, set Console preferences (Parasoft > Preferences > Parasoft > Console) to use normal or high verbosity levels.
After each test, the Console view (Show View > Parasoft > Console) will then display variables used at runtime. For example:
Scenario: ICalculator
    Test 1: first add - success
        get x=0
        set x=10.0
        set Test 1: type=xsd:float
    Test 2: second add - success
        get x=10
        set x=20.0
    Test 3: third add - success
        get x=20
        set x=30.0
    Test 1: first add - success
        get x=30
        set x=50.0
        set Test 1: type=xsd:float
    Test 2: second add - success
        get x=50
        set x=70.0
    Test 3: third add - success
        get x=70
        set x=90.0
Viewing such variables is useful for diagnosing the cause of any issues that occur.
Tutorial
For a step-by-step demonstration of how to use variables, see Creating Reusable (Modular) Test Suites.
Specifying Client Options
Test suites provide a convenient place to configure common options that apply to several client tools without needing to directly edit each tool. Use the Client Options tab in the test suite to set default values to be used by client tools and sub-suites contained within the test suite. You can override these default values at the sub-suite or client tool level by switching the value type from Default to Custom and specifying a new value on their Client Options tab. Client option values are inherited as follows: Workspace preference (if applicable for the option) > Top Test Suite > Sub Test Suite > Client Tool. The Client Options tab is divided into the following sections:
General
You can configure the following general test suite options:
- Authentication: This option allows you to set the default authentication method to be used by test clients within the test suite. Individual test clients can be configured to use alternative methods, as needed. By default, no authentication is used. Choose Custom from the first menu to change this selection. You can choose to use the Global Preferences (as set in Parasoft > Preferences > Security) or an authentication configuration set up specifically for this test suite. Click New to add a new authentication method to the test suite. Multiple authentication methods can be added, but only one can be the default at a time. For more information about adding or modifying shared authentication methods, see "Global Authentication" on the Adding Global Test Suite Properties page.
- Timeout after (milliseconds): If you do not want to use the default, choose Custom from the menu and enter the desired time. The default value is
30000. - Outgoing Message Encoding: This option enables you to choose the encoding for outgoing messages for all non-SOAP test clients, providing additional flexibility to set the charset encoding. You can also configure this setting globally in the Misc settings of the Parasoft Preferences (see Additional Preference Settings). You can configure the outgoing message encoding for SOAP clients in the SOAP settings.
- Cookies: Choose Custom from the menu and enable the Reset existing cookies before sending request to clear the cookies between sessions.
SOAP
You can configure the following SOAP-related test suite options:
- Endpoint: Specifies the endpoint. If you would like to specify an endpoint for all tests within the test suite, enter an endpoint and click Apply Endpoint to All Tests.
- Attachment Encapsulation Format: Choose Custom from the menu and select either None, MTOM always, or MTOM optional. The default value is None.
- Outgoing Message Encoding: Allows you to choose the encoding for outgoing SOAP messages, providing additional flexibility to set the charset encoding. You can also configure this setting globally in the Misc settings of the Parasoft Preferences (see Additional Preference Settings). You can configure the outgoing message encoding for non-SOAP clients in the General settings.
- SOAP Version: Choose Custom from the menu and select either SOAP 1.1 or SOAP 1.2. The default value is SOAP 1.1.
- Constrain to WSDL: Choose Custom from the menu and enable one or both of the following options:
- Constrain request to WSDL: Require the tool to obtain values from the definition file.
- Constrain SOAP Headers to WSDL: Require the tool to obtain only the SOAP Header values from the definition file.
Specifying Browser Playback Options
The Browser Playback Options tab is divided into several sections:
- Default Browser Playback: Specifies the default browser(s) for playing this test.
- Browsers Supported: Enable the Browsers specified here only option if you want to ensure that this test is never played in an alternate browser (for example, because the web page structure is significantly different on other browsers and the scenario would need to be constructed differently on another browser). If this is enabled, the test will only be played in the specified browsers, even if it is run by a Test Configuration set to use different browsers. If you want to allow a Test Configuration’s browser playback settings to override the ones specified here, choose Any browser.
For example:- If you select Chrome, Firefox, and Browsers specified here only, then run a Test Configuration set to run tests in all browsers, the test will be run only in Chrome and Firefox.
- If you select Chrome, Firefox, and Any browser, then run a Test Configuration set to run tests in all browsers, the test will be run in Chrome, Firefox, Safari, and Edge (as applicable).
- Authentication: Allows you to specify authentication settings as described below.
Authentication Settings
Basic, NTLM, Digest, and Kerberos authentication schemes are supported, and can be specified in this panel. You can enter a username and password for Basic, NTLM, and Digest authentication, and a service principal for Kerberos authentication.
There are three main authentication options:
- Use Parent Test Suite’s Configuration: This scenario will inherit the authentication information indicated in the first parent test suite that specifies authentication information.
- Use Global Configuration: This scenario will use the authentication information specified in the SOAtest Security Preferences.
- Use Custom Configuration: This scenario will use the authentication information defined for this test suite.
To specify when the authentication specified for this test suite should be applied, indicate the path or realm that expects authentication. If only one server requires authentication in a scenario that accesses many servers, you can specify a path or realm used by the server. Then, authentication will be applied only to requests that match that path or realm. For example, if you enter the path http://www.example.com/, this will cause the supplied authentication to be used only for any request that starts with "http://www.example.com".
If you want the authentication apply to every request, leave the path and realm empty.
You can enter multiple authentication credentials for scenarios that access many servers which authenticate in different ways. SOAtest will use the path and realm to determine when the authentication scheme should be applied to a request.
For this scenario, the Digest authentication will be applied to any requests that start with http://www.example.com. The Kerberos authentication will be applied to any requests that start with http://www.parasoft.com.
Note that SOAtest will attempt to use the authentication information specified in the SOAtest Security Preferences when it first records a scenario. If authentication is used and succeeds during recording, the authentication information will be recorded in the Browser Playback Options.
