The Data Repository CRUD Tool enables you to update data set records in the connected data repository during your testing activities.
Native CRUD tool versus the CRUD extension
The Data Repository CRUD Tool Extension also allows you to manipulate data in a data repository, but requires additional configuration that is not required with this tool.
In this section:
Introduction
The Data Repository CRUD tool is intended to help you automate actions that require data in the repository to be modified, such as changing the value of account balances in a banking application. It can perform the following operations on records in your data repository:
- create new data set records
- read existing data set records
- update existing data set records
- delete data set records
The primary use-case is to add the tool as an output to your Message Responder and configure operations to perform on the data when a message is sent to the virtual asset. You can manually configure the tool operation settings or script changes to record values before updating the data repository.
General Configuration
Right-click on your responder and choose Add Output...
- Select an incoming request type in the wizard and choose Data Repository CRUD Tool.
- Click Finish and specify a name for the tool (optional).
- Click Add in the Configuration tab and specify name for the operation (optional).
- Enable the Create, Read, Update, or Delete option.
- Choose the data repository data source you want to perform the operation on from the Data Source drop-down menu.
Click Add in the Correlation section and specify the correlation columns and values of the data set records that you want to manipulate.
- Configure the specific settings for Create, Read, Update, or Delete operations and save your changes.
- You can add additional configurations so that you can perform multiple operations on multiple fields in the same execution.
- Deploy your responder and execute your client to perform the operations you configured on the connected repository.
Create Configuration
Specify your method for creating new records in the Create settings section.
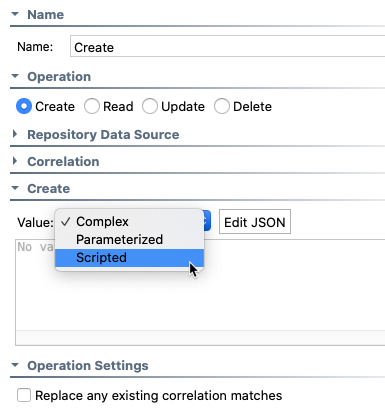
Complex Values
The Complex option enables you to manually enter the new structure and value.
- Click Edit JSON to open an editor for specifying the record. A JSON template of the record structure will be pre-populated by default.
- Choose the Form JSON view or Literal view from the Input Mode drop-down. The Form JSON is selected by default.
- Specify the values and click OK. You can also click Reset Template to reset the form based on the existing JSON structure.
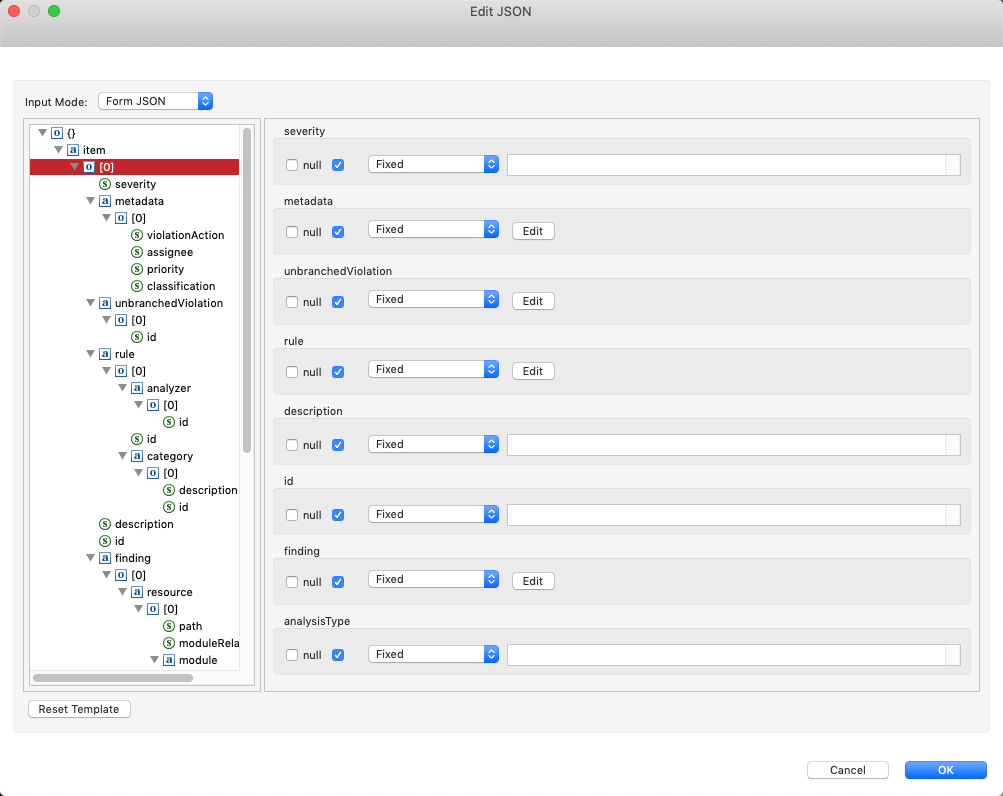
The Form JSON view also supports cut, copy, delete, and insert action from the right-click menu.
- Click OK. The Value field will show a preview of the JSON.

Scripted Values
You can also choose Scripted and construct the JSON payload through scripting
See Extensibility and Scripting Basics for additional information.
Parameterized Values
If your tool is connected to a data bank tool, you can choose Parameterized and choose extracted values from the drop-down menu (also see Parameterizing Tests with Values Extracted from Another Test).
Operation Settings
Enable the Replace existing correlation match option to update an existing record if a matched correlation is found.
Read Configuration
You can configure a Read action in order to copy or extract request or response data and pass it to other actions. This enables you to modify records in the data repository based on the test scenario.
- Click Add in the Read section and choose the element selector type.
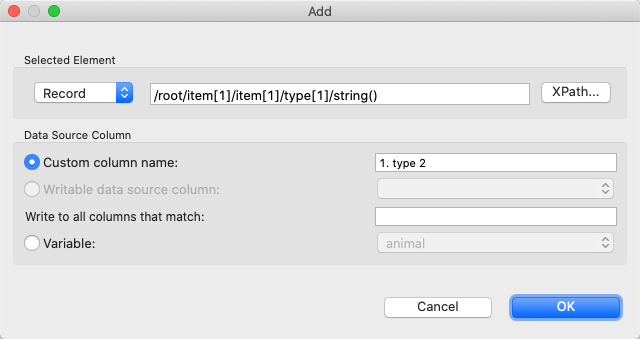
- Choose Record to specify the XPath of the record value you want to read.
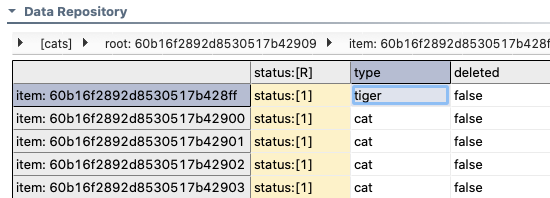
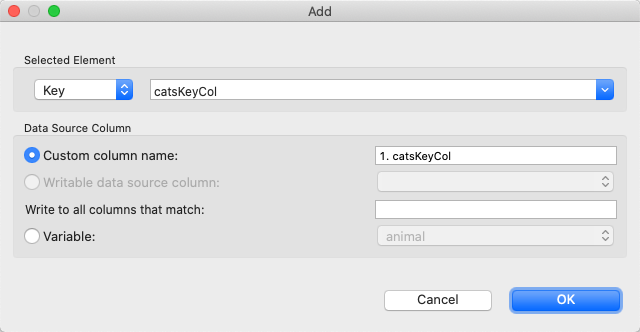
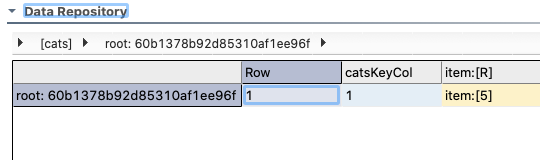
- Choose Key to specify the key column containing the key value you want to read. In the following example, the repository contains a key column called "catsKeyCol."
The repository contains two rows of selectable records.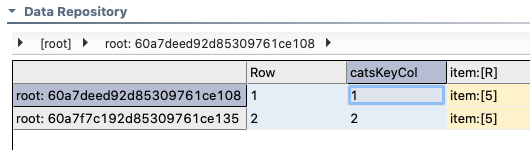
In this example, a wildcard is set in the data source correlation section, which indicates that the CRUD tool should read from all records. At runtime, the CRUD tool should return values1and2.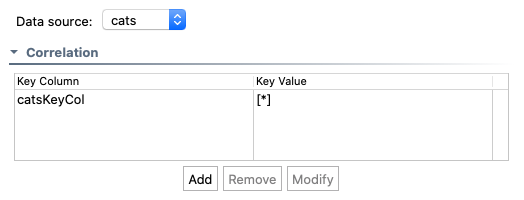
- Choose Record to specify the XPath of the record value you want to read.
- Specify a custom column name in which to store the value.
- If you are using the tool with a SOAtest client, you can also choose a column from a writable data source column.
- If your suite contains variables, you can specify a column name matching a variable value
- Click OK and enable any additional operation settings you want to apply:
- Enable the Fail if no correlation match option to prevent the tool from reading the repository if errors are reported. This option is enabled by default.
- Enable the Return the first correlation match only to stop reading after the first match. This option is enabled by default.
- Enable the Extract empty elements as: option and specify a value or parameterized value to use if the elements are empty.
- Enable the Extract missing elements as: option and specify a value or parameterized value to use if the elements are missing.
Update Configuration
Specify the location of the record you want to update using an XPath-like selector for accessing records in the data repository.
- Click Add and specify the update mode. The following modes are available:
- Replace Element(s). This mode updates the value of individual primitive records, such as strings.
- Replace List. This mode updates non-primitive values, such as arrays.
- Append to List. This mode adds a value to the end of an array.
- Prepend to List. This mode adds a value to the beginning of an array.
- Delete from List. This mode removes a value from an array.
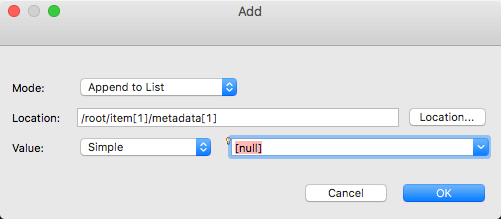
- Specify the location of the element you want to update in the location field.
- In the Value field, specify the new value using one of the following options:
- Choose Simple to enter a fixed value. You can also choose the special [exclude] or [null] values from the the drop-down menu.
- Choose Scripted and click Edit Script to programmatically specify a new value based the existing record.
- Choose Parameterized and choose an extracted value from the drop-down menu.
- Choose Complex and click Edit JSON to manually specify updates to the structure and values of the record. You can modify the JSON using the Form JSON view (default) or Literal view. Click Reset Template to undo modifications. The Form JSON view also supports cut, copy, delete, and insert action from the right-click menu.
- Click OK.
- Enable any additional settings in the Operation Settings section:
- Enable the Create if unable to update option to create a new record if an existing record cannot be found.
- Enable the Fail on correlation and update errors option to prevent the tool from update the repository if errors are reported. This option is enabled by default.
Delete Configuration
If the Delete operation is enabled, any record matching the correlation criteria configuration settings (see General Configuration) will be deleted.
You can enable or disable the Fail if no correlation match option.
CRUD Example Workflow
In this example, we will attach a CRUD tool to a JSON message responder and manipulate a connected data repository. In this example, we'll create a new repository based on a sample response, so you will need access to a functional API endpoint if you want to perform the following procedure.
Setting Up the Project
In this phase, we will set up the project, add the responder, and associate a data repository. You can skip this step if you have an existing responder or SOAtest client connected to a data repository.
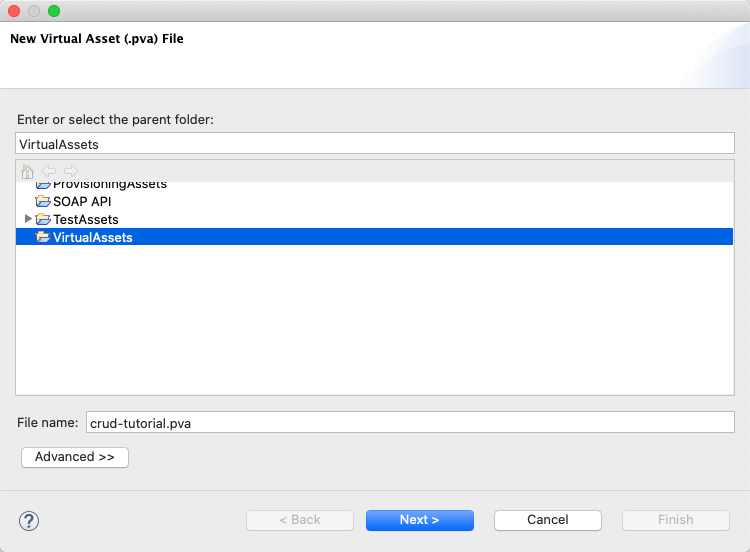
- Right-click on a project folder and add a new .pva file.
- Specify a name and click Next.
- We'll create an empty project in this example. Choose Empty and click Finish.
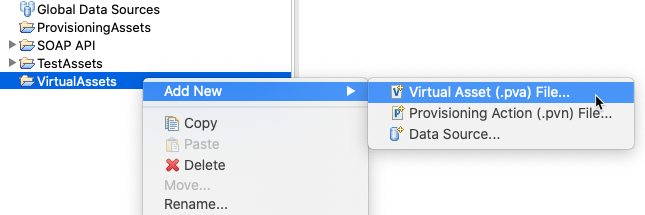
- Right-click the empty responder suite node and choose Add New > Responder.
- Choose JSON Message Responder or another responder type if you are adapting this example to your project and click Finish.
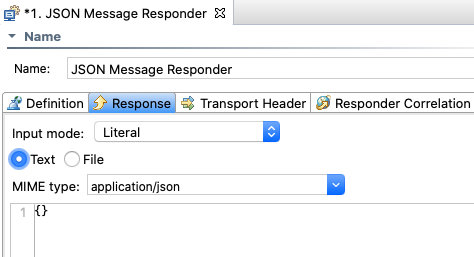
- In this tutorial, we will create a new repository from example responder traffic. Click the Response tab and switch the Form input mode to Literal.
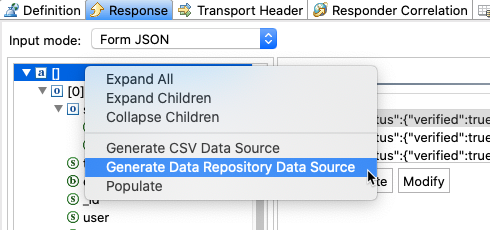
- Paste your sample response in the field and switch the Input mode to the Form input mode suitable for your traffic. In this example, we will switch to Form JSON mode.
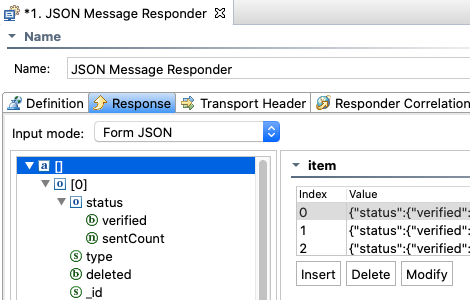
- Right-click the root node of the data tree and choose Generate Data Repository Data Source to begin creating the repository.
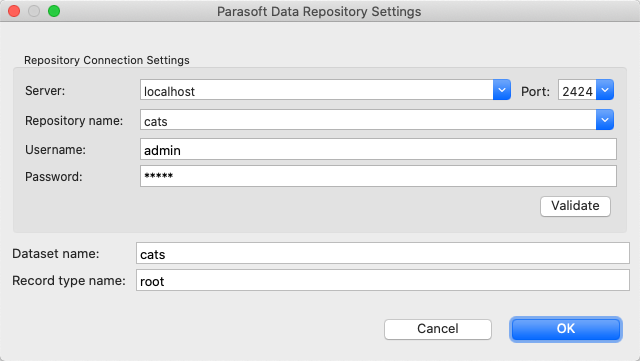
- Configure your data repository connection settings and click OK to create the repository.
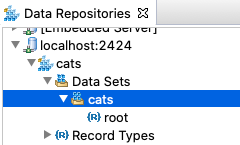
- The new repository in this example does not have a key column, which is necessary to for identifying records. Click on the new data set in the Data Repository view. You may need to open or refresh the view (see Exploring the UI).
- Right-click inside the data repository editor and choose Add Key Column.
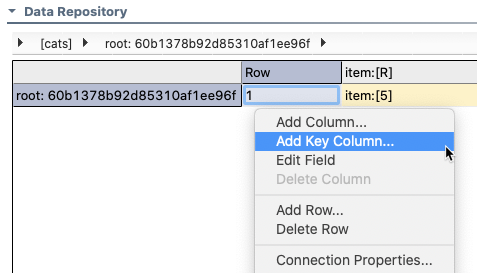
- Specify a name and click OK and save all your changes.
You should have a responder connected to a new repository with at least one key column.
Adding and Configuring the CRUD Tool
In this step, we will add and configure the CRUD tool to perform several operations.
- Right-click on the responder and choose Add Output.
- For this example, we want the CRUD tool execute when a request is sent to the responder. Choose Payload from the Incoming Request menu.
- Choose Data Repository CRUD Tool and click Finish.
- In the CRUD tool interface, click Add and rename the operation to "read".
- Choose the Read operation and verify that the data source you created is selected.
- Click Add in the Correlation table and specify the name of the key column.
- The repository in this example only has one row, but we will use a wildcard to correlate all rows.
- Click OK and click Add in the Read table.
- In this example, we will select the record to ready by specifying the XPath. Choose Record from the Selected Element menu and click XPath.
- Choose which element to read when prompted. In this example, we'll choose the root element to read the entire record.

- Click OK to close the XPath selector and click OK to finish adding configuring the element selection.
- Leave the default settings for all other Read options and click Add in the tool configuration section to add another operation.
- Rename this operation to "create" and choose the Create option.
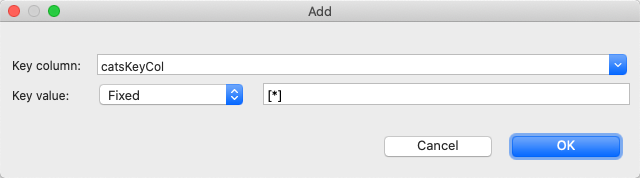
- Click Add in the Correlation table specify the key column and enter
2as the value to create another row. - Click OK and choose Parameterized from the Value field in the Create section and specify the root element. If the root element is not available from the drop-down menu, you may need to save your changes, close the CRUD tool editor, and reopen it.
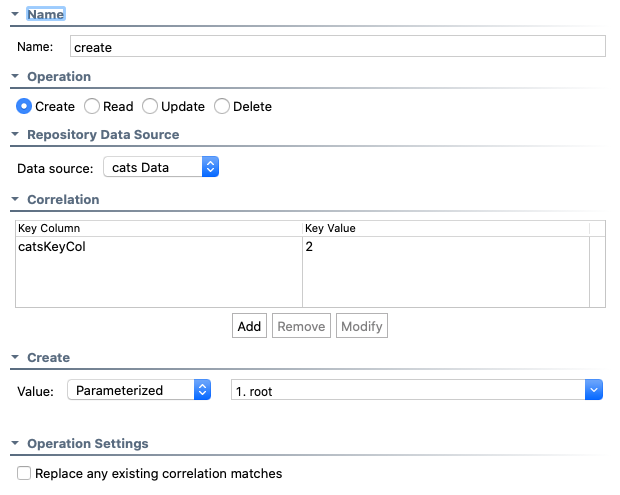
- The CRUD tool is now configured to read all stored records correlated with key column and create another record (row 2) containing all values under the root element. Save your changes and execute the .pva by calling its endpoint.
A copy of the record will be created in the repository.
Extending the Repository
You can add more operations to the CRUD tool to modify or delete existing records.
- Open the CRUD tool and click Add to create another operation.
- Rename the operation to "update" and choose the Update option.
- Click Add in the Correlation table and enter
catsKeyColfor the Key column field. - Specify the a fixed value of
2and click OK. This directs the operation to be performed on the record we created in the previous step. - Click Add in the Update table and choose the Replace Element(s) mode.
- Click Location and choose an element for which to update a value.
- Choose Simple from the Value menu and specify the new value for the field. In this example, the first item element under the root will be updated. To update all items at the same level, you could replace the
1in the path with a*wildcard.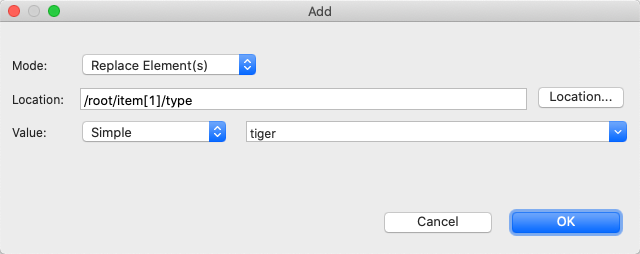
- Click OK and save your changes.
- Call the .pva and the record will be updated in the repository.