In this section:
Basic Installation
Extract the contents of the parasoft_selenic.zip folder to your test machine. After configuring the license (see Licensing), you will be able to use Selenic on the command line. See the Command Line section for details on using Selenic on the command line.
IDE Installation
You can also install the Selenic IDE plugin, which enables you to import Selenic recommendations into the IDE, create new Selenium tests from recorded actions, and easily update test code. Selenic cannot currently run in the same IDE instance as other Parasoft tools (for example, SOAtest, Jtest, and so on). Deploy a separate instance of your IDE for installing Selenic.
Eclipse
- If you have not already done so, extract the contents of the parasoft_selenic.zip folder to your test machine.
- Choose Help > Install New Software from the Eclipse menu.
- Click Add in the Available Software overlay and specify a name, such as "Selenic."
- Click Archive and browse for the selenic_eclipse_p2.zip file located in the
<INSTALL>/eclipse/directory and click Add. The browse window will close. - Expand the Parasoft Selenic package and enable the Parasoft Selenic plug-in.
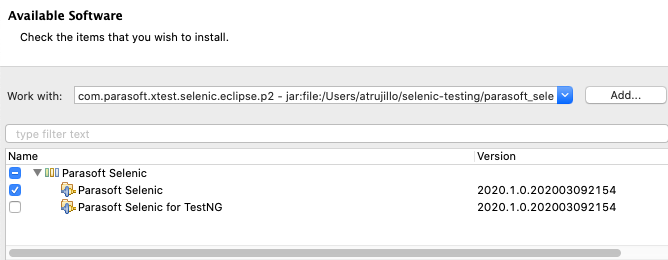
- If your tests are written for the TestNG framework, you must also enable the Parasoft Selenic for TestNG plug-in. You can skip this step if your Selenium tests are written for JUnit.
- Click Next and verify that the plug-in(s) you selected should be installed.
- Click Next and review the installation details.
- Click Next and accept the license agreement when prompted.
- Click Finish and restart Eclipse when prompted to complete the installation.
You will need to configure your license settings to continue (see Licensing).
IntelliJ
The Selenic implementation for IntelliJ requires two plugins to be installed.
- If you have not already done so, extract the contents of the parasoft_selenic.zip folder to your test machine.
- Choose Preferences from the IntelliJ IDEA menu (macOS) or Settings from the File menu (Windows) and click Plugins in the sidebar.
- Choose Install Plugin from Disk... from the gear icon menu and go to the
<INSTALL>/intellij/directory. - Choose either the selenic_intellij_plugin.zip or parasoft_intellij_plugin.zip file and click Open. Both plug-ins are required and the order in which they are installed has no impact.
- Repeat step 3 and 4 to install the other plug-in.
- Click Apply and restart the IDE.
You will need to configure your license settings to continue (see Licensing).
Installing Parasoft Recorder
Parasoft Recorder is a Chrome Browser extension shipped with Selenic that enables you to capture UI actions that Selenic can use to create Selenium tests and Selenium JUnit test projects.
- Navigate to the
<SELENIC_INSTALL>/recorderdirectory and run the Windows or MacOS installer. - The installer will guide you through the process of adding Parasoft Recorder to your browser. It will also install SOAtest Web Proxy, which is required for generating API tests with SOAtest or collecting coverage in multi-session mode (see Test Impact Analysis).
Refer to the Parasoft Recorder documentation for complete installation and usage information.
Updating Selenic
This topic describes how to update Selenic.
Command Line
Use the following procedure to update Selenic for your command line implementation:
- Back up the selenic.properties file to another directory.
- Delete the existing
<SELENIC_INSTALL>directory. - Extract the newer version of the Selenic archive to the same directory as the previous version.
- Move the selenic.properties backup file from step 1 into the newly extracted
<SELENIC_INSTALL>directory.
IDE
An update site is added to your IDE repository when you install Selenic. This enables you to use your IDE functionality to update Selenic. The license for your Selenic IDE plug-in and Selenic run configurations and settings will be preserved.
Eclipse
- Go to Help > Check for Updates from the Eclipse menu. If a new version is available, it will appear in the Available Updates overlay.
- Select the update and click Next.
- Review and verify that you want to update Selenic and click Next.
- Accept the license agreement when prompted and click Finish.
- If you have not already trusted the Parasoft update site in your Eclipse Preferences (Eclipse Preferences > Install/Update > Trust > Authorities tab), you will be asked to do so now. Enable https://updates.parasoft.com and click Trust Selected. This will add the Parasoft update site as a trusted site in your preferences, so you won't see this dialog again.
- Restart Eclipse when prompted.
IntelliJ
- Open the IntelliJ Preferences screen and click Plugins.
Locate the Parasoft Plugin and Parasoft Selenic plugins and click Update.
