In this section:
Introduction
Unit Test Assistant can help you create parameterized test cases to test methods against different arguments. Test cases can be added with the following UTA options:
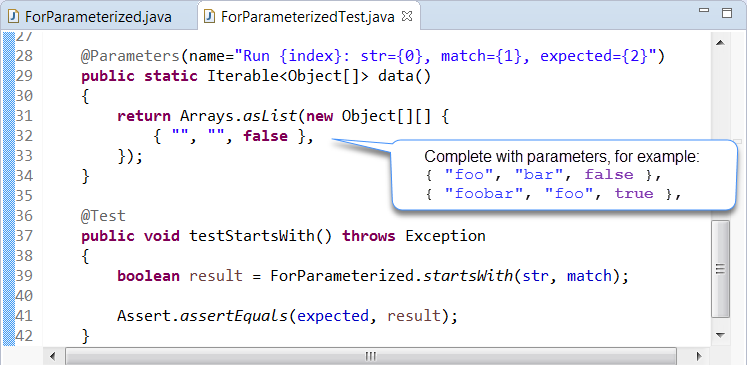
- Parameterized - Available in the UTA interface. This option allows you to add test templates for individual methods selected in the editor. The generated templates need to be manually modified and completed with parameterization data.
- Add test case(s) - Available in the UTA interface and the IDE context menu. This option allows you to add multiple test cases for methods selected in the editor or for items selected in the Project Explorer. You can configure input data that will be used when test cases are generated using this option; see Configuring Preferences for details.
Test parametrization is supported for JUnit 4 and 5. UTA generates parameterized tests using the testing framework and parameterization type configured on the Preferences page (see Configuring Preferences).
Using the Parameterized Option
- Select the method in the editor.
- Click the Parameterized action link in the Unit Test Assistant view
- Complete the test template with parameters and modify the default UTA values.
- Run the test with Unit Test Assistant to collect coverage information and recommendations for possible improvements (see Executing Unit Tests with Unit Test Assistant).
Creating Parameterized Tests for Private Methods
UTA allows you to create parameterized tests for private methods to achieve a higher code coverage rate.
- Enable the Create tests for private methods option in the UTA Preferences (see Configuring Preferences).
- Select a private method in the editor.
- Click the Parameterized private action link to create a test for the selected method.
By default, the Create tests for private methods option is disabled, because the industry best practice is to test private methods by creating tests for the accessible methods that call them, rather than by creating tests for private methods directly.
Using the Add test case(s) Option
- Select the method in the editor.
- Click the Add test case(s) button in the UTA interface.
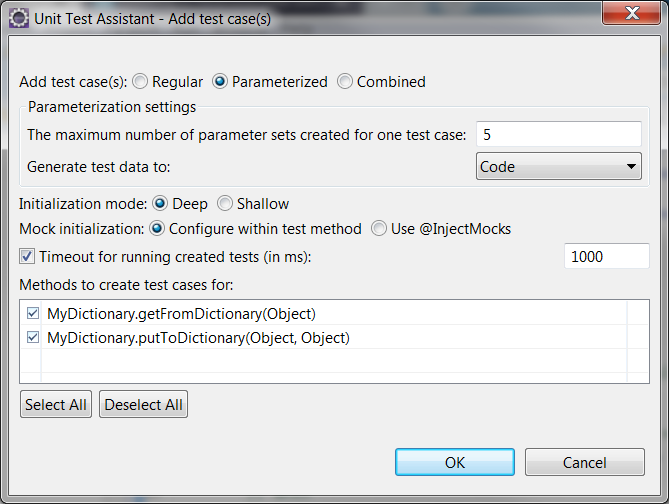
The Unit Test Assistant - Add test case(s) dialog will open. - Select the Parameterized option (see Creating Multiple Unit Tests for information about other options).
Customize the following options:
- The maximum number of parameter sets created for one test case specifies the maximum number of rows with parameter variants that will be created for one test case.
- Generate test data to specifies where the test cases will be saved. Choose Code (default) or CSV from the drop-down menu.About CSV
- The CSV format is supported for JUnitParams and JUnit 5 Parameterized test types.
- CSV supports UTF-8 character encoding.
- The CSV files are saved in the same folder as your Java files. If the location does not match the resource folder specified by your build system, copy the CSV files to the appropriate location.
- Specify the object initialization mode:
- Deep - (default) Prepares objects and mocks using data collected from the tested method and other methods that are called when the test is executed.
- Shallow - Prepares objects and mocks using data collected from the tested method. - Specify how you want mocks to be initialized:
- Configure within test method - Initializes mocks by declaring and initializing the object under test and its dependencies within the test method.
- Use @InjectMocks - Initializes mocks by using the @InjectMocks annotation to mark fields on which mock injection should be performed and the @Mock annotation for dependencies.
See Configuring Mock Initialization for details. - (Optional) Enable or disable the Timeout for running created tests (in ms) option and specify the time limit (in milliseconds) for executing this set of test. If the time limit is exceeded, the test execution will stop and the test will fail. The information about the error will be displayed as a Recommendation. This option is enabled and set to 1000 by default.
- Select the methods you want to create test cases for.
- Click OK to create test cases. Your test cases will include the preconfigured parametrization data (see Configuring Preferences to view and customize the settings).
- View the tests to modify the values and uncomment sample assertions.
- Run the test with UTA to collect coverage information and recommendations for possible improvements (see Executing Unit Tests with Unit Test Assistant).
Alternatively, you can add test cases using the context menu in the Package Explorer.
- Right-click the files, package(s), or project(s) in your IDE.
- Click Unit Testing> Add test case(s) to open the Unit Test Assistant dialog and follow the steps 3-11 described above.
If you select a scope larger than one file, the Unit Test Assistant dialog will not display individual methods. Test cases will be added to all testable files whose corresponding test classes have not been created. UTA will skip the files that are not testable or whose corresponding test classes already exist.
You can create test cases for individual methods selected in the Package Explorer if they are of the same class. If you select methods from different classes, or an individual method and a class or a package, test cases will not be generated.
Cloning as a Parameterized Test
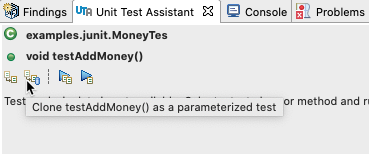
You can create a parameterized JUnit 5 test from an existing non-parameterized test from the UTA view.
Cloning an existing test as a parameterized test does not affect the original test. The existing literal values that are passed to the method under test will become test parameters. The values will be moved into a single row of data for the new test.


