Parameterization Introduction
- A Data Bank tool (described in Data Banks for Test Scenarios and Data Banks for Message Responders).
- A supported data source that is associated with the test scenario or responder suite—including Parasoft data repositories, data groups, Excel files, csv files, and SQL databases.
- A variable set that is associated with the test scenario (described in Working with Variables).
CTP automatically adds repository data sources when creating tests or virtual assets from traffic. Additional data sources can be defined directly from CTP, or added in the SOAtest/Virtualize desktop UI. Data Bank tools can be created directly from CTP, or added from the SOAtest/Virtualize desktop UI.
Adding and Configuring a Data Source
Adding a Data Source
- In the left pane, select the test or responder suite where you want the new data source added.
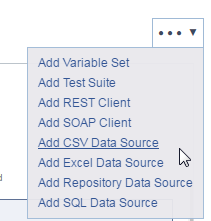
- Choose the appropriate Add New Data Source command from the page-level action menu.
- (Optional) Modify the name of the newly-created data source.
- Configure the data source as described below:
- Save the new data source configuration.
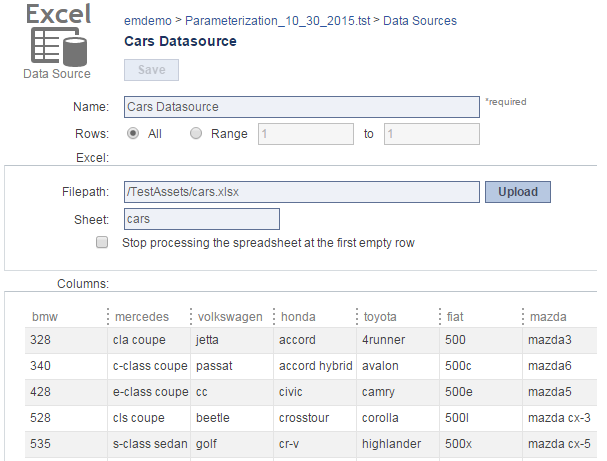
Configuring an Excel Data Source
- Use the Rows controls to indicate the range of rows you want to use. If you only want to use selected rows, click the Range button, then enter the desired range (assuming a one-based index) by typing values into the From and To fields. For example, to use only the first 10 rows, enter 1 in the From field and 10 in the To field. To use only the fifth row, enter 5 in the From field and 5 in the To field.
- For Filepath, specify the location of the Excel file you want to use. You can either click in the text field and select from the list of files already uploaded to the active workspace on this SOAtest/Virtualize server (using the process described in Uploading Files), or you can click Upload and add a file from your local system.
- For Sheet, specify the sheet of the specified Excel file you would like to use.
- If you want SOAtest to limit the size of every column in the Excel data source to the size of the column with the least number of rows (in other words, if you want it to stop processing data when it encounters an empty cell), enable Stop processing the spreadsheet at the first empty row.
Configuring a CSV Data Source
- Use the Rows controls to indicate the range of rows you want to use. If you only want to use selected rows, click the Range button, then enter the desired range (assuming a one-based index) by typing values into the From and To fields. For example, to use only the first 10 rows, enter 1 in the From field and 10 in the To field. To use only the fifth row, enter 5 in the From field and 5 in the To field.
- For Filepath, specify the location of the CSV file you want to use. You can either click in the text field and select from the list of files already uploaded to the active workspace on this SOAtest/Virtualize server (using the process described in Uploading Files), or you can click Upload and add a file from your local system.
- For Separator, enter or select the type of separator that the file uses.
- For Quote, enter or select the type of quotes that the file uses.
- Modify additional options if desired:
- Trim leading/trailing whitespace: Specifies whether or not to strip whitespace from the beginning and end of the value.
- First row specifies column names: Specifies whether or not to consider the first row of the CSV file as column names. If the first row specifies column names, the elements in Form XML will show the column names as the name of each value. If the first row does not specify column names, then the elements in Form XML will use "value" as the name of each value.

Configuring a Repository Data Source
Parasoft’s Data Repository is designed to help teams define, extend, and review large and/or hierarchical data sets for use in Parasoft messaging tools. A repository data source is a "wrapper" for the repository data source that allows you to consume it in Parasoft messaging tools—in the same manner as you would consume data from an Excel data sheet or CSV file.
To configure a repository data source:
Use the Rows controls to indicate the range of rows you want to use. If you only want to use selected rows, click the Range button, then enter the desired range (assuming a one-based index) by typing values into the From and To fields. For example, to use only the first 10 rows, enter 1 in the From field and 10 in the To field. To use only the fifth row, enter 5 in the From field and 5 in the To field.
- Specify the repository to which this data source will connect.
- For Host, specify which Data Repository server you want to connect to. You can select one of the servers connected through TDM—or you can specify a new server. If the named server does not yet exist, it will be created.
- For Port, specify the port for that Data Repository server.
- For Repository name, select or enter the name of the repository you want to use. You can select one of the repositories connected through TDM—or you can specify a new repository. If the named repository does not yet exist, it will be created.
- Enter the username and password for connecting to this Data Repository server .
- Specify the data set to which this data source will connect. It’s okay to specify a data set that does not yet exist. However, that data set will need to exist (and contain data) by the time you start applying tools to use this data source.

Creating a Repository Data Source for SQL Data Sets?
If you are creating a data source for use in Virtualize’s SQL Responder tool, be sure to change the Type setting from Data Set to SQL Data Set:
Configuring a SQL Data Source
- Use the Rows controls to indicate the range of rows you want to use. If you only want to use selected rows, click the Range button, then enter the desired range (assuming a one-based index) by typing values into the From and To fields. For example, to use only the first 10 rows, enter 1 in the From field and 10 in the To field. To use only the fifth row, enter 5 in the From field and 5 in the To field.
- Specify the database to which this data source will connect.
- For Database type, select the type of database you want to connect to. The driver for the specified database type must be available on your CLASSPATH.

Using a different type of database
If the database you want to use is not listed under Database type, select Custom. You can then specify a driver class in the Driver class field. Type the path to the appropriate JDBC driver class, including the package name.
- Specify the settings for that particular type of driver. Settings will vary from driver to driver.
- In the SQL Query area, type or copy the SQL query that expresses which data you want to use. A preview of the resulting data will be shown in the Columns area.
- (Optional) Enable Close connection if you want to close the connection to this database. It is recommended when you plan to use the data source only once, and it doesn't need to wait for another command. It is not recommended when you plan to have multiple data sources all connecting to the same database. In that case, all of the data sources can share a connection—and do not need to waste resources on a new connection each time.

Selecting a Data Source within a Test Scenario or Responder Suite

Specifying Parameterized Values
