Introduction
dotTEST allows you to monitor and collect coverage data from managed code during manual or automated functional tests performed on a standalone or web application.
In typical workflows, dotTEST collects coverage for web applications deployed on IIS server. You can collect coverage data from managed code during tests performed on a running web application that is deployed on IIS server. .NET web applications are supported. Alternatively, the application can be run as a desktop application (for example, using dotnet.exe or application executable if it is a .NET application).
Coverage can be collected using a dedicated dotTEST application coverage UI or the command line. You can send coverage data and test results to DTP, which merges and correlates the data. The application coverage information can be displayed in the DTP Coverage Explorer, which provides insights about how well the application is tested, as well as the quality of your tests. For details, see the "Coverage Explorer" chapter in the DTP User Guide.
Process Overview
dotTEST ships with a component called the coverage agent, which makes it possible to collect coverage for applications using REST client API for coverage engine (agent_client.exe). The tool facilitates collecting coverage information from managed code during execution of standalone and web applications. Coverage can be collected in two ways: using the command line or the UI. When using the command line, you can configure a separate coverage agent for each application in the agent_config.json file. Each coverage agent is controlled by agent_client via a dedicated WebSocket and/or REST API channel. WebSocket (default) is used for communicating with the CTP (Continuous Testing Platform).
dotTEST enables you to generate a local coverage report and upload the results to DTP.
The dotTEST coverage agent is attached to the application under test (AUT) and monitors the code being executed as the AUT runs. When the coverage agent is attached to the AUT, a REST API is exposed that enables you to mark the beginning and end of each test and test session. During test execution, interactions with the coverage agent and AUT are written to a dynamic coverage data file, which contains markers that specify which lines of code were touched.
Metadata about the lines of code that can be covered (static coverage data) is collected either by running a dedicated test configuration or by scanning the application assemblies. During test execution, interactions with the AUT are written to dynamic coverage data files, which contain markers that specify which lines of code were touched.
Dynamic coverage is not reported for files other than .cs or .vb.
dotTEST processes dynamic coverage and static coverage data. A coverage.xml file, which contains the coverage information, is produced and sent to DTP. When DTP receives the coverage data, it is loaded into a coverage image, which is a special tag that enables you to aggregate coverage data from runs with the same build ID. The coverage image enables you to associate coverage information with specific tests.
dotTEST can also collect application coverage which includes only runtime coverage and general information about the classes that have been executed without any details about the source code structure other than the lines that have been covered. A simplified report is then sent and appended to existing coverage data on DTP. The coverage data can be viewed if information about class structure (static coverage data) is already available on DTP.
Test results are also sent to DTP from the tool executing the tests (that is, CTP, SOAtest, tests executed by dotTEST, manual tests, etc.) in a report.xml file. If the build IDs for the coverage data (coverage.xml) file and the report match, DTP can correlate the data and display the coverage information.
You can use either dottestcov or the dottestcli to create a coverage report and upload the data to DTP. dottesctcov is a dedicated tool for coverage and offers more options in terms of collecting, merging and creating coverage reports, see Creating a Coverage Report and Uploading the Data to DTP. CTP can also collect coverage from the dotTEST coverage agent and publish that runtime coverage to DTP.
Agent_client (located in <INSTALL_DIR>\integration\coverage\agent) and dottestcov (located in <INSTALL_DIR>\integration\coverage\dottestcov) are standalone tools that can be copied out from dotTEST installation directory and used independently. Therefore, you can easily integrate them within your testing flow. For details about the agent client command line options, see Command Line Options for Agent Client. For details about dottestcov command line options, see Command Line Options for dottestcov.
Prerequisites for Using the Coverage Agent
Ensure that the Visual C++ Redistributable Packages that are shipped with dotTEST are installed on the machine where the monitored application will be run. They are automatically installed when you install dotTEST with the wizard (see Installation). If you install dotTEST from a ZIP distribution, or if you are going to collect coverage on another machine, install the packages manually by running the executables located in the <INSTALL_DIR>\bin\prerequisites directory.
The monitored application can be installed on the same machine where dotTEST is installed, or on another machine.
If you use a source control system, ensure that your source control settings are properly configured; see Source Control Settings.
Additionally, for web applications deployed on IIS server:
- The
LoadUserProfileoption should be set totruein the IIS Management Console. - Internet Information Services (IIS) version 7.5 or higher is required.
Prerequisites for Using the dottestcov Tool
The dottestcov tool can be run on the following operating systems:
- Linux with .NET Runtime 9.0
- Windows versions listed in Operating Systems.
The dottestcov tool requires Java 11 or higher to be installed on your machine. Both Oracle Java SE and OpenJDK are supported. Other free and open-source implementations may cause issues with the proper functioning of the coverage tool. It is recommended to set JAVA_HOME and add it to the system PATH.
Also, ensure the proper .NET framework is installed on your machine:
- .NET Runtime 9.0 (for
dottestcovon Linux) - .NET Framework 4.7.2 or .NET Runtime 9.0 (for
dottestcovon Windows)
Workflow for Coverage Collection Using Command Line
The following steps are required to collect coverage using CLI:
- Configure the coverage agent for the application; see Configuring the Coverage Agent.
- (Optional) Generate the static coverage file with source code information. The static coverage file contains metadata about user classes, methods, and lines; see Generating the Static Coverage File with Source Code Information.
- Attach the coverage agent to the AUT; see Attaching the Coverage Agent to the AUT.
- Collect coverage using CLI or execute tests to collect coverage; see Collecting Coverage Using CLI or Executing Tests to Collect Runtime Coverage.
- Stop runtime coverage collection; see Stopping Runtime Coverage Data Collection.
Configuring the Coverage Agent
You can define a separate coverage agent for each of your applications.
- Go to
<INSTALL_DIR>\integration\coverage\agentdirectory and edit the agent_config.json file. - Configure the properties for individual applications in the "apps" section, and global properties at the beginning of the file. If no apps are configured, a common session for all applications runs on the web server.
Note: The application name specified as an entry name in the "apps" section must match the actual or expected application name, defined as follows:
- For IIS applications:
- As the PARASOFT_DOTTEST_MONITORED_APP_NAME environment variable, or
- As the APP_POOL_ID variable set by the IIS based on the Application Pool name
- For standalone applications:
- As the PARASOFT_DOTTEST_MONITORED_APP_NAME environment variable, or
- As the process name (without the file extension)
Global properties
General coverage agent settings:coverageDataDirectory- Specifies the path to the coverage data output directory.
Default:%ProgramData%/ParasoftlocationmultiUser- Enables collecting coverage information for multiple users that are simultaneously accessing the same web application server. By default, coverage information is collected for a single user.
Default:falsenonInteractive- Disables all user input in the command line interface after the application starts.
Default:false
WebSocket/STOMP connection settings (required for CTP integration):
reconnectDelayMs- Specifies the delay, in milliseconds, between reconnection attempts when the connection to the coverage agent is lost.- Default:
2000 maxReconnectAttempts- Specifies the maximum number of reconnection attempts to the coverage agent after a connection failure.
Default:10heartbeat- Specifies the initial, negotiable heartbeat settings for the STOMP connection (send and receive intervals in milliseconds) used to keep the connection to the coverage agent alive and detect broken connections.
Default:0,0stompChunkSize- Specifies the chunk size in bytes for sending large binary responses over STOMP.
Default:1048576(equal to 1 MB)
REST server settings:
useSsl- Enables connecting via HTTPS.
Default:falseskipCertificateValidation- Enables using a self-signed SSL certificate.
Default:falsecertificateHash- Specifies the hash of the SSL certificate for the port that is used by the coverage agent.
Default:nullcertificatePath- Specifies the path to a PFX file that stores the SSL certificate.
Default:nullcertificatePassword-Specifies the password for the SSL certificate stored in a PFX file.
Default:nullskipRegistration- Enables running the application without registering the coverage service port. It is assumed that the port is already registered. This option allows running the application without admin privileges.
Default:false
Application-level properties
appCoverageScope- Specifies the path to the coverage scope configuration file. It is required if the scope is other than the default.
Default:nullcoverageFlushingInterval- Specifies the frequency, in seconds, at which collected coverage data is written to disk.
Default:0(no flushing)maxCoverableLines- Specifies a limit for the number of lines that can be covered.
Default:2123456connectionTimeout- Specifies the timeout, in milliseconds, for a connection with the coverage agent.Default:If you provide 0 or a negative value, the connection attempt will not timeout, which may lead to a considerable slowdown or cause the tool to hang indefinitely.
1500defaultTest- Specifies the test ID to be associated with the collected coverage data (until test execution events are triggered through the REST API).
Default:nulldefaultTestCase- Specifies the test case ID to be associated with the collected coverage data (until test execution events are triggered through the REST API).
Default:nullsessionAutostart- Specifies whether the coverage collection session starts automatically when the application or coverage agent is initialized.
Default:false
Settings for CTP integration:
ctpWebsocketUrl- Specifies the WebSocket URL used to establish a connection to the CTP (Continuous Testing Platform).
Default:nullctpSubscriptionQueue- Specifies the queue destination that the coverage agent subscribes to over WebSocket to receive coverage-related messages from the CTP.
Default:nullappLocationIncludes- Specifies the path to a file or directory containing application assemblies. This path is used to calculate checksums — either for each method within the assemblies, or for the entire application. Ant-style wildcards can be used to specify patterns. Alternatively, you can specify a .lst file containing a list of paths or patterns (each line in the file will be treated as a single entry).
Default:nullappLocationExcludes- Narrows the scope defined by the-appLocationIncludesproperty by excluding specified items.
Default:nulldtpProject- Specifies the DTP project to be sent to DTP with the collected coverage (required for CTP integration when publishing to DTP is enabled).
Default:nulldtpFilterID- Specifies the DTP filter to be sent to DTP with the collected coverage (required for CTP integration when publishing to DTP is enabled).
Default:nulldtpBuildID- Specifies the DTP buildID to be sent to DTP with the collected coverage (required for CTP integration when publishing to DTP is enabled).
Default:nulldtpCoverageImages- Specifies the DTP coverage images to be sent to DTP with the collected coverage (required for CTP integration when publishing to DTP is enabled). Specify tags that will be used to fill in coverage images in DTP, separated by semicolons. DTP supports up to three coverage images per report.
Default:null
REST server settings:
restServerEnabled- Enables REST server communication. It is disabled by default.
Default:falserestServerPort- Specifies the custom REST server port number to use when starting the coverage agent if the default port is unavailable.
Settings for desktop and standalone applications (also for running the Kestrel server):
appPath- Specifies the full path to the tested application for which coverage will be collected.
Default:nullappArguments- Specifies the application command line arguments.
Default:nullappWorkingDirectory- Specifies the path to the working directory.
Default:null
Generating the Static Coverage File with Source Code Information
Generating the static coverage file is required if you want to create a report containing merged static coverage (including source code information) and runtime coverage.
Generate the static coverage file by running the following test configuration on the solution:
dottestcli.exe -config "builtin://Collect Static Coverage" -solution SOLUTION_PATH
The dottestcli console output indicates where the static coverage data is saved, for example:
Saving static coverage information into: 'C:\Users\[USER]\Documents\Parasoft\dotTEST\Coverage\Static\[FILE].xml
This static coverage file can be used with dottestcli and dottestcov to be merged with runtime coverage data and sent to DTP.
Generating the Static Coverage File without Source Code Information
Generate the static coverage file by running the following command:
dottestcov.bat -app [dir]
Where -app specifies the path to the Application Under Test directory.
Attaching the Coverage Agent to the AUT
- Copy the
<INSTALLATION_DIR>\integration\coverage\agentdirectory to the machine where IIS is installed and the web application is deployed.Deploying the agent in the home directory (%USERPROFILE%directory) is not recommended, as it may prevent coverage collection from web-based applications. - Run a console as an Administrator.
Invoke the Agent Client tool on this machine to enable runtime coverage collection inside IIS:
agent_client.exe
You may need to configure the Agent Client with additional options, either in the agent.config.json file or on the command line; see Configuring the Coverage Agent and Command Line Options for Agent Client.
The Agent Client initializes the environment for the web server (IIS) and behaves like a service, enabling you to execute tests and collect coverage. The service is ready and waiting for commands as long as the following message is printed to the output:
Write 'exit' and hit Enter to close agent_client
A test session and test can be started even if the tested website or application has not been loaded yet.
- Ensure that port 8050 (default port for the coverage agent) allows HTTP traffic in firewall settings on this machine. You can change the coverage agent port number if the default port is unavailable.
- Open the website or application.
Go to the following address to check the status of the coverage agent:
http://host:8050/status
You should receive the following response:{"session":null,"test":null}
Connecting with the Coverage Agent via HTTPS
By default, the coverage agent is available via the HTTP protocol. To connect via HTTPS, you need to bind an SSL certificate to the port used by the coverage agent. This can be configured in the agent.config.json file (see Configuring the Coverage Agent) or by specifying a port with an SSL certificate and the appid of the Agent Client for the Netsh.exe tool. The Agent Client has the following ID:
{ed344e08-fab7-4dfb-9d07-68f2c2c9e373}
You can use an SSL certificate in the PFX or PKCS12 format.
Removing an SSL Certificate
By default, the Agent Client automatically handles certificates configured for the coverage agent. To manually remove a certificate, launch the Certmgr.exe tool and remove the certificate stored in Personal > Certificates.
If you manually unregister the coverage service port using the Agent Client with the -unregister switch, you need to add the -removeCertificate switche to remove the SLL certificate:
agent_client.exe -unregister -port 8050 -removeCertificate
This will delete the SSL certificate from the port number. You can now manually remove the certificate from the storage.
Collecting Coverage Using CLI
Prerequisites: The coverage agent must be configured in the agent_client.json file; see Configuring the Coverage Agent.
To collect coverage using CLI, run agent_client.exe with the dedicated command line options to specify the information necessary for collecting application coverage.
Customizing the Coverage Scope Using dottestcli
By default, coverage is measured for the entire application. To narrow down the scope of collecting coverage, provide paths to the selected parts of the application with the -solution, -resource, -include, and/or -exclude options (see Configuring the Test Scope for details) when generating static coverage. As a result, dotTEST will generate a scope configuration file that would include the customized scope for collecting static coverage.
You do not need to modify the content of the scope configuration file. However, if you collect coverage for large applications, you may want to additionally fine-tune the scope of collecting runtime coverage (that is, coverage collected while interacting with the application under test) to optimize performance. To customize collecting runtime coverage, open the scope.instumentation.txt file and remove the assemblies for which you do not want to collect coverage data from the list of assemblies.
It is not possible to use the application coverage scope file for web projects that are compiled on IIS. This is because the target assemblies of IIS compilations are named unpredictably. Scope files can be used safely when the assembly's name loaded by IIS can be predetermined before coverage collection starts.
To narrow down the scope of collecting coverage:
Add the paths to resources to your command line (see Generating the Static Coverage File with Source Code Information), for example:
dottestcli.exe -config "builtin://Collect Static Coverage"
-solution "C:\Devel\FooSolution\FooSolution.sln"
-resource "FooSolution/QuxProject"
-include "C:\Devel\FooSolution\src\QuxProject\**\*.cs"
-exclude "C:\Devel\FooSolution\src\QuxProject\**\tests\**\*.cs"
When static coverage is generated, the scope information is stored in a scope configuration file. The output from the console indicates the location of the scope configuration file, for example:
Saving static coverage scope configuration into: 'C:\Users\[USER]\Documents\Parasoft\dotTEST\Coverage\Static\scope.instrumentation.txt'
Pass the path to the scope configuration file to the Agent Client tool (see Attaching the Coverage Agent to the AUT) with the
-scopeoption, for example:agent_client.exe -scope 'C:\Users\[USER]\Documents\Parasoft\dotTEST\Coverage\Static\scope.instrumentation.txt'
Customizing the Coverage Scope Using dottestcov
By default, coverage is measured for the entire application. To narrow down the scope of collecting coverage, execute:
dottestcov.bat
-include "MyAssembly.dll/*"
-exclude "MyAssembly.dll/packageA.*"
-app [dir] -runtime [path/dir] -publish -settings [path to .properties]
Changing Agent Client Idle Timeouts
By default, the Agent Client application pool processes are recycled after 20 minutes of idle time, which can have negative consequences on a test session. You can prevent this behavior by changing the default value so that people working with the application do not experience unexpected stops and restarts during a test session.
- Start the Internet Information Services (IIS) Manager.
- Open the Application Pools node.
- Choose the pool for your web application.
- Click Advanced Settings in the Actions panel.
- In Process Model section, change the Idle Time-out (minutes) setting to a value better suited to your testing practices.
Executing Tests to Collect Runtime Coverage
You can use CTP or SOAtest to collect runtime coverage while running functional tests. The runtime coverage data is then uploaded to DTP. Refer to the SOAtest user guide for details about performing test sessions.
You can also execute tests on an application with the attached coverage agent. Coverage will be collected in the runtime coverage directory. Next, you need to merge the runtime coverage with static coverage and upload the merged data to DTP. For details, see Creating a Coverage Report and Uploading the Data to DTP.
Stopping Runtime Coverage Data Collection
You can stop the process of collecting runtime coverage data in one of the following ways:
Write
exitin the open console when the following message will be printed to the output to stop the agent client:Write 'exit' and hit Enter to close agent_client
Send a request to the service by entering the following URL in the browser:
http://host:port/shutdown- Send a request to the service by entering the following URL in the browser:
http://host:port/terminate- this request stops coverage data collection for all running applications.
Agent client is stopped only when all test sessions are finished. Application coverage will no longer be collected when the service stops, so it is important that the agent client runs continuously while performing tests to collect coverage.
If any errors occur when the agent client exits, which prevents the clean-up of the Web Server environment, then execute the agent client with the -uninitialize option to restore the original Web Server environment and settings:
agent_client.exe -uninitialize
Workflow for Coverage Collection Using UI
You can collect coverage from the applications residing on an IIS server or for a specified standalone or web application using a dedicated UI. The Coverage Agent initiates a single REST API session to collect coverage data for all applications.
Collecting Application Coverage for IIS Web Applications
Follow these steps to collect coverage from all the web applications residing on the configured IIS server:
- To launch the dotTEST application coverage UI, go to
<INSTALL_DIR>\integration\coverage\agentand double-click the agent_client_ui.lnk shortcut. - Choose IIS Web Application and click Next.

- (Optional) Configure the following settings:
- Application URL - Specifies the URL of an application which you will be able to run from the application coverage UI.
- Advanced settings:
- Enable simultaneous collection of coverage for multiple users - Enables collecting coverage information for multiple users.
- Coverage output directory - Specifies the path to the coverage data output directory.
- Coverage scope file - Specifies the path to the coverage scope configuration file. It is required if the scope is different from the default.
- Agent REST API port - Specifies the custom port number to use when starting the coverage agent if the default port is unavailable.
- Agent connection timeout (seconds) - Specifies the timeout for a connection with the coverage agent. The default value is 2 seconds.
If you provide 0 or a negative value, the connection attempt will not timeout, which may lead to a considerable slowdown or cause the tool to hang indefinitely.
- Enable data flushing - Enables flushing of collected coverage data to disk.
- Data flushing interval (seconds) - Specifies the frequency at which collected coverage data is written to disk. To update the interval, set a value greater than 1 second.
- Maximum number of coverable lines - Specifies a limit for the number of lines that can be covered.
- Enable SSL for connecting to the agent - Enables connecting via HTTPS.
- Skip SSL certificate validation - Enables using a self-signed SSL certificate.
- Certificate path - Specifies the path to a PFX file that stores the SSL certificate.
- Certificate hash - Specifies the hash of the SSL certificate for the port that is used by the coverage agent.
- Certificate password - Specifies the password for the SSL certificate stored in a PFX file.
- Click Next. Coverage will be collected for all applications residing on the IIS server.
- (Optional): Perform tests on the specified application and view the coverage API. Click Start Application to run the specified application and perform tests on it.

- Click Stop Coverage Agent to finish collecting coverage from all applications.
- Click Finish to close the application coverage UI, or New Session to configure a new coverage collection session.
Collecting Application Coverage for Standalone and Web Applications
Follow these steps to collect coverage for a specified standalone or web application:
- To launch the dotTEST application coverage UI, go to
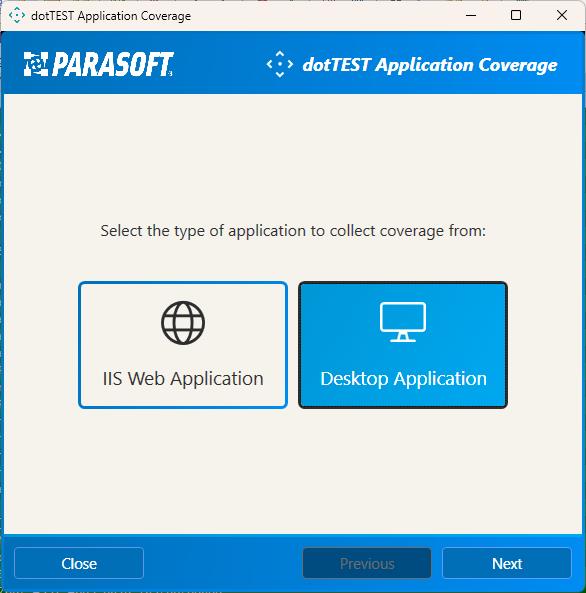
<INSTALL_DIR>\integration\coverage\agentand double-click the agent_client_ui.lnk shortcut. - Choose Desktop Application and click Next.
- Configure the following settings:
- Full path to the tested application - Specifies the full path to the tested application for which coverage will be collected. You will be able to run this application from the application coverage UI.
- Application command-line arguments - Specifies the application command line arguments.
- Application working directory - Specifies the path to the working directory.
- (Optional) Advanced settings:
- Enable simultaneous collection of coverage for multiple users - Enables collecting coverage information for multiple users.
- Coverage output directory - Specifies the path to the coverage data output directory.
- Coverage scope file - Specifies the path to the coverage scope configuration file. It is required if the scope is other than the default.
- Agent REST API port - Specifies the custom port number to use when starting the coverage agent if the default port is unavailable.
- Agent connection timeout (seconds) - Specifies the timeout for a connection with the coverage agent. The default value is 2 seconds.
If you provide 0 or a negative value, the connection attempt will not timeout, which may lead to a considerable slowdown or cause the tool to hang indefinitely.
- Enable data flushing - Enables flushing of collected coverage data to disk.
- Data flushing interval (seconds) - Specifies the frequency at which collected coverage data is written to disk. To update the interval, set a value greater than 1 second.
- Maximum number of coverable lines - Specifies a limit for the number of lines that can be covered.
- Enable SSL for connecting to the agent - Enables connecting via HTTPS.
- Skip SSL certificate validation - Enables using a self-signed SSL certificate.
- Certificate path - Specifies the path to a PFX file that stores the SSL certificate.
- Certificate hash - Specifies the hash of the SSL certificate for the port that is used by the coverage agent.
- Certificate password - Specifies the password for the SSL certificate stored in a PFX file.
- Click Next. The specified application will be run and coverage will be collected. Perform tests on the application.
- Click Stop Coverage Agent to finish collecting coverage from the application.
- Click Finish to close the application coverage UI, or New Session to configure a new coverage collection session.
Publishing and Reviewing Test Results in DTP
Uploading Test Results to DTP
Follow these steps to upload the test results from the executed tests to DTP:
- Go to Report Center in the DTP interface.
- Click the gear icon and choose Report Center Settings > Additional Settings > Report Center Administration > Tools > Data Collector Upload Form (requires admin permissions).
- Click Choose File and browse for the report.xml file.
- Click the Upload button to upload the file to DTP.
If you use CTP or SOAtest, test results are automatically sent to DTP during test execution. See Collecting Coverage for Microservices Guide for CTP and the Application Coverage section in the SOAtest user guide at https://docs.parasoft.com.
Creating a Coverage Report and Uploading the Data to DTP
You can use either the dottestcov or the dottestcli command to create a coverage report and upload the data to DTP. For details about dottestcov command line options, see Command Line Options for dottestcov.
There are 3 types of coverage report that can be generated:
- A static and runtime coverage report - a report containing merged static coverage (including source code information) and runtime coverage. To create this report, run
dottestcliwith the-runtimeCoverageand-staticCoverageswitches ordottestcovwith the-runtimeand-staticswitches. - An application coverage report - a static coverage report created by scanning application assemblies and runtime coverage. To create this report, run
dottestcovwith the-appand-runtimeswitches. - A runtime coverage report - a simplified application coverage report including only runtime coverage and general information about the classes that have been executed without any details about the class structure (only the lines that have been covered). The report can be viewed if there is already existing application or static coverage-based data on DTP. To create this report, run
dottestcovwith the-runtimeswitch.
Follow the procedure below to create a coverage report and upload the data to DTP:
- Ensure that
dottestcli/dottestcovis properly configured, including DTP, scope, and authorship settings. See Connecting to DTP, Sending Results and Publishing Source Code to DTP, Configuration. - Configure the following settings in the .properties file in order to properly merge coverage data:
-report.coverage.images- specifies a set of tags that are used to create coverage images in DTP. A coverage image is a unique identifier for aggregating coverage data from runs with the same build ID. DTP supports up to three coverage images per report.
-session.tag- specifies a unique identifier for the test run and is used to distinguish different runs on the same build.
-build.id- specifies a build identifier used to label results. It may be unique for each build, but it may also label several test sessions executed during a specified build.
-report.coverage.limit - If you want to use
dottestcli, copy the runtime coverage and static coverage files to the same machine and rundottestcliwith the following switches:-runtimeCoverage- specifies the path to runtime coverage data collected using the coverage agent. You can provide a path to an individual .data file with coverage information from one testing session, or a path to a folder that contains many .data files from multiple testing sessions.-staticCoverage- specifies the path to the static coverage file (see Generating the Static Coverage File with Source Code Information).-publish- sends the merged coverage to DTP.dottestcli.exe -runtimeCoverage [path] -staticCoverage [path] -publish
This ensures that dotTEST has access to the runtime coverage data generated during test execution, as well as the static coverage data, which is required to fill the coverage.xml file with runtime coverage data.
- If you want to use
dottestcov, rundottestcovwith the following switches:-app- specifies the path to the Application Under Test directory or archive file.-runtime- specifies the path to runtime coverage data collected using the coverage agent. You can provide a path to an individual .data file with coverage information from one testing session, or a path to a folder that contains many .data files from multiple testing sessions.-static- specifies the path to the static coverage file (see Generating the Static Coverage File with Source Code Information).-publish- sends the merged coverage to DTP.Example 1: Generating a report based on runtime data and static coverage from the monitor
dottestcov.bat -static [path to static_coverage.xml file] -runtime [path/dir]
-publish -settings [path to .properties]
Example 2: Generating a report based on runtime data and coverage from the application binaries
dottestcov.bat -app [dir] -runtime [path/dir] -publish -settings [path to .properties]
Example 3: Generating a report based on runtime data
dottestcov.bat -runtime [path/dir] -publish -settings [path to .properties]
If you want to merge previously generated runtime coverage reports, run the
dottestcov mergecommand. To merge two or more reports, rundottestcov.bat merge -coverage <REPORT_FILE> -coverage <REPORT_FILE> [-coverage <REPORT_FILE>] [-report <REPORT_DIR>] [-excludeunmatchedruntime]
-coverage <REPORT_FILE>- specifies one or more input coverage reports to merge and publish to DTP.-report <REPORT_DIR>- (optional) generates an xml coverage report to the given folder. By default, the report is stored to the.coverage/reportsfolder.
If you use SOAtest, static and runtime coverage data are merged and sent to DTP during test execution. See the "Application Coverage" section in the SOAtest User Guide.
Reviewing Coverage in DTP
You can use the Coverage Explorer in DTP to review the application coverage achieved during test execution. For details on viewing coverage information, see the DTP User Guide.
Known Limitations
- You can download coverage information that was collected in a test session. Coverage data collected when no test session was active cannot be downloaded.
- If multiple users are simultaneously accessing the same web application, the coverage data they collect may be mixed. To ensure that coverage is properly associated with individual users, the multiuser mode must be enabled.
- The HTTP or HTTPS protocols are required to enable the multiuser mode, as the user-specific information must be provided within the HTTP header.
- In multiuser mode, coverage collection is supported for .NET applications, but not for .NET Framework applications. See Supported Frameworks.
- In multiuser mode, collecting coverage for WCF-based applications requires that they have the ASP.NET compatibility mode enabled.
- In multiuser mode, the "default" user (the user who has not specified their ID) may collect extra coverage information from other users who are accessing the same web application.
- Coverage data collected web initialization is not assigned to a specific user, but to the "default" user.
- The application coverage scope file cannot be used for WebSite projects as they may get recompiled by IIS server and change the name of the target assembly. Scope files can be safely used for Web Applications.
