Parasoft's solution provides extensive support for generating and consuming JMS messages, and simulating various patterns-including point-to-point and publish-and-subscribe patterns. This allows for end-to-end testing and validation of messaging systems. These same scenarios can be scaled into load tests.
The exercises in this lesson will use the ParaBank application introduced in Setting Up ParaBank.
Preparation: Running ParaBank
To configure SOAtest for the ParaBank tests:
- Add the JDBC driver to the SOAtest JDBC Driver preference page as follows:
- Choose Parasoft> Preferences, then open Parasoft > JDBC Drivers.
- Click New.
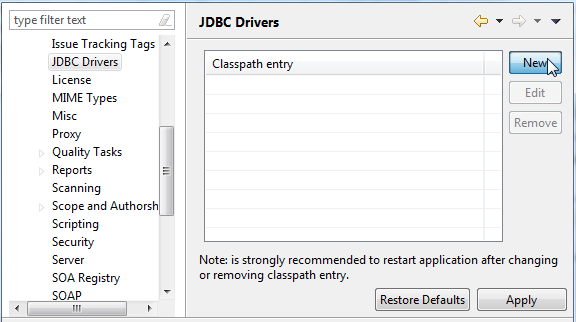
- Navigate to your ParaBank workspace, select
{PARABANK}/WebContent/WEB-INF/lib/hsqldb-<version>.jarand click Open. - Click OK and apply the changes.
- Add the ActiveMQ driver to the SOAtest System Properties preference page as follows:
- Choose Parasoft> System Properties from the main menu
- Click Add JARs.
- Navigate to your ParaBank workspace, select
{PARABANK}/WebContent/WEB-INF/lib/activemq-client-<version>.jar, then click Open.
- Ensure that the ParaBank Tomcat 8.5 Server is Started and Synchronized.
Testing JMS Services
To test JMS services provided by the ParaBank application:
- Right click the main project you have been using in this tutorial, then choose Add New > Test (.tst) File.
- Enter
LoanProcessorin the File Name field, then click Next. - Select Empty, then click Finish.
- Right click the Loan Processor> Test Suite: Test Suite node, then choose Add New> Test.
- Add a SOAP Client tool as follows:
- Right click the Loan Processor> Test Suite: Test Suite node, then choose Add New> Test.
- Select SOAPClient, then click Finish.
- In the SOAP Client editor that opens, rename the SOAP Client to
initializeDB. - To to the WSDL tab and enter
http://localhost:8080/parabank/services/ParaBank?wsdlinto the WSDLURL field. - Click RefreshWSDL to propagate the WSDL to the other sections of the SOAP Client.

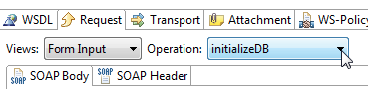
- Go to the Request tab and ensure that Operation is set to initializeDB. This will reset the ParaBank database for this example.
- Save the initializeDB SOAP Client.
- Add a Messaging Client tool as follows:
- Right click the Loan Processor> Test Suite: Test Suite node, then choose Add New> Test.
- Select MessagingClient, then click Finish.
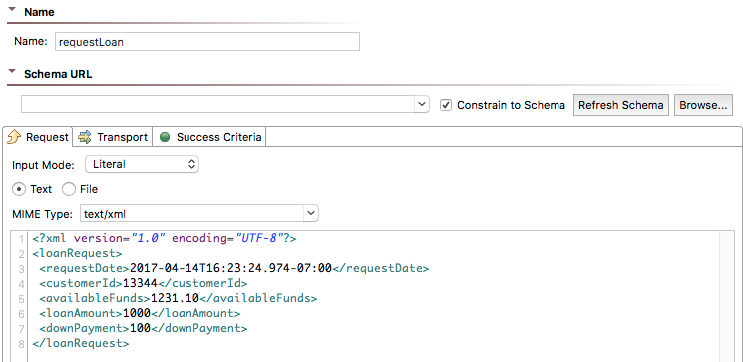
- In the Messaging Client editor that opens, rename the Messaging Client to
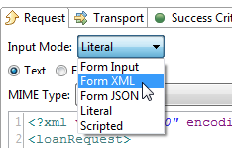
requestLoan. - Click the Request tab and set InputMode to Literal.
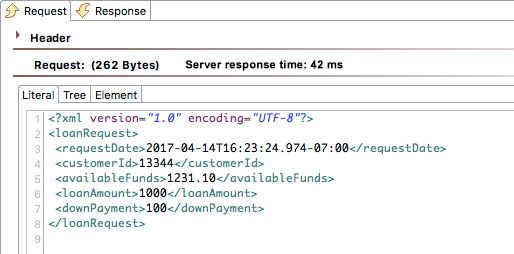
Replace the
<Placeholder/>element with the following XML:<?xml version="1.0" encoding="UTF-8"?> <loanRequest> <requestDate>2017-04-14T16:23:24.974-07:00</requestDate> <customerId>13344</customerId> <availableFunds>1231.10</availableFunds> <loanAmount>1000</loanAmount> <downPayment>100</downPayment> </loanRequest>
- Save the Messaging Client.
- Switch the InputMode to FormXML.
If prompted, click Yes to propagate the values. You will see the tree structure of the loanRequest element.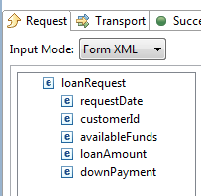
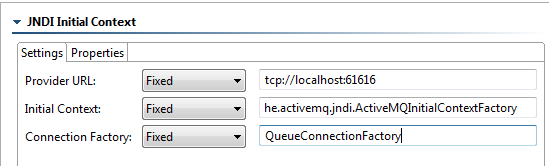
- Go to the Transport tab, set Transport to JMS, then enter the following:
- ProviderURL: tcp://localhost:61616
- InitialContext: org.apache.activemq.jndi.ActiveMQInitialContextFactory
- Connection Factory: QueueConnectionFactory
- Select Queue/Topic from the left panel, then enter
queue.loans.requestfor the JMSDestination andqueue.loans.responsefor the JMSReplyTo.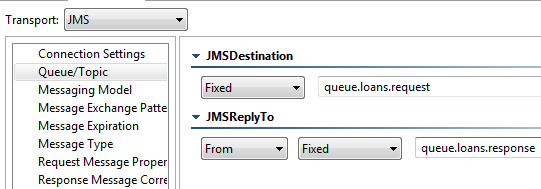
- Save the requestLoan Messaging Client.
- Run the test suite.
- Expand the requestLoan Messaging Client node, double click the Traffic Viewer.
- Open the Traffic Viewer’s Response tab and note that the <approved> element returns true.