This topic explains how to configure deployment settings for Virtualize servers. Refer to Configuring Virtual Assets Deployed to Virtualize Server for details on configuring individual virtual asset deployment settings deployed to a server.
In this section:
You can configure additional settings (for example, startup, authentication, and CTP notification options) from the Preferences panel as described in Server Settings.
You should deploy the Virtualize server in a secure manner on a trusted network. The Virtualize server hosts web services that can be used to manage virtual assets, so any host with network access to the Virtualize server can add, modify, or remove virtual assets hosted by that Virtualize server. If a connection to CTP is configured, however, access controls will be enforced. See Configuring User Access Control for Virtualize Servers for details.You could use a proxy server or gateway in front of the Virtualize server to apply additional layers of security other than what is provided by the Virtualize server.
The Virtualize server's HTTPS port (9443) should be used when sending login credentials.
Take extra caution when deploying a Virtualize server on an untrusted network, such as the Internet. We recommend that you use a firewall to block unacceptable access (such as restricting access by IP addresses). A proxy server or gateway could also be used in front of the Virtualize server to add authentication, filtering, and logging.
To secure communication between the Virtualize server and your AUT (Application Under Test), you need to configure HTTPS using a trusted certificate and its corresponding private key. This can be a certificate issued by a trusted certificate authority (CA), or a self-signed certificate. Note that if you use a self-signed certificate, you must ensure that all client applications (such as your AUT) trust this certificate. For Java-based clients, this typically involves importing the certificate into the Java truststore (cacerts).
There are several options to setup SSL:
For the AUT to accept a certificate/private key pair, you generally need—at minimum—a self-signed certificate/private key pair whose common name (CN) parameter matches the fully-qualified name of the server. For example, if your Virtualize server URL is http://myserver.mycompany.com, the CN parameter should be "myserver.mycompany.com".
In any case, Virtualize can be configured to accept incoming HTTPS connections on port 9443 (default SSL connector) or another port.
After obtaining your certificate and private key, you need to configure the Virtualize server's underlying Tomcat instance to use them. This requires editing the server.xml configuration file.
<INSTALL-DIR>/plugins/com.parasoft.ptest.libs.web_<VERSION>/root/tomcat/conf <TOMCAT_HOME>/confSSL details can be configured by modifying the SSL HTTP/1.1 Connector entry in server.xml. For example:
<Connector port="9443" protocol="org.apache.coyote.http11.Http11NioProtocol"
               connectionTimeout="20000"
               enableLookups="false"
               maxThreads="150"
               SSLEnabled="true"
               scheme="https"
               secure="true">
        <SSLHostConfig>
            <Certificate certificateKeystoreFile="conf/server-keystore.jks"
                         certificateKeystorePassword="changeit"
                         certificateKeyAlias="virtualize"
                         type="RSA"/>
        </SSLHostConfig>
</Connector> |
certificateKeystoreFile
The certificateKeystoreFile attribute specifies the location of the keystore file that contains the Virtualize server’s private key and SSL certificate. This file is essential for enabling HTTPS, as it allows the server to identify itself securely to clients. The value depends on your configuration option.
C:/Users/myUser/keystore.jks.keystoreFile attribute, since the AUT will accept any server certificate.certificateKeystorePassword
Set the certificateKeystorePassword attribute to be the password to your keystore.
certificateKeyAlias
Set the certificateKeyAlias attribute to point to the alias of the certificate/private key pair.
type
Set the type to the type of keystore you are using, such as PKCS12, JKS, BKS, UBER, or PEM.
Two-Way SSL (Mutual Authentication)
For two-way SSL (mutual authentication), the trust store used for validating client certificates should be specified using the truststoreFile, truststorePass, and truststoreType in the SSL HTTP/1.1 Connector entry in server.xml. For example:
<Connector port="9443" protocol="org.apache.coyote.http11.Http11NioProtocol"
               connectionTimeout="20000"
               enableLookups="false"
               maxThreads="150"
               SSLEnabled="true"
               scheme="https"
               secure="true">
        <SSLHostConfig sslProtocol="TLS"
                       truststoreFile="conf/server-truststore.jks"
                       truststorePassword="changeit"
                       truststoreType="JKS"
                       certificateVerification="required"
                       protocols="all">
            <Certificate certificateKeystoreFile="conf/server-keystore.jks"
                         certificateKeystorePassword="changeit"
                         certificateKeyAlias="virtualize"
                         type="RSA"/>
        </SSLHostConfig>
</Connector> |
Additional Configuration Details
For more details on how to enable and configure the SSL connector, see the Apache Tomcat documentation (https://tomcat.apache.org/tomcat-9.0-doc/ssl-howto.html).
It is possible to configure more than one port number for SSL. This is typically the case if different keystore/certificate configurations need to be virtualized.
The default SSL connector (the one with attribute name="default") port number should be changed in the Virtualize server preferences (see Server Settings for details). When Virtualize starts, the preferences settings will take precedence over the server.xml settings.
You may add additional Connector elements to server.xml with distinct names and distinct SSL/certificate configurations as needed. Virtual assets and proxies cannot be mapped to specific Connector ports. A message received on a particular connector/port could be processed by any virtual asset based on header, URL and message content correlation criteria within the virtual asset path, proxy path or responder correlation rules, but not based on the port.
The Virtualize server supports Tomcat's relaxedPathChars and relaxedQueryChars properties (see https://tomcat.apache.org/tomcat-8.5-doc/config/http.html). These properties enable you to specify which unencoded characters should be allowed in URI paths and URI query strings. You can specify the following characters: " < > [ \ ] ^ ` { | }
If you do not specify which characters are allowed, the Tomcat server will reject messages that contain one or more of the unencoded characters in URI paths and queries.
Add the relaxedPathChars and relaxedQueryChars attributes to the <Connector> element in the server.xml file and specify the characters you want to allow. If there is more than one <Connector> element, add the attributes to the elements with the protocol set to HTTP and HTTPS. The file is located in the <INSTALL-DIR>/plugins/com.parasoft.ptest.libs.web_<VERSION>/root/tomcat/conf directory.
Example:
<Connector
URIEncoding="UTF-8" allowTrace="true" connectionTimeout="20000"
enableLookups="true" name="default" port="9080" protocol="HTTP/1.1"
redirectPort="9443"
server="Parasoft Server"
relaxedPathChars="" < > [ \ ] ^ ` { | }"
relaxedQueryChars="" < > [ \ ] ^ ` { | }"
/> |
You can also configure these properties at the HTTP Listener level. See HTTP Reverse Proxy Configuration.
You can configure various preferences and settings for a Virtualize server in the server configuration panel. To open this panel:
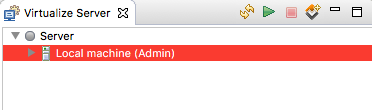
From this panel, you can review and modify settings related to monitoring, server statistics, global JMS and IBM MQ connections, and user authentication (for remote servers only).
This tab displays a summary of Virtualize server statistics. See Collecting Server Statistics for details.
Click the Server Configuration tab to view and configure event monitoring and statistics collection settings. See the following chapters for information about the settings in this tab:
If the application under test sends and receives messages through an IBM MQ Queue Manager or JMS provider, click the Connections tab to define connection settings. Assets and proxies deployed to the Virtualize server can be configured to use the connection settings to communicate with the application under test. You can perform the following actions:

Click Add in the MQ Queue Managers section and specify the following configurations. Click Test Connections after configuration to verify proxies and virtual assets on the server will be able to communicate with the Queue Manager. The settings configured in this interface are also used in the virtual asset or proxy configuration panels.

Mode
Choose one of the following modes from the drop-down menu:
Host (Default Mode)
Specify the IBM MQ queue manager host.
Port (Default Mode)
Specify IBM MQ queue manager port.
Channel (Default Mode)
Specify IBM MQ queue manager channel.
CCDT File (CCDT Mode)
Specify the location of the client channel definition table file, which provides connection details.
Queue manager
Specify the name of the queue manager.
Username
If login credentials are required, specify the username in this field.
Password
If login credentials are required, specify the password in this field.
SSL Properties
Enable Use SSL when connecting to the service and configure the SSL settings if the virtual assets and message proxies hosted on the Virtualize Server are required to communicate with the service under test over SSL.
Enable Trust all server certificates to allow Virtualize Server to accept any certificate. This option disables trust validation when virtual assets or message proxies on the server establish connections with services and forces assets or proxies to accept connections using any certificates services present. In general, this option should be enabled if certificate trust is not a focus for the environment where Virtualize is deployed.
CipherSuite (SSL)
Specifies the CipherSuite to use for the SSL connection on the specified IBM MQ Channel. Refer to the IBM MQ documentation to determine which CipherSuite to select based on the CipherSpec.
Peer Name (SSL)
(Optional) Specifies a peer name to verify that the certificate presented by the Queue Manager matches the criteria specified with the peer name parameter. A server certificate will match this parameter with the Distinguished Name (DN) of the certificate presented by the Queue Manager.
Keystore Settings
Specify the key store file, key store password, and key store type to be used by the queue manager to authenticate virtual assets and message proxies over SSL. If the IBM MQ Channel does not require SSL, then the key store settings are not required. After configuring the key store settings, click Validate to verify that the settings are configured correctly.
Trust Store Settings
Specify the file, password, and store type to be used by the virtual assets to authenticate the Queue Manager over SSL. After configuring the trust store settings, click Validate to verify that the settings are configured correctly.
Enabling the Trust all server certificates option disables the trust store configuration settings.
If using key/trust stores, you will need to download and install the Unlimited Strength Java Cryptography Extension. For details, see JCE Prerequisite.
You can copy existing IBM MQ manager connection settings between servers. You can copy settings from a remote server or the local server.
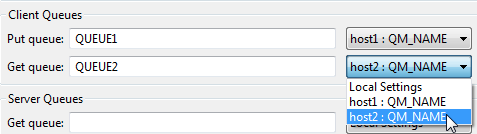
After you add a connection, you will be able to choose it from the configuration panel as you add and configure proxies and virtual assets hosted on Virtualize Server. For example, this shows how to select a global connection for a proxy using IBM MQ:
Click Add in the JMS Connection settings section and specify the JMS configurations. See JMS Provider Configuration for details on configuring JMS connection settings.
Click Test Connections after configuration to verify proxies and virtual assets on the server will be able to communicate with the JMS provider. The settings configured in this interface are also used in the virtual asset or proxy configuration panels.
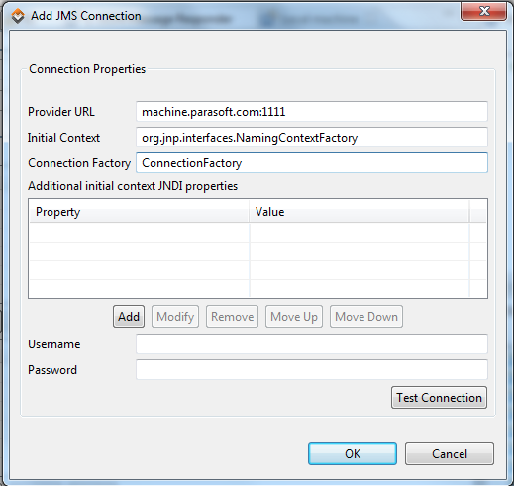
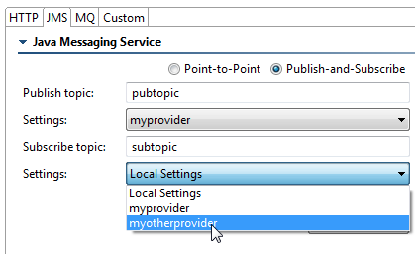
After you add a connection, you will be able to choose it from the configuration panel as you add and configure proxies and virtual assets hosted on Virtualize Server.
For example, this shows how to select a global connection for a virtual asset using JMS:
The Authentication tab is for remote servers only and provides an interface for re-entering credentials (for example, if your role changed via CTP).
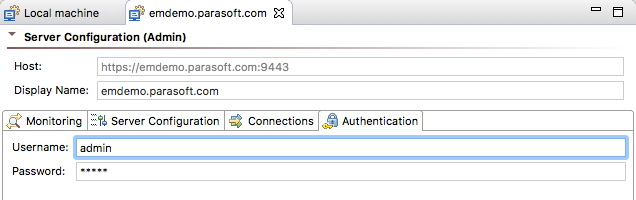
For details, see Re-Entering Credentials for an Existing Server.
By default, the local Virtualize server uses port 9080. To change this:
For details on how to govern what actions each user can perform on the Virtualize Servers connected to his or her Virtualize Desktop installation, see Configuring User Access Control for Virtualize Servers.