Configuring a Repository Data Source| Anchor |
|---|
| Configuring a Repository Data Source |
|---|
| Configuring a Repository Data Source |
|---|
|
Parasoft’s Data Repository is designed to help teams define, extend, and review large and/or hierarchical data sets for use in Parasoft messaging tools. For details on configuring a repository data source, see Working with Large, Hierarchical Data Sets. Configuring a CSV File Data Source| Anchor |
|---|
| Configuring a CSV File Data Source |
|---|
| Configuring a CSV File Data Source |
|---|
|
To configure a CSV file data source: - (Optional) Change the data source label in the Name field.
- Use the Rows controls to indicate the range of rows you want to use.
- If you only want to use selected rows, click the Range button, then enter the desired range (assuming a one-based index) by typing values into the From and To fields. For example, to use only the first 10 rows, enter 1 in the From field and 10 in the To field. To use only the fifth row, enter 5 in the From field and 5 in the To field.
Specify the path to the CSV file in the File Path field. You can use the following variables:
test_suite_loc: File path relative to the .tst or .pva file. For example: ${test_suite_loc}/../files/myCSVFile.csv
project_loc: Relative path to a project. For example: ${project_loc:MyProject}/myCSVFile.csvworkspace_loc: Relative path to a SOAtest workspace. For example: ${workspace_loc}/../files/myCSVFile.csvYou can also use environment variables. For example, ${project_loc:MyProject}/DataSource/${soa_env:CVS_DIR}/my_csv_file.csv. See Using Environment Variables in Tests.For example, ${project_loc:MyProject}/DataSource/${virt_env:CVS_DIR}/my_csv_file.csv. See and Configuring Virtualize Environments.See Using Environment Variables in Tests and Configuring Virtualize Environments. - Specify Specify the type of separator and quotes that the file uses.
- Modify additional options if desired:
- Trim leading/trailing whitespace - Specifies whether or not to strip whitespace from the beginning and end of the value.
- First row specifies column names - Specifies whether or not to consider the first row of the CSV file as column names. If the first row specifies column names, the elements in Form XML will show the column names as the name of each value. If the first row does not specify column names, then the elements in Form XML will use "value" as the name of each value.
- If you want to see a list of the columns from that data source, click Show Columns. The first row of values are recognized as column titles. If you want to use different column titles, update the first row of your data source and click the Show Columns button.
Configuring a Database Data Source| Anchor |
|---|
| Configuring a Database Data Source |
|---|
| Configuring a Database Data Source |
|---|
|
You must specify the JDBC driver to connect to a database. See Configuring JDBC Drivers for details. - (Optional) Change the data source label in the Name field.
- Use the Rows controls to indicate the range of rows you want to use. You can enable the Range option and specify a specific range of rows (one-based index). For example, to use only the first 10 rows, enter 1 in the From field and 10 in the To field. To use only the fifth row, enter 5 in the From field and 5 in the To field. All database rows are specified by default.
- Choose a driver class from the drop-down menu and configure the database connection settings. See Configuring JDBC Drivers for details on configuring connections for common database. Choose Custom if you do not see your driver class in the drop-down menu.
Click Show Columns if you want to check what column names are being used. To use different column titles for the existing columns, update your database column names, then click the Show Columns button. If you want to use different columns, update your SQL query so that it retrieve the appropriate columns, then click the Show Columns button.
Configuring a Database Correlation Data Source| Anchor |
|---|
| Configuring a Database Correlation Data Source |
|---|
| Configuring a Database Correlation Data Source |
|---|
|
Unlike database data sources, database correlation data sources allow you to disable caching so the virtual asset does not need to be redeployed in order to read new records. This makes it particularly suited for CRUD workflows. You must specify the JDBC driver to connect to a database. See Configuring JDBC Drivers for details. - (Optional) Change the data source label in the Name field.
In the SQL Query field, enter a SQL statement that will be run to load data. This statement must specify a correlation key, which will be used for data source correlations within Message Responders in the Data Source correlations tab. The correlation key can be declared in the following format: DatabaseColumnName=:CorrelationKeyName. For example:
| Code Block |
|---|
| SELECT * FROM Customer WHERE ID = :CustomerID; |
The above selects all columns in the rows from the Customer table where the ID column has the value specified by the correlation key "CustomerID". - In the Correlation Keys table, click Add to define the correlation keys used for data source correlations within Message Responders. The table will be automatically populated with any correlation keys declared in the SQL Query, though you might need to set the correct type for the key. Specify a sample value according to the selected type. For some databases, the sample value may need to be set to a valid database value to retrieve the expected database columns. Select a column and click Modify to make changes.
- Note that all correlation keys configured in the table must be configured in the data source correlation tab for Message Responders.
- If you want updates to the database to be immediately reflected in any deployed virtual assets that use that data, leave the Enable caching option disabled (it is disabled by default). When enabled, virtual assets will need to be redeployed in order for the changes to take effect at runtime. Enabling caching for load testing is recommended for performance optimization.
- The Columns field shows the database columns that can be used for parameterization based on the SQL query. If you want to use different columns, update your SQL query and click Show Columns.
Configuring an Excel Spreadsheet Data Source| Anchor |
|---|
| Configuring an Excel Spreadsheet Data Source |
|---|
| Configuring an Excel Spreadsheet Data Source |
|---|
|
To configure an Excel spreadsheet data source: - (Optional) Change the data source label in the Name field.
- Use the Rows controls to indicate the range of rows you want to use.
- If you only want to use selected rows, click the Range button, then enter the desired range (assuming a one-based index) by typing values into the From and To fields. For example, to use only the first 10 rows, enter 1 in the From field and 10 in the To field. To use only the fifth row, enter 5 in the From field and 5 in the To field.
Specify the path to the Excel file in the File Path field. You can use the following variables:
test_suite_loc: File path relative to the .tst or .pva file. For example: ${test_suite_loc}/../files/myspreadsheet.xls
project_loc: Relative path to a project. For example: ${project_loc:MyProject}/myspreadsheet.xls workspace_loc: Relative path to a SOAtest workspace. For example: ${workspace_loc}/../files/myspreadsheet.xls You can also use environment variables. For example, ${project_loc:MyProject}/DataSource/${soa_env:XLS_DIR}/myspreadsheet.xls. See Using Environment Variables in Tests. For example, ${project_loc:MyProject}/DataSource/${virt_env:XLS_DIR}/myspreadsheet.xls. See Configuring Virtualize Environments. See See Using Environment Variables in Tests and Configuring Virtualize Environments. - Select the sheet of the specified Excel file you would like to use from the Sheet menu.
- If you want SOAtest to limit the size of every column in the Excel data source to the size of the column with the least number of rows (in other words, if you want it to stop processing data when it encounters an empty cell), enable Stop processing the spreadsheet at the first empty row.
Important: SOAtest assumes that the first row of values represents your column titles. If they do not, you might have trouble identifying and selecting your data source columns in SOAtest. If you want SOAtest to use different column titles, update the first row of your data source, then click the Show Columns button. Configuring a Table Data Source| Anchor |
|---|
| Configuring a Table Data Source |
|---|
| Configuring a Table Data Source |
|---|
|
To specify data source values by entering or pasting them into an internal table editor: - (Optional) Change the data source label in the Name field.
- Use the Rows controls to indicate the range of rows you want to use.
- If you only want to use selected rows, click the Range button, then enter the desired range (assuming a one-based index) by typing values into the From and To fields. For example, to use only the first 10 rows, enter 1 in the From field and 10 in the To field. To use only the fifth row, enter 5 in the From field and 5 in the To field.
- If you want to specify column names (rather than use the default A, B, C, D, etc.), check First row specifies column names.
- Add the data values by typing or pasting them into the table. You can copy from popular spreadsheets such as Excel. Note that the table editor contains standard copy/cut/paste editing commands (when a cell is selected) as well as commands to insert rows or tables. To add more rows, use the downward arrow key or the downward arrow scrollbar button. To add more columns, use the right arrow key or the right arrow scrollbar button.
| Note |
|---|
| | You can add columns to a table data source by right-clicking on a column header and selecting Insert column or Insert multiple columns from the shortcut menu. |
Configuring an Aggregate Data Source that Combines Multiple Data Sources| Anchor |
|---|
| Configuring an Aggregate Data Source that Combines Multiple Data Sources |
|---|
| Configuring an Aggregate Data Source that Combines Multiple Data Sources |
|---|
|
You can create an aggregate data source in which you can combine the values of other available data sources into a single data source. This is especially useful if you would like to perform a functional test that needs to draw values from multiple data sources. For example, in sending a request to a server, you may want to send values from a data source that contains user information such as a first and last name, and you may also want to send values from a separate data source that contains the user’s login and password information. By combining the two data sources into a single aggregate data source, you can create a single test instead of having to create separate tests for each data source. For a discussion of how aggregate data sources compare to data groups, see Understanding Data Groups and Aggregate Data Source . Understanding Data Groups and Aggregate Data Source.Understanding Data Groups and Aggregate Data Source in SOAtest and/or Understanding Data Groups and Aggregate Data Source in Virtualize.To combine multiple data sources into an aggregate data source: - (Optional) Change the data source label in the Name field.
- Use the Rows controls to indicate the range of rows you want to use.
- If you only want to use selected rows, click the Range button, then enter the desired range (assuming a one-based index) by typing values into the From and To fields. For example, to use only the first 10 rows, enter 1 in the From field and 10 in the To field. To use only the fifth row, enter 5 in the From field and 5 in the To field.
- Choose the desired data sources from the Available box and click the Add button to add them to the Selected box.
- The Available box contains all of the data sources added to the test suite or responder suite. After selecting and adding the desired data sources to the Selected box, the column names contained in the added data sources display in the Columns box.
Configuring a Data Group Data Source that Lets You Switch Between Multiple Data Sources| Anchor |
|---|
| Configuring a Data Group Data Source that Lets You Switch Between Multiple Data Sources |
|---|
| Configuring a Data Group Data Source that Lets You Switch Between Multiple Data Sources |
|---|
|
A data group can include a number of similar data sources that have at least one column in common; it allows you to select which data group should be applied at any given time. This is especially useful if you want to dynamically specify different data sources for the same tool. You can quickly switch which data source is used at runtime without having to edit tools or data sources. To use data groups, you group together data sources with shared columns and then specify which data source should be active. For a discussion of how data groups compare to aggregate data sources, see Understanding Data Groups and Aggregate Data Source and Understanding Data Groups and Aggregate Data Source. Understanding Data Groups and Aggregate Data Source.Understanding Data Groups and Aggregate Data Source.To combine multiple data sources into a data group: - (Optional) Change the data source label in the Name field.
- Use the Rows controls to indicate the range of rows you want to use.
- If you only want to use selected rows, click the Range button, then enter the desired range (assuming a one-based index) by typing values into the From and To fields. For example, to use only the first 10 rows, enter 1 in the From field and 10 in the To field. To use only the fifth row, enter 5 in the From field and 5 in the To field.
- Choose the desired data sources from the Available box and click the Add button to add them to the Selected box.
- The Available box contains all of the data sources added to the test suite or responder suite.
- If a data source does not have any columns in common with the currently selected data sources, it cannot be added.
- If adding a data source will reduce the number of shared columns across data source, a warning will be displayed.
- After you select and add the desired data sources to the Selected box, the common columns that occur in all the selected data sources will be shown in the Columns box.
Specify the data source you want to use under Active Data Source. The group's active data source can also be selected based on the active environment. You can enter an environment variable using the ${var_name} notation into the Active Data Source field and specify the desired environment at runtime. For details about using runtime environments on the command line or in the UI, see Configuring Testing in Different Environments and Configuring Virtualize Environments.Configuring Testing in Different Environments. Configuring Virtualize Environments.
Configuring a File Data Source| Anchor |
|---|
| Configuring a File Data Source |
|---|
| Configuring a File Data Source |
|---|
|
To configure a File data source: - (Optional) Change the data source label in the Name field.
- Use the Rows controls to indicate the range of rows you want to use.
- If you only want to use selected rows, click the Range button, then enter the desired range (assuming a one-based index) by typing values into the From and To fields. For example, to use only the first 10 rows, enter 1 in the From field and 10 in the To field. To use only the fifth row, enter 5 in the From field and 5 in the To field.
- Specify the file or directory to import files from. All of the files available in the specified location will display in the table. Right-click options allow you to cut, copy, and paste values in as well.
- To filter which files are used by the File Data Source, enter a string in the File Filter field. For example:
- * = wild card for any string
- *.* = all files (this is the default)
- *.txt = all text files
- data* = all files whose files names begin with "data"
- data*.txt = all text files whose files names begin with "data"
- *data* = all files whose file names contain the string "data" somewhere
- Enable the Refresh Dynamically Based on Last Import option if you want the file data source to use all files that are in the import directory at the time the file data source is used. If you do not enable this option, the file data source will only use the files that are listed in the table in the file data source—even if the import directory has additional files. This option must be enabled in the following cases to ensure the portability of the .tst file:
- When the .tst file needs to be executed on multiple machines.
- When the .tst file will be used in a load test that uses multiple Load Test generator machines.
At runtime, the contents of each file is used as a data source value. Configuring a Writable Data Source| Anchor |
|---|
| Configuring a Writable Data Source |
|---|
| Configuring a Writable Data Source |
|---|
|
To configure a writable data source that captures runtime data for reuse in subsequent tests: - (Optional) Change the data source label in the Name field.
- Use the Rows controls to indicate the range of rows you want to use.
- If you only want to use selected rows, click the Range button, then enter the desired range (assuming a one-based index) by typing values into the From and To fields. For example, to use only the first 10 rows, enter 1 in the From field and 10 in the To field. To use only the fifth row, enter 5 in the From field and 5 in the To field.
- Specify your preferred writing mode for writing to the data source. You can choose one of the following options:
- Set-Up test mode> Append: Choose this option if you want set-up tests to append new data after any previously written values. This is the default mode. Only set-up tests can write to the data source in this mode.
- Standard test mode> Overwrite: Choose this option if you want standard tests (non set-up tests) to overwrite any previously written values with new data. Only standard tests can write to the data source in this mode.
- Standard test mode> Append: Choose this option if you want standard tests (non set-up tests) to append new data after any previously written values. Only standard tests can write to the data source in this mode. If you enable this option, you can also specify the Reset frequency setting, which determines how the data source will reset (i.e., clear) any previously-written data.
- If you want to specify column names (rather than use the default A, B, C, D, etc.), check First row specifies column names.
- Set up population for the Writable data source (e.g., by having tool a data bank tool write to it).
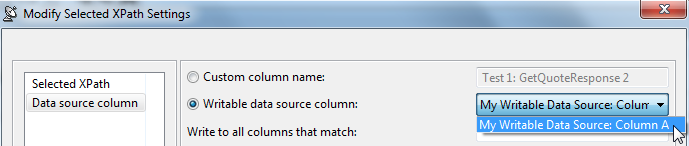 Image Removed Image Removed
For example, one way to populate the Writable data source in Virtualize is: - Add an XML Data Bank tool as a tool output.
- Exercise the suite to populate the XML Data Bank.
- Add a node to the Selected XPaths in the XML Data Bank GUI.
- Double-click the entry row underneath the Data Source column name column in the XML Data Bank GUI. A Modify dialog displays.
- Select Data source column on the left, then select Writable data source column on the right and specify the name of the column you want to contain the stored value.
In this example, the process would be very similar for SOAtest: - Add a SOAP Client tool as a Set-Up Test to the test suite. For more information on Set-Up Tests, see Adding Set-Up and Tear-Down Tests.
- Add a XML Data Bank tool as an output to the SOAP Client Set-Up Test.
- Run the SOAP Client Set-Up Test to populate the XML Data Bank.
- Add a node to the Selected Element list in the XML Data Bank GUI.
- Double-click the entry row underneath the Data Source column name column in the XML Data Bank GUI. A Modify dialog displays.
- Select Writable Data Source Column in the Modify dialog and click OK. Now when the Set-Up Test runs, the Writable Data Source will be populated. The Writable Data Source will automatically be reset every time its parent Test Suite is run.
- If you want to specify column names (rather than use the default A, B, C, D, etc.), check First row specifies column names.
- Set up population for the Writable data source (e.g., by having tool a data bank tool write to it).
Image Added For example, one way to populate a the Writable data source is:in Virtualize is: - Add an
- Add a SOAP Client tool as a Set-Up Test to the test suite. For more information on Set-Up Tests, see Adding Set-Up and Tear-Down Tests.
- Add a XML Data Bank tool as an output to the SOAP Client Set-Up Testa tool output.
- Run the SOAP Client Set-Up Test Exercise the suite to populate the XML Data Bank.
- Add a node to the Selected Element list XPaths in the XML Data Bank GUI.
- Double-click the entry row underneath the Data Source column name column in the XML Data Bank GUI. A Modify dialog displays.
- Select Writable Data Source Column in the Modify dialog and click OK. Now when the Set-Up Test runs, the Writable Data Source will be populated. The Writable Data Source will automatically be reset every time its parent Test Suite is run.
For example, one way to populate the Writable data source is:- the Data Source column name column in the XML Data Bank GUI. A Modify dialog displays.
- Select Data source column on the left, then select Writable data source column on the right and specify the name of the column you want to contain the stored value.
In this example, the process would be very similar for SOAtest: - Add a SOAP Client tool as a Set-Up Test to the test suite. For more information on Set-Up Tests, see Adding Set-Up and Tear-Down Tests.
- Add a XML Data Bank tool as a tool outputan output to the SOAP Client Set-Up Test.
- Exercise the suite Run the SOAP Client Set-Up Test to populate the XML Data Bank.
- Add a node to the Selected XPaths Element list in the XML Data Bank GUI.
- Double-click the entry row underneath the the Data Source column name column column in the XML Data Bank GUI. A A Modify dialog dialog displays.Select Data source column on the left, then select Writable data source column on the right and specify the name of the column you want to contain the stored value
- Select Writable Data Source Column in the Modify dialog and click OK. Now when the Set-Up Test runs, the Writable Data Source will be populated. The Writable Data Source will automatically be reset every time its parent Test Suite is run.
| Note |
|---|
| | You can add row and columns to a writable data source by right-clicking and selecting Insert rows | columns. |
| Anchor |
|---|
| Configuring a Data Source form Java Bean Fields with the Bean Wizard |
|---|
| Configuring a Data Source form Java Bean Fields with the Bean Wizard |
|---|
|
See Using Interpreted Data Sources. Setting Up a "One-to-Many" Data Source Mapping| Anchor |
|---|
| Setting Up a "One-to-Many" Data Source Mapping |
|---|
| Setting Up a "One-to-Many" Data Source Mapping |
|---|
|
You can also set up SOAtest to use values from a single row of one data source (e.g., a global data source that contains login information) with multiple rows from another data source as follows: - Add a Writable Data Source, then configure it as described in Configuring a Writable Data Source. The Writable Data Source lets SOAtest iterate independent of the other Data Sources.
- If you have more than one "global" parameter in your Data Source, right-click the single Writable Data Source column and select Insert Columns. Rename the columns to something matching your original Data Source columns.
- Add an Extension tool as a Set-Up Test (see Adding Set-Up and Tear-Down Tests for details). This will act as an interface to your "global" Data Source.
Configure the extension tool as described in Extension Tool for Custom Scripting. Assuming that the column names you want to access are named "username" and "password" from the Data Source "Credentials", you would select the Credential data source in the tool’s configuration panel, check Use data source, then add the following code: | Code Block |
|---|
from soaptest.api import *
def getCredentials(input, context):
	username = context.getValue("Credentials", "username")
	password = context.getValue("Credentials", "password")
return SOAPUtil.getXMLFromString( [ username, password ] ) |
- Chain an XML Data Bank to the output of the Extension Tool by right-clicking the Extension tool, choosing Add Output, and then selecting the XML Data Bank tool option.
- Run the test once to populate the XML Data Bank.
- Double-click the XML Data Bank tool to open its configuration panel.
- Select the element that corresponds to the first parameter, and click Add.
- Click Modify and select Data Source column name.
- Select Writable Data Source Column and select the corresponding name.
- Repeat steps 8-10 for the element corresponding to the second parameter.
|