...
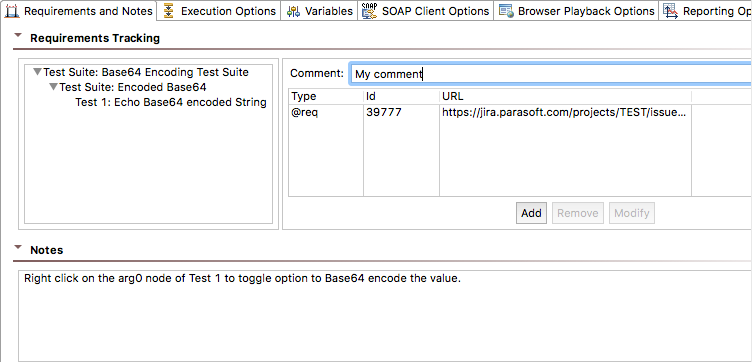
- Double-click the test suite node in the Test Case Explorer and click the Requirements and Notes tab.
- Choose the scope that the association and/or comments apply to in the Requirements Tracking section. You can apply this information to test suites, nested test suites, and tests.

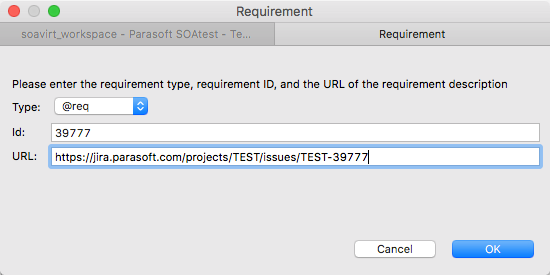
- Click Add button and choose a tag from the Type drop-down menu. DTP will use this information to associate the test suite’s test cases to the specified element type. You can create custom tags as described in Indicating Code and Test Correlations. Default tags are:
- @pr: for defects.
- @fr@req: for feature requestsrequirements.@req
- @task: for requirementstasks.
@task@test: for taskstests.
Info title Configuring Custom Defect/Issue Tracking Tags You can configure defect/issue tracking tags to match the language that your organization uses to refer to defects or to feature requests. For details, see Indicating Code and Test Correlations.
- Enter an ID and a URL for the requirement and click OK.

If you enable the Preferences> Reports> Report contents option for Requirement/defect details, associations specified here will be shown in the HTML report. If a URL is specified, the HTML report will include hyperlinks. - To add a comment (e.g., "this test partially tests the requirement" or "this test fully tests the requirement"), enter it into the Comment field. Comments specified here will be visible in HTML reports.

- To add more detailed notes for the test suite, enter them into the Notes field.
...
Specifying Client Options
The Test suites provide a convenient place to configure common options that apply to several client tools without needing to directly edit each tool. Use the Client Options tab is divided into the following sections:
General
You can configure the following general test suite options:
in the test suite to set default values to be used by client tools and sub-suites contained within the test suite. You can override these default values at the sub-suite or client tool level by switching the value type from Default to Custom and specifying a new value on their Client Options tab. Client option values are inherited as follows: Workspace preference (if applicable for the option) -> Top Test Suite -> Sub Test Suite -> Client Tool. The Client Options tab is divided into the following sections:
General
You can configure the following general test suite options:
- Authentication: This option allows you to set the default authentication method to be used by test clients within the test suite. Individual test clients can be configured to use alternative methods, as needed. By default, no authentication is used. Select Custom from the first dropdown menu to change this selection. You can choose to use the Global Preferences (as set in Parasoft > Preferences > Security) or an authentication configuration set up specifically for this test suite. Click New to add a new authentication method to the test suite. Multiple authentication methods can be added, but only one can be the default at a time. For more information about adding or modifying shared authentication methods, see "Global Authentication" on the Adding Global Test Suite Properties page.
- Timeout after (milliseconds): If you do not want to use the default, Timeout after (milliseconds): If you do not want to use the default, select Custom from the drop-down menu and enter the desired time. The default value is 30000.
- Outgoing Message Encoding: This option enables you to choose the encoding for outgoing messages for all non-SOAP test clients, providing additional flexibility to set the charset encoding. You can also configure this setting globally in the Misc settings of the Parasoft Preferences (see Additional Preference Settings). You can configure the outgoing message encoding for SOAP clients in the SOAP settings.
- Cookies: Choose Custom from the drop-down menu and enable the Reset existing cookies before sending request to clear the cookies between sessions.
...
- Default Browser Playback: Specifies the default browser(s) for playing this test.
- Browsers Supported: Enable the Browsers specified here only option if you want to ensure that this test is never played in an alternate browser (e.g., because the web page structure is significantly different on other browsers and the scenario would need to be constructed differently on another browser). If this is enabled, the test will only be played in the specified browsers—even if it is run by a Test Configuration set to use different browsers. If you want to allow a Test Configuration’s browser playback settings to override the ones specified here, choose Any browser.
For example:- If you select Chrome, Firefox, and Browsers specified here only, then run a Test Configuration set to run tests in all browsers, the test will be run only in Chrome and Firefox.
- If you select Chrome, Firefox, and Any browser, then run a Test Configuration set to run tests in all browsers, the test will be run in Chrome, Firefox, Safari, and Internet Explorer Edge (as applicable).
- Visibility: Describes the visibility of the tests as they playback. This option is inherited from its parent if Default is selected. You may choose Headless or Visible if Custom is selected.
- In Headless mode, you will not be able to see the tests as they run (i.e. the browser will not be visible while the test is running). The following support is available for Headless mode:
- Windows: Fully supported
- Mac: Fully supported
- Linux: Supported on Linux 2.4.21-27.0.2 kernel builds and later (tested on Red Hat, Debian, and Mandrake Architectures)
- In Visible mode, you will be able to watch in the browser as the test runs and be able to visually verify that the test ran correctly.
- In Headless mode, you will not be able to see the tests as they run (i.e. the browser will not be visible while the test is running). The following support is available for Headless mode:
...