The Message Stub emulates a service and is the complement of the SOAP Client. This tool is used to stub out a service by returning a single message.
Sections include:
| Table of Contents | ||
|---|---|---|
|
About Message Stub
The Message Stub tool can be invoked as part of an end-to-end test scenario. SOAtest’s local server will start listening for a message when that specific Message Stub test step is called as part of the test sequence. It will consume the message, then react in the manner defined in the Message Stub tool’s configuration. After this completes, the next test in the test scenario will execute.
...
You can gain visibility into Message Stub tools’ behavior through the Traffic Viewer tools that are attached to them.
Service Definition Options
Specifying options in the Definition tab allows SOAtest to populate the Response tab with items that make it easier for you to specify the response message. You can specify the following settings related to the service definition or schema that defines the expected request and outgoing response:
- Service Definition: Specifies if the responder has an associated service definition (RAML, OpenAPI/Swagger, WSDL or Schema). For plain XML, choose None. When a service definition is specified and the tool is constrained to WSDL or schema, the applicable form view will be automatically populated with appropriate field values and controls (for example, radio buttons for booleans, different controls for numbers vs. integers, drop-downs for enumerations). It will also prevent the entry of invalid messages (for example, messages missing required values, a value of the incorrect type, a method/resource/response code not specified in a schema, and so on). Editing will be restricted to ensure that the message complies with the associated schema (for example, you will not be able to insert, delete, rename, copy, or paste tree nodes).
- For RAML Service Definition Mode
- RAML URL: A specific RAML URL, or a variable referencing a RAML URL.
- RAML URL: A specific RAML URL, or a variable referencing a RAML URL.
- For OpenAPI/Swagger Service Definition Mode
- OpenAPI/Swagger URL: A specific OpenAPI/Swagger URL, or a variable referencing an OpenAPI/Swagger URL.
- OpenAPI/Swagger URL: A specific OpenAPI/Swagger URL, or a variable referencing an OpenAPI/Swagger URL.
- For WSDL Service Definition Mode
- WSDL URL: Describes the WSDL URL where this service can be accessed. You can either enter a value or click Browse. If you do not have a WSDL, you can leave this field empty.
- Constrain to WSDL: Determines whether certain tool parameters obtain their values from the WSDL rather than from manual entry. If this option is enabled, certain parameters (for example, router endpoint, SOAP action, SOAP body and header parameters) are disabled and get their values from the WSDL. If this option is disabled, the Refresh WSDL button will also be disabled.
- WSDL Documentation (Automatically completed if available): Describes the service at the given WSDL URI.
- WSDL URL: Describes the WSDL URL where this service can be accessed. You can either enter a value or click Browse. If you do not have a WSDL, you can leave this field empty.
- For Schema Service Definition Mode
- Schema URL: Describes the Schema URL where this service can be accessed. You can either enter a value or click Browse. If you do not have a schema, you can leave this field empty.
- Constrain to Schema: Determines whether certain tool parameters obtain their values from the Schema rather than from manual entry. If this option is enabled, certain parameters are disabled and get their values from the schema. If this option is disabled, the Refresh Schema button will also be disabled.
- XML Message Type: Determines whether the Response tab’s Form Input controls are geared for SOAP messages or plain XML messages. If Plain XML is selected, Form Input mode will directly represent the message. If SOAP is selected, the XML configured in Form Input will be wrapped with a SOAP Envelope and the view will provide a SOAP Header section that allows you to configure SOAP headers if desired.
Response Options
The Response tab allows you to configure the response values that you want the emulated asset to deliver when specified requests are received.
The options available vary depending on what option is selected in the Views menu.
Literal XML, Form XML, Scripted XML, and Form Input Views
The available options for Literal XML, Form XML, Scripted XML, or Form Input are similar to those available with the SOAP Client tool.
...
- In Form Input mode, the resource selector will show all resources for which the associated service definition 1) defines the response as XML and 2) specifies an XML schema.
- In Form JSON mode, the resource selector will show all resources for which the associated service definition 1) defines the response as JSON and 2) specifies a JSON schema.
Multiple Responses View
The Multiple Responses view allows you to specify which responses to use for specific requests.
...
If more than one XPath or URL parameter matches a response, SOAtest will return the first matching response in the list (use the Up and Down buttons to specify the desired order or responses). If the XPath or URL parameter provided for each response results in a unique match, the order of the responses is irrelevant.
Scripted XML View
The Scripted XML view allows you to specify complex logic. For details, see Using Scripted Logic.
Transport Header Options
The Transport Header tab allows you to specify HTTP, JMS, or MQ message header properties.
Test Correlation Options
The Test Correlation tab allows you to specify which messages this Message Stub tool/test accepts and processes. Various messages sent to the stub URL are routed to specific Message Stub tools (each of which handle different operations) based on the settings here. For example, one Message Stub tool might respond to customer registration messages, another might respond to payment messages, and another might function as a default "catch all" that it used when none of the others match.
...
| Tip | ||||
|---|---|---|---|---|
| ||||
A custom test correlation is based on the return value of a custom method. Requirements:
More information can be found in the Javadocs for For example, if you want to test a plain text message based on a regular expression, you might use:
If you want to test an element in an XML message, you might use:
|
Transport Correlation
To configure a transport correlation:
- Enable the Enable correlation option.
- Click Add. A new entry row appears.
- Enter the Name and Value of the message correlation you would like to specify.
Request Body Correlation
To configure a request body message correlation:
- Enable the Enable correlation option.
- Click Edit. An Edit XPath Function dialog opens.
- Select an element from the Element tree, choose a function from the Function menu, and click OK.
URL Parameters Correlation
To configure the URL parameters correlation:
- Enable the Enable correlation option.
- Click Add. A new entry row appears.
- Enter the Parameter Name and Value of the correlation you would like to specify.
Data Source Correlation Options
| Anchor | ||||
|---|---|---|---|---|
|
The Data Source Correlation tab allows you to specify which data source row values to use in stub responses.
Benefits
One way to configure stubs with Multiple Responses mode is to manually configure the Message Stub tool to send different response messages based on the nature of the incoming message.
...
The value matching supports the wild cards wildcards * and ?. For example, if you want an incoming value named "title keyword" to match a certain row as long as it contains the word Linux, then you can have the data source value "*Linux*". * matches zero or more characters, ? matches a single character.
Configuration
To parameterize stub responses from a data source:
- Ensure that you have a data source configured in SOAtest and available for the Message Stub.
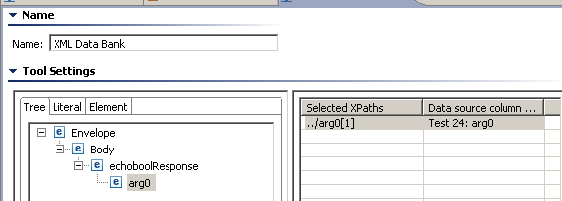
- Click Add in the appropriate part of the Data Source Correlation tab, provide an XPath and/or URL parameter, and select the appropriate column name. When the deployed stub is exercised, SOAtest will extract the specified values from the request, then search the named column for a match that corresponds to the extracted value. If a match is found, the data in the corresponding data source row will be used to populate the response:
- If a service definition was provided, the XPath can be generated using the Edit button. That dialog validates the XPath expression and the column name in real time.
- SOAtest validates the XPath syntax while you type/edit these XPath expressions, if you choose to customize them instead of using the visual Edit option.
- Wildcards can be used in the data source column.
- Parameterize the Response area of the Message Stub by referencing other data source columns within that same data source (that is, Form Input, Form XML, and so on). You can add several XPaths or URL parameters to column name mappings.
Processing Details
When the Message Stub executes in a test suite, or as a hosted stub, the incoming messages are evaluated through these XPath expressions/URL parameters. The values are then matched against the corresponding data source values (each with its respective column) to find a row that matches the values.
...
If a matching row is found, then that row will be used for any parameterized values in the Message Stub Response message. This way, the stub can respond with the desired message values based on values in the incoming messages.
Service Options
The Service Options tab allows you to configure how the message is processed. The following options are available:
- Message Exchange Pattern: Select Solicit Response or Notification Only.
- Return Status: Allows you to specify how the message is returned, for instance, to emulate working or faulty services. To use the default value of 200 OK, enable Use Default Return Status. If this option is not enabled, the following options are available:
- Return Status: Enter the custom return status value. If a data source is available, you can also parameterize this value.
Skip message proxy failover: Enable to bypass the message proxy's failover setting (as set in the HTTP Reverse Proxy or HTTP Forward Proxy) for internally routed error messages and send the custom return status configured in the response.
- Request Handling: Select Apply incoming request tools on the message before responding if you need the request message to be transformed before it is processed by the Data Source Correlation or Multiple Responses "if request matches" condition logic. This is important when the XML must be altered to make it suitable for correlation, or if the message is not XML at all and requires some transformation before the stub sends the original caller a suitable response for the request.
- Performance: The Performance tab enables you to set the following options related to the execution time:
- Timeout after (milliseconds): Specifies the length of delay (in milliseconds) after which SOAtest should consider the message to be timed out. The Default setting is 30000. The Custom setting allows you to enter a timeout. A non-positive timeout value can be entered to specify an infinite timeout.
- Fail the test on timeout: Select this option to fail the test on the specified timeout.
- Pass the test only if a timeout occurred: Select this option to pass the test if the specified timeout occurred (that is, test did not finish execution within the specified time).
- Think time (ms): Enter the amount of time (in milliseconds) for the message delay you want to emulate. This can be used to emulate a slow service. If a data source is available, you may also parameterize this value. A think time value larger than the Timeout value will not force a timeout. Timeouts will only occur if a message is not correlated successfully and the Message Stub is idle and unable to complete.
- Timeout after (milliseconds): Specifies the length of delay (in milliseconds) after which SOAtest should consider the message to be timed out. The Default setting is 30000. The Custom setting allows you to enter a timeout. A non-positive timeout value can be entered to specify an infinite timeout.
- Style/Use: These options allow you to select the body style and encoding of the message:
- Body Style: Select either document or rpc.
- Use: Select either encoded or literal.
- Encoding Style URI (Automatically completed if available): Lists the encoding style URI used to send requests.
- Target Object URI: Specifies the target object URI.
- Attachment Encapsulation Format: Specifies whether to use the Default or Custom encapsulation format. The Default option specifies whatever is chosen as the Attachment Encapsulation Format in the SOAP Client tab of the Preferences panel (for more information, see SOAP Settings). The Custom option allows you to choose None, MTOM always, or MTOM optional.
- Headers: Allows you to add custom headers in the response.
Adding Custom Headers
To add custom headers:
- Click Add in the Service Options tab. A dialog opens.
- Enter the Name and Value of the message correlation you would like to specify.
- Click OK.
Using Existing Data Sources or Rapidly Creating Data Sources for Responses
| Anchor | ||||
|---|---|---|---|---|
|
Specifying response values in a data source is a very efficient way to add a significant volume of request/response pairs.
Using Existing Data Sources
If you already have a data source that specifies values for request parameters and the desired corresponding response parameters, you can use those values as follows:
- Add the data source to SOAtest.
- Configure the Message Stub’s data source mapping with the appropriate request columns (as described in Data Source Correlation Options).
Rapidly Creating Data Sources
If you do not already have such a data source but want a fast way to specify multiple request/response sets:
- Use the procedure described in Generating a Data Source Template for Populating Message Elements to create a CSV file from the Form Input view of the Message Stub tool. A data source will be generated and added to the test suite. This generated data source will contain columns for responses. The Message Stub tool’s Form Input view will be parameterized automatically.
- Add a new data source column (for example, using Excel, OpenOffice or a similar spreadsheet application) for each request parameter that should be used to determine the response. Wildcards can be used.
- Configure the Message Stub’s data source mapping with the new request columns you added. See Data Source Correlation Options for details.
- Add new rows to the data source (for example, using Excel, OpenOffice or a similar spreadsheet application) in order to specify values for request parameters and the desired corresponding response parameters.
Using Scripted Logic
| Anchor | ||||
|---|---|---|---|---|
|
You can script response values based on the incoming request. This allows for more complex logic for your stubs. In addition, the Message Stub allows you to access data source values through the script. Access to these values is similar to how you would access them through the Extension Tool.
...
- Enter a service definition in the in the Definition tab of the Message Stub tool.
- Right-click the Message Stub node and choose Add Output. The Add Output wizard opens.
- From the Add Output wizard, select Incoming Request from the left pane and XML Data Bank from the right pane, then click Finish.
- Double-click the Incoming Request> XML Data Bank node beneath the Message Stub node. The XML Data Bank configuration panel displays in the right GUI panel.
- In the right GUI panel, add the XPath of the value you want to access in your script.
- Double-click the Message Stub node. The Message Stub configuration panel displays in the right GUI panel.
- In the Response tab, choose the Scripted view.
- Enable the Use Data Source option.

Specify your logic. The following is the basic template for accessing data source and data bank values:
Code Block def customLogic(context): # Retrieve the data source value. "Data Source Name" should be replaced # with the name of your data source and "Column Name" should be the column # that your value is coming from. You can access many columns from the same # data source within this script. For Data Bank values, the table is always # named "Generated Data Source" so you only need to replace "Data Bank Column Name" dataSourceValue = context.getValue("Data Source Name", "Column Name") dataBankValue = context.getValue("Generated Data Source", "Data Bank Column Name") # add custom logic that uses value from data source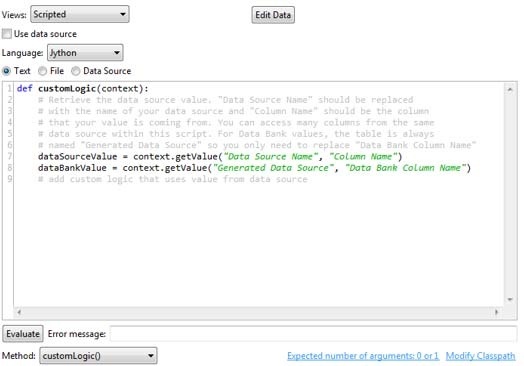
- Select the correct method from the Method menu. The method you select should be your entry point. In the above example, the method would be customLogic().
Adding Attachment Handlers to the Message Stub
It may be useful to add an Attachment Handler to the Message Stub in order to test your attachment handling when sending message attachments. To add an Attachment Handler to a Message Stub, complete the following:
...