...
Parasoft supports OAuth 1.0a and 2.0 security protocols for web server flow and client credentials flow (two-legged scenario). You can configure OAuth authentication settings for OAuth 1.0a in the OAuth Authentication section of the HTTP transportREST Client's HTTP Options tab (see OAuth 1.0a). For OAuth 2.0, the authentication is configured in the REST Client's Resource and Payload tabs.
...
- Add a REST client to your test suite.
- Click the Resource tab and specify your REST call method and endpoint, including any expected parameters.
- Click the HTTP Options tab and choose the HTTP Headers settings.
- Add an HTTP header with name
Authorizationand value of${token_type} ${access_token}. The${token_type}and${access_token}values should match the names of the JSON Data Bank columns created in the previous test. A single space must separate values. - Run the scenario and verify the expected HTTP request header that was sent. Example Authorization header:
Authorization: Bearer 2YotnFZFEjr1zCsicMWpAA
| Anchor | ||||
|---|---|---|---|---|
|
Authenticating against OAuth 1.0a includes the following general steps:
...
The following example uses the REST Client to send request messages to the server. You can alternatively use the Messaging Client in the same manner.
Obtain and Authorize a Request Token from the Service Provider
- Create a new REST Client and configure the settings for the location where the Request Token will be obtained.
- Click the HTTP Options and tab and choose either HTTP 1.0 or HTTP 1.1 from 1 from the Transport menu.
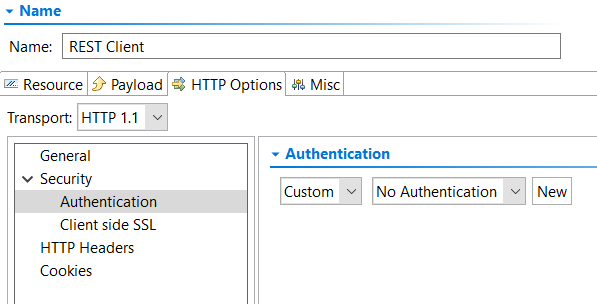
- Click the OAuth Authentication settings and enable the Perform Authentication option. The other fields necessary to complete the OAuth Authentication configuration will become active Authentication under Security.
- Select Custom from the first drop-down menu in the Authentication pane.
- If an OAuth 1.0 shared authentication configured to obtain a request token has been set for the test suite (see "Specifying Client Options" on the Configuring Test Suite Properties page), you can select it from the second drop-down menu and skip to step 10.
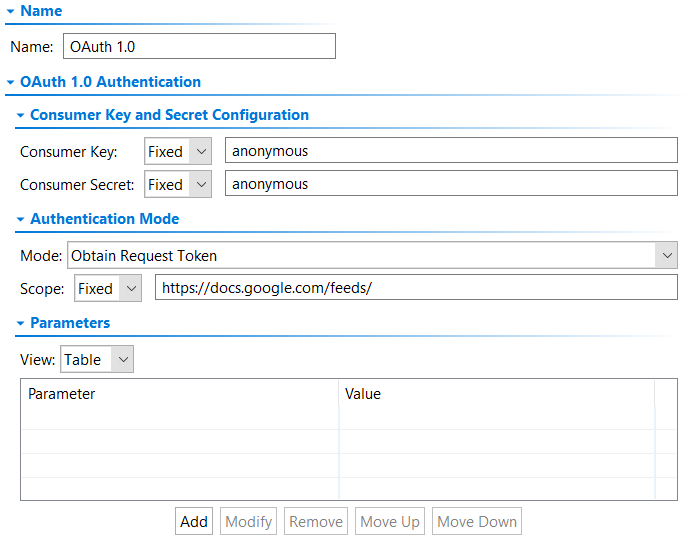
- Click New, then select OAuth 1.0 and click Finish. An OAuth 1.0 authentication is added to the Authentications node for the test suite (if this is the first custom authentication added to the test suite, the Authentications node is created automatically).
- Enter the consumer key and consumer secret in the Consumer Key and Consumer Secret fields.
- Choose "Obtain Request Token" from the OAuth Mode menu.
- (Optional) Specify a scope in the Scope fieldfields.
- (Optional) Add additional OAuth parameters under OAuth Parameters.
- Attach a Text Data Bank to the Response Traffic of the REST Client and extract the Request Token and the Request Token Secret. The token is usually denoted as
oauth_token. - Choose File > New > Test (.tst) File from the main menu and choose your project.
- Enter a name for the file and click Next.
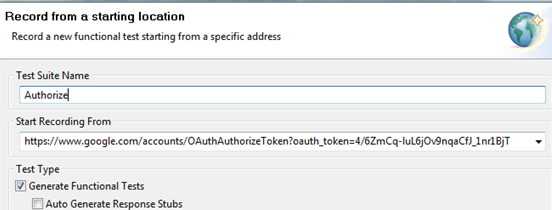
- Choose Web > Record web scenario and click Next.
- Choose Record new web scenario and click Next.
- In the Start Recording From field, enter the URL to obtain the verification code. Add an
oauth_tokenparameter parameter and specify the value of the request token obtained in the step 810.
Once the browser launches, it will display the login page of the server that is hosting the protected resource. - Sign-in by providing the user's login credentials (Username/Password). Once authorized, the browser will redirect you to a new page with a verification code.
- After you see the verification code, exit the recording by closing the browser.
- Attach a Browser Data Bank to the Browser Contents (rendered HTML) and extract the value of the verification code.
- Open the Browser Playback tool and replace the literal Request Token string with the Request Token data source column generated by the Text Data Bank (step 710). Use the
${varName} syntax, as shown below.
...
- Create a new REST Client and configure the settings for the location where the Request Token should be exchanged for the Access Token.
- Click the HTTP Options and choose either HTTP 1.0 or HTTP 1.1 from 1 from the Transport menu.
- Click the OAuth Authentication settings and enable the Perform Authentication option. The other fields necessary to complete the OAuth Authentication configuration will become active Authentication under Security.
- Select Custom from the first drop-down menu in the Authentication pane.
- If an OAuth 1.0 shared authentication configured to exchange the request token for an access token has been set for the test suite (see "Specifying Client Options" on the Configuring Test Suite Properties page), you can select it from the second drop-down menu and skip to step 10.
- Click New, then select OAuth 1.0 and click Finish. An OAuth 1.0 authentication is added to the Authentications node for the test suite (if this is the first custom authentication added to the test suite, the Authentications node is created automatically).
- Enter the consumer key and consumer secret in the Consumer Key and Consumer Secret fields.
- Choose "Exchange Request Token for Access Token" from the OAuth Mode menu.
- Parameterize the Request Token and Request Token Secret fields from the Text Data Bank extractions.
- Parameterize the Verification Code field from the Browser Data Bank.
- Attach a Text Data Bank to the Response Traffic of the REST Client and extract the Access Token (usually denoted as oauth_token) and the Access Token Secret (usually denoted as oauth_token_secret).
...
- Create a new REST Client and configure the settings for the location where the Request Token should be exchanged for the Access Token.
- Click the HTTP Options and choose either HTTP 1.0 or HTTP 1.1 from 1 from the Transport menu.
- Click the OAuth Authentication settings and enable the Perform Authentication option. The other fields necessary to complete the OAuth Authentication configuration will become active Authentication under Security.
- Select Custom from the first drop-down menu in the Authentication pane.
- If an OAuth 1.0 shared authentication configured to sign the request for OAuth authentication has been set for the test suite (see "Specifying Client Options" on the Configuring Test Suite Properties page), you can select it from the second drop-down menu and skip to step 9.
- Click New, then select OAuth 1.0 and click Finish. An OAuth 1.0 authentication is added to the Authentications node for the test suite (if this is the first custom authentication added to the test suite, the Authentications node is created automatically).
- Enter the consumer key and consumer secret in the Consumer Key and Consumer Secret fields.
- Choose "Sign Request for OAuth Authentication" from the OAuth Mode menu.
- Parameterize the Access Token and Access Token Secret fields from the Text Data Bank extraction.
- Request the user's private resources. This should be possible because the Access Token has been obtained.


