...
- Edit the environment diagram and choose New Instance from the component dropdown. The menu becomes visible on hover. See Adding Component Instances for details.
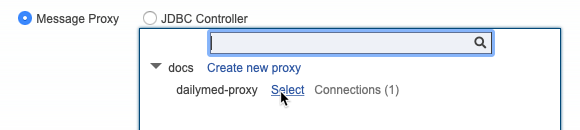
- Specify a name and click Select a message proxy.
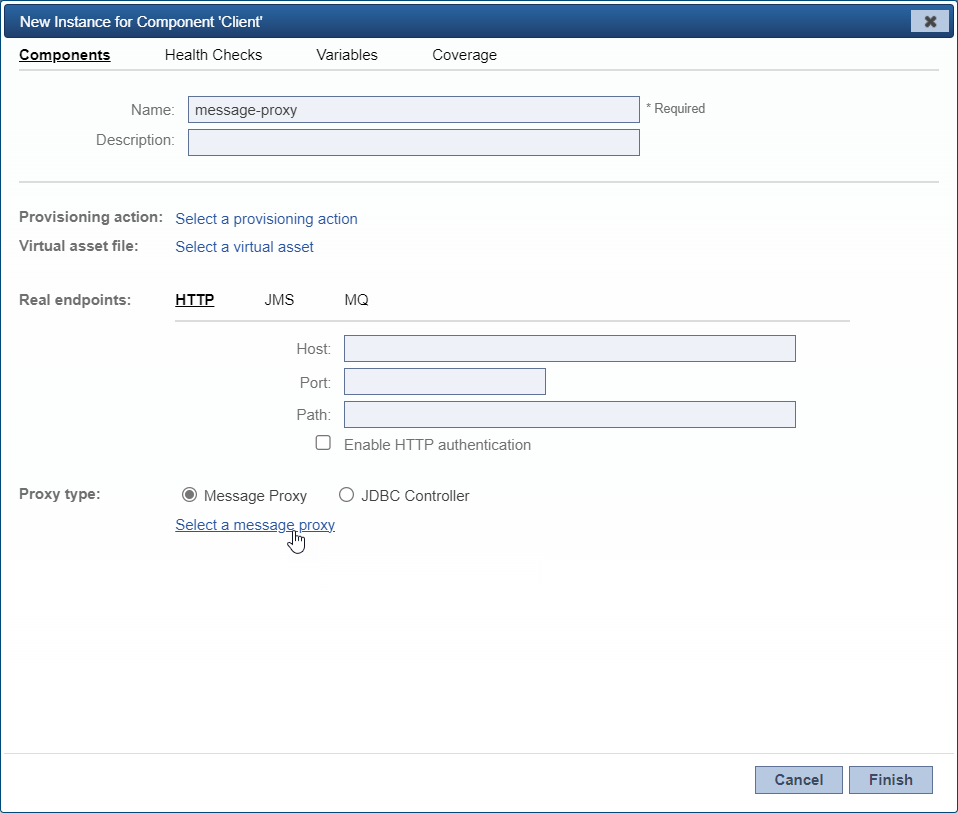
- If you want to select all connections for an available proxy, click Select.
- If you want to select a specific connection for an available proxy (for example, you have three HTTP connections, one MQ connection, and one JMS connection configured, but you are using only the MQ connection right now), hover over the proxy, click the Connections link that appears, then click the Select link for the connection you want to add. You could also click Select All to select all shown connections. Each available connection's listener/proxy path and forward/target path will be shown.
- If you want to select a specific connection for an available proxy (for example, you have three HTTP connections, one MQ connection, and one JMS connection configured, but you are using only the MQ connection right now), hover over the proxy, click the Connections link that appears, then click the Select link for the connection you want to add. You could also click Select All to select all shown connections. Each available connection's listener/proxy path and forward/target path will be shown.
- If you want to adjust proxy settings (taken from the proxy’s current state), click the Edit icon, then make the desired modifications; options are described in Proxy Configuration Details.
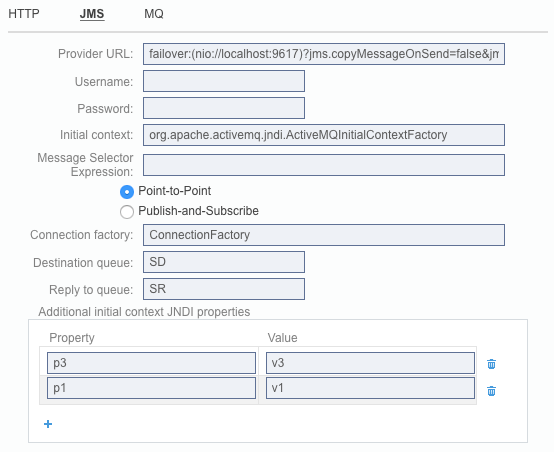
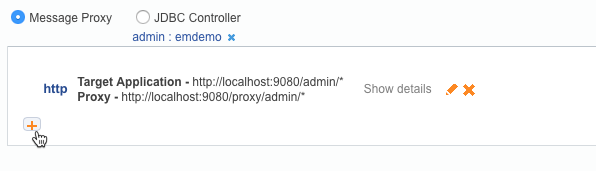
- If you want to add a message proxy connection, click the + icon, then specify the connection settings as described in in Proxy Configuration Settings Details.
Creating a New Proxy
...
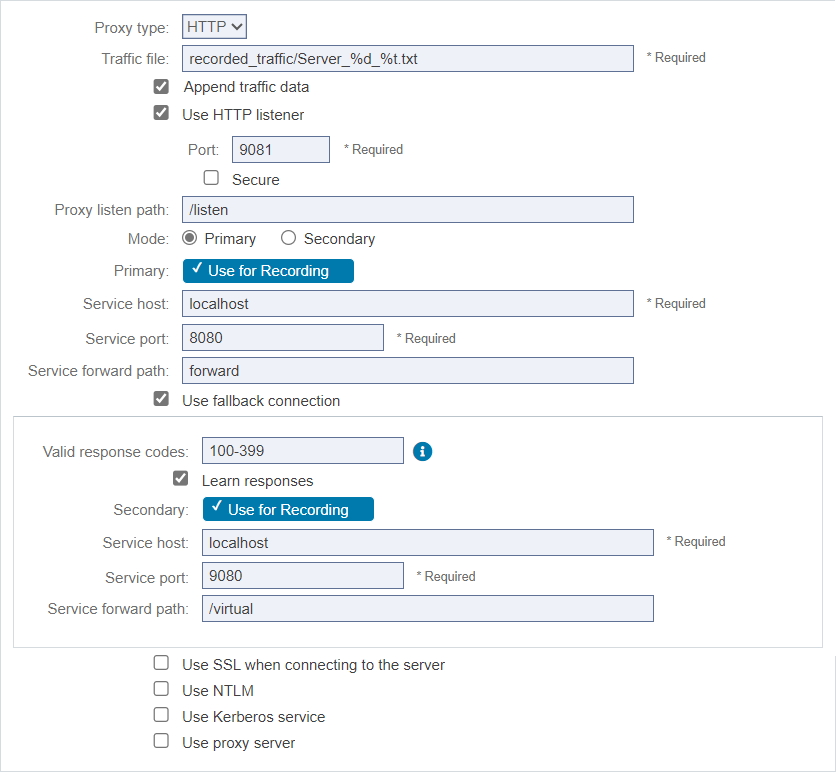
Choose HTTP from the Proxy type drop-down menu to configure message proxies that connect over HTTP.
| Scroll Table Layout | ||
|---|---|---|
|
Option | Description | |||||
|---|---|---|---|---|---|---|
| Name | Enter a name for the connection within the proxy. Connection names are used to work with specific connections within the proxy through the REST API and must be unique within the proxy. | |||||
| Traffic file | Specify where you want to save the traffic data that will be captured when the proxy is set to record mode. You can later use this traffic file to generate virtual assets that represent the live traffic captured in record mode. By default, traffic will be recorded in a file named %n_%d_%t.txt (<proxy_name>_<current_date>_<current_time>.txt) and will be stored within the recorded_traffic folder (this will be created if it does not exist). The traffic file must be inside the VirtualAssets project when provisioning an instance that contains the message proxy. If set a location outside of the VirtualAssets project, the provision request (PUT request) will fail. CTP, however, can read a traffic file (GET request) that is outside of the VirtualAssets project when the proxy was configured with Virtualize. When specifying the file name, you can use variables such as %d (current date) %t (current time), %n (proxy name), and %u (unique time-based id). Wildcards can be used together and mixed in with the name. For example, you could use %nProxyTraffic%d or %u_%d%nTraffic. Do not configure multiple proxy connections to write to the same traffic file at the same time. This could corrupt the traffic file. | |||||
| Append traffic data | Enable this option to add new traffic data to an existing traffic file (the one specified in the Traffic file field). If the specified file does not already exist, a new file will be created | |||||
| Use HTTP listener | Enable this option to specify a port specific to your proxy. If the client sends traffic over SSL, enable the Secure option and specify your verification options:
You can configure one listener per proxy. If you want to use multiple HTTP listeners, you must create multiple components and configure them separately. | |||||
Proxy listen path | Enter the path where the proxy should listen for incoming connections. No two message proxies can have HTTP connections with the same proxy path or with a path that matches an existing virtual asset’s HTTP path. In the simplest case, you can set the Proxy listen path to your service's path and leave the Service forward path setting empty. With this configuration, the proxy will automatically forward all messages it receives on that path to the same path at the Service host and Service port. If you need the proxy to listen on a different path than the path of your service, set Service forward path to the actual path where you want the received messages to be sent. The proxy will forward the path and any query parts to the target service. If the Proxy listen path and the Service forward path are different, then any segments in the request after the Proxy listen path will be appended to the forwarded request. The Proxy listen path is essentially being replaced with the Service forward path so that the entire path (as received by the proxy) gets sent to the service. | |||||
| Mode | Determines whether the Primary or Secondary forwarding connection is active when both exist. The non-active connection can be used as a fallback connection if the active connection fails (see "Use Fallback Connection" below). For example, during a recording session, you might want a message proxy to forward to the live service as the primary connection and fall back to a virtual service as a secondary connection. In this case, you can set the mode to Primary and enable Use Fallback Connection, which will cause CTP to use the secondary connection if the primary mode fails. | |||||
Use for Recording | Determines which forwarding connection is used for recording, when both Primary and Secondary connections are defined. Must be enabled for one, but can be enabled for both. The precise behavior varies slightly depending on which connection or connections are being used for recording:
| |||||
Service host | Enter the host name of the machine where the service resides. This is the machine to which the proxy will send messages. If you want the proxy to forward to a virtual asset on the local Virtualize server without consuming an HTTP connection, enter localhost or 127.0.0.1 rather than the actual host name. | |||||
Service port | Enter the port where the service is listening. This is the port to which the proxy will send messages. | |||||
Service forward path | (Optional) Enter the path to which the proxy should forward the messages that it receives. If blank, this defaults to the value in the Proxy listen path field. If the HTTP proxy is sending messages to localhost, you must enter a Service forward path because the proxy doesn't allow forwarding to itself. If the Service forward path sends a redirect, the proxy will follow the redirect and then respond. It will not pass the redirect back to the client. | |||||
Additional options |
|
| Info | ||
|---|---|---|
| ||
A proxy can use a virtual asset on a Virtualize server as its target service. To do this:
|
JMS Options
Choose JMS from the Proxy type menu to configure message proxies that connect over JMS.
| Scroll Table Layout | ||
|---|---|---|
|
Option | Description |
|---|---|
| Name | Enter a name for the connection within the proxy. Connection names are used to work with specific connections within the proxy through the REST API and must be unique within the proxy. |
Option | Description |
| Traffic file | Specify where you want to save the traffic data that will be captured when the proxy is set to record mode. You can later use this traffic file to generate virtual assets that represent the live traffic captured in record mode. By default, traffic will be recorded in a file named %n_%d_%t.txt (<proxy_name>_<current_date>_<current_time>.txt) and will be stored within the recorded_traffic folder (this will be created if it does not exist). The traffic file must be inside the VirtualAssets project when provisioning an instance that contains the message proxy. If set a location outside of the VirtualAssets project, the provision request (PUT request) will fail. CTP, however, can read a traffic file (GET request) that is outside of the VirtualAssets project when the proxy was configured with Virtualize. When specifying the file name, you can use variables such as %d (current date) %t (current time), %n (proxy name), and %u (unique time-based id). Wildcards can be used together and mixed in with the name. For example, you could use %nProxyTraffic%d or %u_%d%nTraffic. Append traffic data adds new traffic data to an existing traffic file (the one specified in the Traffic file field). If the specified file does not already exist, a new file will be created |
Provider URL | Specify the location of the JMS Administered Objects. |
Initial context | Specify the Java class that contains all the JMS properties mappings. |
Connection factory | Specify the key used to look up the MOM-specific factory from the initial context. This can be either a Queue Connection Factory or a Topic Connection Factory. |
Username/password | Enter the username and password for authentication. |
| Queue/Topic | For Queues (Point-to-Point): Virtualize will capture messages sent to the client Destination queue and forward them to the server Reply to queue for processing. The server Destination queue is the queue that the server will place a response message on (after processing the request message). Virtualize will capture these messages and forward them to the client Reply to queue. |
Use JMS ReplyTo | Specifies whether to use the message's JMSReplyToQueueName header to determine where the proxy sends the response. If it is enabled, values from the incoming request will be used to determine where to send the response. If it is not enabled, the response will be sent to the queue specified in the UI; the values in the JMS message header will be ignored. |
| Worker count | Worker count impacts the number of listener worker threads that get created.Increasing the worker count can help performance under concurrency. |
| Additional initial context JNDI properties | Specifies any additional JNDI properties you want applied to this deployment. |
MQ Options
Choose MQ from the Proxy type menu to configure message proxies that connect over MQ.
| Scroll Table Layout | ||
|---|---|---|
|
Option | Description |
|---|---|
| Name | Enter a name for the connection within the proxy. Connection names are used to work with specific connections within the proxy through the REST API and must be unique within the proxy. |
| Traffic file | Specify where you want to save the traffic data that will be captured when the proxy is set to record mode. You can later use this traffic file to generate virtual assets that represent the live traffic captured in record mode. By default, traffic will be recorded in a file named %n_%d_%t.txt (<proxy_name>_<current_date>_<current_time>.txt) and will be stored within the recorded_traffic folder (this will be created if it does not exist). The traffic file must be inside the VirtualAssets project when provisioning an instance that contains the message proxy. If set a location outside of the VirtualAssets project, the provision request (PUT request) will fail. CTP, however, can read a traffic file (GET request) that is outside of the VirtualAssets project when the proxy was configured with Virtualize. When specifying the file name, you can use variables such as %d (current date) %t (current time), %n (proxy name), and %u (unique time-based id). Wildcards can be used together and mixed in with the name. For example, you could use %nProxyTraffic%d or %u_%d%nTraffic. Append traffic data adds new traffic data to an existing traffic file (the one specified in the Traffic file field). If the specified file does not already exist, a new file will be created |
Host | Specify the name of the host running MQ. |
Port | Specify the port where MQ is running. |
Queue manager | Specify the queue manager. |
| Channel | Specify the name of the server-defined channel. |
| Username/password | Enter the username and password for authentication. |
| Use replyToQueueName | This option specifies whether to use the message’s replyToQueueName header to determine where the proxy sends the response. It impacts responses to MQ messages of type MQMT_REQUEST. |
| Client and server queues | Specify the client and server queues. A "put" queue is always where the AUT/client is putting/sending request messages. A "get" queue is where the client/AUT is getting response messages from. |
| Worker count | Worker count impacts the number of listener worker threads that get created. Increasing the worker count can help performance under concurrency. |

MQ Queue Managers
If you want to configure queues deployed on different MQ servers within a single proxy connection (e.g., you want a specific proxy connection to use two queues that are deployed on two different MQ servers), you can define them globally in Virtualize and reference them when configuring proxies in CTP.
...
If you want traffic to be redirected to a fallback connection (e.g.for example, a secondary proxy endpoint) when the primary connection fails or the responder/virtual asset is not available, enable the the Use fallback connection option, then provide connection details for the alternate endpoint. By default, the connection will be considered "failed" if the response status code is 400 level or higher; you can change this by modifying the Valid response codes field (see HTTP Options for more details).
...