...
- Right-click a test suite and choose Add New > Global Property...
- Expand the Authentication list, then choose OAuth 2.0 and click Next.
- Set the Grant Type to
Authorization CodeorAuthorization Code with PKCE, as appropriate, and click Next. - Choose Record a new login suite and click Next.
- Enter the URL to start recording from, as appropriate for your login process, and the path to your Chrome executable. Click Finish. The login page for your application opens.
- Log into your application. When you have completed your process, click Stop Recording to complete the recording.
- Enter or select the parent folder to store the login test suite and enter a name for it. Click Finish. A dialog opens to remind you of three important things:
- Your authorization server needs to be configured for a redirect URI that matches the call back URL (by default,
http://localhost:9080/servlet/oauth2/code). - The SOAtest server needs to be running whenever this test is used in order to function correctly. The status of the SOAtest server can be seen on the SOAtest Server view (Parasoft > Show View > SOAtest Server).
- If your authorization server requires a client secret, you will need to enter it manually in the configuration (detailed below). It cannot be extracted by the wizard.
- Your authorization server needs to be configured for a redirect URI that matches the call back URL (by default,
- Click OK to dismiss the dialog. The OAuth 2.0 authentication configuration screen opens with the login suite and the settings extracted by the wizard set automatically.
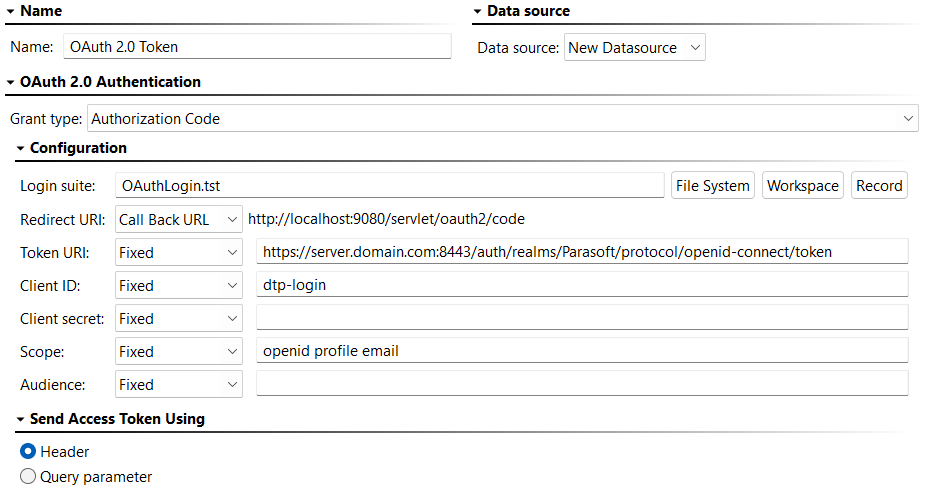
- Enter an easily identifiable name in the Name field.
- Configure the remaining settings as described below. Some of these settings will have been extracted for you automatically and others cannot be extracted and will need to be entered manually. If you change or enter any settings, be sure that they match those in the authorization endpoint URL exactly (when applicable).
- Redirect URI: By default, this is set to use the Call Back Tool and is set to its URL:
http://localhost:9080/servlet/oauth2/code. This is the recommended configuration, but you can change it if necessary. - Token URI: Specifies the access token endpoint on the OAuth 2.0 authorization server.
- Client ID: Specifies the client ID needed for authenticating with the authorization server.
- Client Secret: Enter the client secret needed for authenticating with the authorization server. This cannot be extracted by the wizard and, if it's needed, must be entered manually.
- Scope: This is used by the client to request limited access to the application. A comma-separated list of values specific to the authorization server may be entered or a parameterized value, if appropriate. See https://oauth.net/2/scope/ for additional information. If no scope is specified, the default scope may be returned.
- Audience: Enter the URI of the resource server or a parameterized value, if appropriate. This cannot be extracted by the wizard and, if applicable, must be entered manually.
- Code Verifier (Authorization Code with PKCE only): Select a method for generating the code verifier. By default, this is done automatically, which is recommended. The automatically generated code verifier will comply with OAuth 2.0 standards, being a cryptographically random string using the characters A-Z, a-z, 0-9, and the punctuation characters - . _ ~ (hyphen, period, underscore, and tilde), between 43 and 128 characters long. If you choose a different method, ensure that the result meets the same standards, or the token request might be rejected.
- Challenge Method (Authorization Code with PKCE only): Select whether the code challenge is the plain text version of the code verifier or the SHA-256 version of the code verifier.
- Redirect URI: By default, this is set to use the Call Back Tool and is set to its URL:
- Select whether to send the access token using Header or Query Parameter.
- Save your configuration.
...